Unreal Bridge

eRealtime content created by Tony Prohl for the VR/AR Industry
 Introduction
Unreal Bridge is a real-time workflow link between the Unreal Engine (v4.19 and newer) and LightWave, focusing on LightWave driving Unreal changes. It can be limited to single project use in Unreal, or installed as a general plugin for use in all Unreal projects. The Unreal Bridge will transfer objects, materials and animation from LightWave to Unreal to create a powerful realtime system that can leverage Unreal's powerful capabilities for presentations, games and more.
Installation

In LightWave, Unreal Bridge is a Master Plugin that can be opened from the I/O tab in Layout. To install for the Unreal Engine, go to your LightWave install and select the lightwavebridge folder in support/3rdparty_support/UnrealEngine/[version] and:
- copy the contents to your Unreal Engine install folder under
YOUR_INSTALL_LOCATION\Engine\Plugins\Editorfor system-wide access (Users/Shared/Epic Games/UE_4.xx/Engine/Plugins/Editoron the Mac),OR
- create a folder called
Pluginsin your Unreal project and copy theLightwavebridgefolder there for single project use
Launch the Unreal editor. If you have installed lightwavebridge for single project use, the plugin will be automatically activated. If you have installed system-wide, you will first need to activate the Unreal-side lightwavebridge plugin:

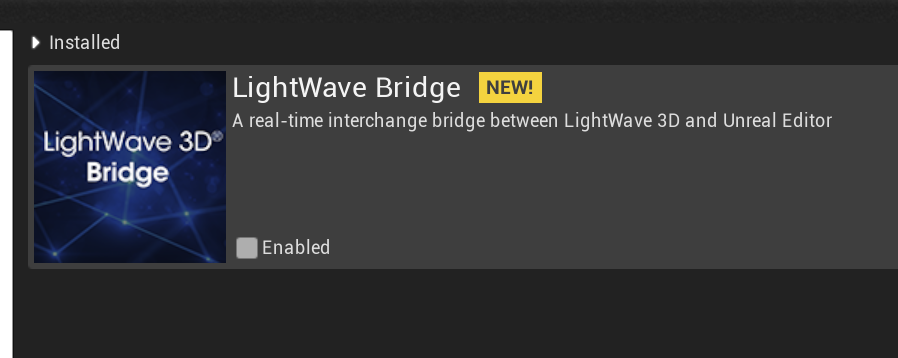
When you restart Unreal after installing the LightWave Bridge plugin system-wide, you will get a message telling you "New plugins are available." Clicking "Manage Plugins..." you can activate the LightWave Bridge. You can also visit Edit > Plugins to activate. You will need to restart the Unreal engine once LightWave Bridge is activated.
First Use
- Unreal
Once installed, and activated as necessary, visit the Unreal Engine preferences and in the Performance tab uncheck Use Less CPU When in Background - this is only necessary to allow the real-time updating between UE and LightWave. If real-time updates are not crucial for your project, you can leave this setting checked and simply Send from LightWave when necessary.
LightWave 3D
In LightWave, change the color space to sRGB to match with Unreal and go to the I/O tab to launch Unreal Bridge. Start by clicking the Connect button to link LightWave to the Unreal Editor.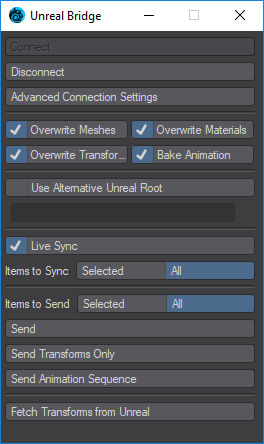
Check the options required:
Overwrite options:
Overwrite Meshes - will update meshes on the Unreal side
Overwrite Materials - will update materials on the Unreal side
- Overwrite Transforms - will overwrite any transformations made on the Unreal side
- Bake Animation - will create baked keyframes for all scene animation
- Live Sync - Will send updates to Unreal in real-time while you interactively edit in LightWave
- Items to Sync - Use "Selected" to limit interactive synchronization to the currently selected scene items
- Items to Send - Use "Selected to limit the following "Send" actions to the currently selected scene items
- Send - Send scene items limited by the "Items to Send" selection
- Send Transforms Only - Sends only transforms of items limited by the "Items to Send" selection
- Send Animation Sequence - Sends animation envelopes of items limited by the "Items to Send" selection
- Fetch Transforms from Unreal - this performs a single grab of the current state of Transforms from Unreal to bring them back to Layout
Unreal
Start by creating a new project with no Starter content. Once the editor window is open, remove everything from it apart from the PlayerStart item to start with a blank slate. Now change back to LightWave.LightWave 3D
Add a polygonal object to your scene and convert its surface(s) to the Unreal material. Now you can send it to Unreal. You can also create keyframe animation for your object and send that through as well, as a separate operation.- Unreal
Changes to animation or transforms will not carry back through to LightWave. Make those changes in Layout to avoid any confusion. In Unreal, make changes that will affect your game or presentation's code.
If you have used the Send Animation Sequence in The Unreal Bridge plugin to transfer LightWave keyframe animation into Unreal, you will need to set the playrange for the animation to plaback. Do so by double-clicking on the animation icon in your Content Browser to bring up the Sequencer.

You need to set the playhead to 0, if not already there, and click the left square bracket icon to set the start of your range. Then, you need to go to the end of your animation and click the right square bracket to set the end of the animation range. Now, the animation will play in Unreal's editor.
Advanced Connection Settings
Clicking on the "Advanced Connection Settings" button on the Unreal Bridge panel will open the following dialog:
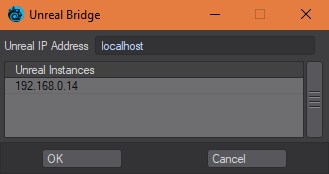
In the "Unreal IP Address" input field you may enter the IP address of the Unreal instance to which you wish to connect.
Alternatively, you can select one of the Unreal Instances discovered in your network.
The change is only applied after you press the "OK" button.
The Unreal Bridge plugin allows multiple connections to the same Unreal instance, enabling collaborating on the same scene by multiple artists if desired.
Preparing LightWave content for Unreal
There are always strictures when making content for a game engine, and Unreal is no exception. Right now, these are the main points for LightWave use.
Supported for transfer
- Meshes
- Positions
- Normals
- UVs (maximum of seven UVs per object, not layer; no overlaps allowed)
- Color Maps
- Nulls
- Lights - Supports basic light settings like color and intensity
- Point Light
- Spherical Light
- Size
- Linear Light
- Length
- Spot Light
- Cone Angles
- Distant Light
- Cameras
- Field of View
- Materials
- In principle, all Materials are supported, but only the Attributes with the same name as in Unreal are sent.
They are:- Base Color or Color
- Roughness
- Specular
- Metallic
- Emissive Color
- Opacity or Transparency
- Unreal will use a material connected to the OpenGL surface input in preference if one exists (allowing for a rendered material and a realtime one simultaneously)
- In principle, all Materials are supported, but only the Attributes with the same name as in Unreal are sent.
- Transformations
- Keyframe Animations can be sent optionally
- Dynamic animations can be sent baked
- Parenting
- If the parent of an object exists in the Unreal level/world, the sent object will be parented to it
- If the parent of an object does not exist, it will be parented to the Unreal level/world root
- Alternatively, if an Actor of the name LightWaveAnchor exists in the Unreal level/world, the new object will be parented to it
- Parenting information is sent with every update, and parent relations will be updated in Unreal on incremental sends
When editing material properties in Modeler for a LightWave asset that is being sent to Unreal, it is important to remember that the LightWave Bridge is converting standard LightWave texture projections (Planar, Cylindrical, Cubic) to UV maps on the fly. This means that sending materials only is not sufficient, the mesh also needs to be sent. Note, this is only for objects using standard texture projections. Objects using UV maps already will update fine without needing to resend meshes.