Edit Edges

Edit Edges used to tighten a subd box
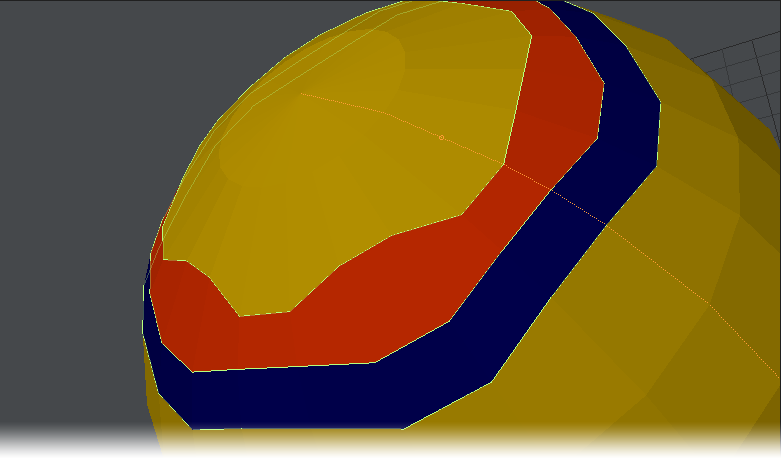
Edit Edges has been used to create an extra loop colored blue and individual edge segments have been moved up and down. The Edit Edges tool is still active and the vertical edge loop colored Orange shows the preselection highlighting with the circle in the center of the segment the mouse is over indicating where an additional horizontal edge loop will be inserted if the right mouse button is pressed.
Detail > Edges > Edit Edges - With Edit Edges you can slide edges, create edges or delete them:
- Sliding Edges - Left clicking on an edge will select the whole edge loop. Moving the mouse left and right will slide the loop up and down in the case of a horizontal loop, or left and right in the case of a vertical loop. If you wish to only slide one segment of a loop, holding down Ctrl will slide only the segment you click on.
- Creating Edges - When you select a loop you will notice a small circle in the center of the edge segment you click on. Right clicking the edge segment will create a new edge loop at this midway point - a vertical loop on a horizontal edge, a horizontal loop on a vertical edge.
- Deleting Edges - Shift left-clicking on an edge will delete it.
The Numeric panel contains Percent and Distance fields. They are linked and show the distance an edge has slid. Either one can be modified, the other will update to the equivalent value and the edge loop will move.
The Normalize toggle slides the edges by a percentage of the gap on either side of the loop so all edges will reach their neighbors at the same time. If Normalize is off, edges get moved by an equal absolute amount, so some of the edges might hit their neighbors before others.
If you are having trouble with moving just a segment, rather than the whole loop, click on the loop before you hold down Ctrl and move the segment you wish to slide.