FX Linker
Using FX Linker is a one-way shot. You can’t undo what it does after you click OK. Therefore, you should definitely save your scene before running this modifier.
FX Linker (Utilities > Additional > FX Linker) automates FX_Link setup on multiple particles. It basically clones the specified object and adds the FX_Linkmotion modifier using the settings you specify. This is a great tool for creating a flock of bats, or for creating a quick crowd simulation.
To use FX Linker:
- Save your scene!
- Load the target object.
- If you plan to use the Size effect option, keyframe the size on this object. Also, make sure your particles have some amount of size (Emitter properties).
- Choose Utilities > Additional > FX Linker and set the copy field to the number of instances you want to create.
- The Random, Time Shift, Pre/Post Behavior, Distance/Sec, Size effect, and Make key options correspond to the same options on FX Link, see above. Check them if you want those options set.
- If you are using Random or Size effect, you may set maximum and minimum values in the provided fields.
- Click OK. Depending on how many copies you make, it may take a while before FX Linker finishes.
Using FX_Linker is a one-way shot. You can’t undo what it does after you click OK. Therefore, you should definitely save your scene before running this modifier, or better, press shift + s to save a scene increment.
FX Property
You can display the Property Panel for the currently selected FX controller by choosing Utilities > Plug-ins > Additional > FX_Property .
You can also access the Controllers Property Panel by using the Dynamics Tab in the Object Properties Panel.
FX_Hardlink
FX_Hardlink is a very powerful tool that allows you to use the dynamic motion from one object and apply it to another. In most cases the dynamic object contains very few polygons (2 point polygons) while the “HardLink” object has a higher polygon count.
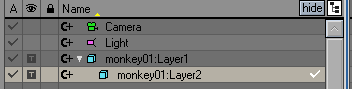
In the example below, Cloth Dynamics is applied to a 2-point polygon chain made up of (x4) 2-point polygons. It is the parent of a single layered object that is made up of 4 monkeys. When you use FX_Hardlink, the monkeys take on the motion of the 2- point polygon chain.Hardlink keeps the geometry rigid and will displace it based on the Piece Mode setting.
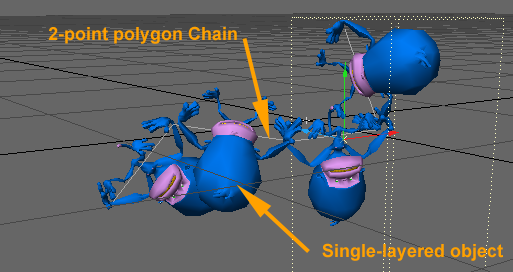
The HardLink Object must be parented to the Dynamic object in order for FX_Hardlink to work.
FX_Hardlink Properties
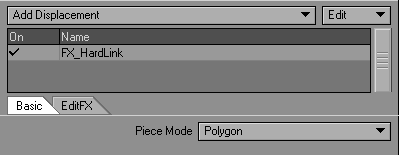
Under the Basic Tab you can choose what Piece Mode you would like to use. Polygon treats each segment as its own object. 1 Piece will make the entire object a solid and considers it one piece. Point Set will read selection sets that you could create in Modeler.
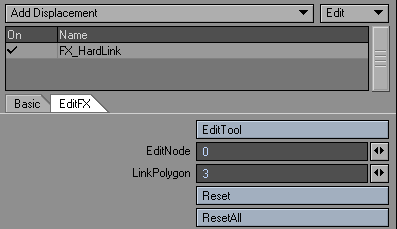
The Edit FX Tab allows you to change what pieces are linked to what nodes. This is handy if the tool doesn’t quite link what you thought it would on complex objects.
FX_MetaLink
FX_Metalink is a very powerful tool that allows you to use the dynamic motion from one object and apply it to another. In most cases the dynamic object contains very few polygons (2 point polygons) while the “MetaLink” object has a higher polygon count.
You may run into problems if the Dynamic Object is too rough. Subdividing the Dynamic Object may help.
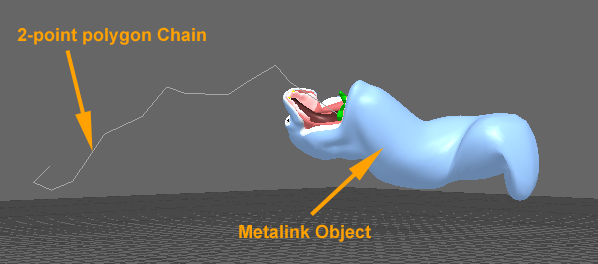
In the example below, a 2 point polygon chain with Cloth dynamics applied to it is the Parent of the Worm (MetaLink Object). The Work takes on the dynamic motion of the 2-point polygon chain with zero calculation time.
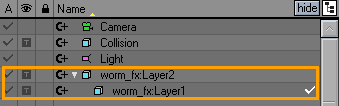
The MetaLink Object must be parented to the Dynamic object in order for FX_Metalink to work.
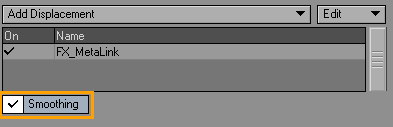
The Smoothing option attempts to smooth the reshaping of the Metalink object. If unchecked, the reshaping can pass through the vertex of the Cage Object (dynamic Object).
If you want to use other Displacement Maps and not have them be ignored by MetaLink also apply Metalink_Morph.
FX Metalink Morph
FX_Metalink_Morph is a displacement plug-in that enhances the functions of FX_Metalink. By itself, FX_Metalink cannot use normal morphing information because it ignores bones, Morph Mapping, and Displacement Maps. However, if you use FX_Metalink with FX_Metalink _Morph, you can use normal morphing data.
The FX_Metalink _Morph plug-in can be added before or after FX_Metalink.
FX_Metalink _Morph has one pop-up menu called Morph Mode. Set this to One time morph to execute morphing only one time. This mode is appropriate when the morphing is from Morph Mapping. Use Every time morph to execute morphing for each displacement process. This mode is appropriate when the morphing varies, like the Displacement Map of waves. The Non morph setting simply disables this plug-in.
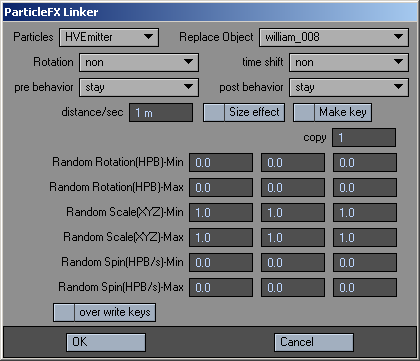
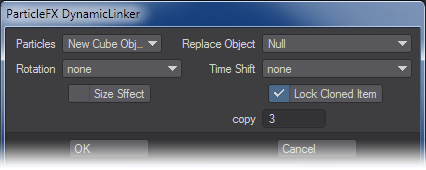
ParticleFX DynamicLinker
Allows you to replace particles with other objects.
- Particles --Choose the particle emitter to do the replacing.
- Replace Object --Choose the object to replace the particles
- Rotation --Give the item a rotation, once it is replaced
- Time Shift --The amount of time to wait to replace the object
Size effect
- time shift - Contains: start shift, end shift, start adjust (distance) and end adjust.
- Lock Cloned Item --Locks the current item to be the same cloned item
- Copy --The number of replacements to make
ParticleFX_Link
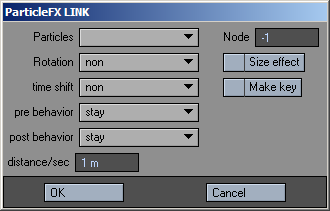
Particles
Choose the particle group.
Node
- Rotation - The choices in rotation are: random, align to path (h) and align to path (hp).
Random will rotate the item starting from a random rotational position.align to path (h) Will align the item to a path using heading.align to path (hp) Will align the item to a path using heading and pitch.
Size effect
- time shift - Contains: start shift, end shift, start adjust (distance) and end adjust.
Make Key
- pre behavior - Contains: original, stay and size dissolve.
- post behavior - Contains: original, stay and size dissolve.
distance/sec
FX_Motion
Mode Tab
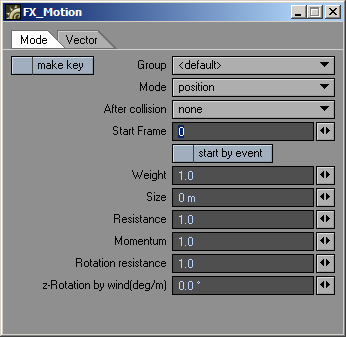
- make key - Generates a key for every frame.
- Group - Select an existing group or create a new one.
- Mode
- After collision - Choose an action post collision: none, reverse, random, stop.
- Start Frame - Choose what frame to start the effect.
- Start by event - Use this option if you want to trigger the motion upon collision.
- Weight - This option sets an arbitrary weighting value that will influence how factors like gravity affect the item.
- Size - This option affects the outer boundary used for collision detection. It can also be used by volumetric plug-ins like HyperVoxels .
- Resistance - This option adds an air resistance effect. Items will move slower as this value is increased.
- Momentum - This option adds in a momentum or increased mass effect. Items will tend to resist being stopped or slowed down.
- Rotation Resistance - This option has the same effect as Resistance except that it affects the items’ rotational channels.
- z-Rotation by wind(deg/m) - This option rotates the item in its bank channel as it moves or is affected by the wind.
Vector Tab
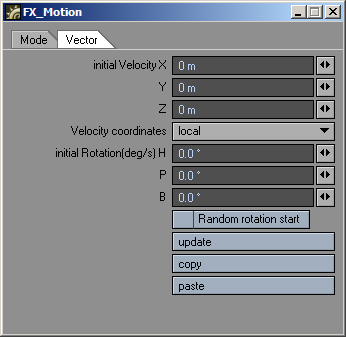
- Initial Velocity - This option sets the initial direction and force.
- Velocity coordinates - This option sets whether these settings use the item’s local axes or world coordinates.
- Initial Rotation(deg/s) - This option sets the items’ initial HPB rotation.
- Random rotation start - This option randomizes the initial HPB rotation.
- Update - This option updates/refreshes the current settings in the Layout viewport. This is good to do with a heavy scene.
- Copy - This option copies the current settings.
- Paste - This option pastes the current settings.