Soft Body Dynamics
Soft Body Dynamics (SoftFX) are used to set physical behavior characteristics and to calculate physical simulations for an object that is intended to have an elastic nature through all or a portion of its volume. Generally a “soft body” maintains its volume, but the shape will vary based on motion and on forces being applied in the scene, including collision with other objects. Some examples:
- Jello wiggling on a plate
- The Pillsbury Dough Boy’s tummy jiggling as he jumps around
- A flat tire flopping as the vehicle comes to a stop
- A ball deforming as it bounces on a floor
SoftFX is located in the Dynamics Tab of the Object Properties Panel. Choose Soft from the Add Dynamic drop down list and then follow that by clicking on SoftFX in the dynamics list window to open up the SoftFX options.

Input Tab
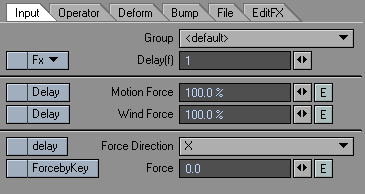
- Group - you can group Dynamic objects with a user-defined name to prevent unwanted interaction. This also works with ParticleFX controllers. This becomes very handy when you are working on a complex scene and you want certain Wind emitters to affect only certain objects.
- Delay - Delays the deformation by a set amount of frames. Delay will not take effect until the Delay check box is selected for motion force, wind force, or wind force direction.
- FX Button - Allows you to use a Vertex Map to control the value of an attribute (spring, viscosity, etc) or a function (delay, wave size, compress bump).
From the Effects drop down menu the user can select a Vertex Map as well as change the base value.
- Vertex Map – Will be displayed by name and type.
Example: LeftArm/Weightmap
- Weightmap – The weight value of each point is defined in Modeler when you create a Weight Map. In Layout you cannot edit Vertex Map values. But the FX button allows you to add a modifier, that combined with the original values of the Vertex Map provides a way to adjust values of the selected attribute/function without changing the original Vertex Map value.
- Pointset – A pointset is created in Modeler. In Layout you cannot add or subtract points from a pointset. But the FX button allows you to add a modifier, that combined with the pointset (value of 100%) provides a way to adjust values of the selected attribute/function.
- Surface – Surfaces are created in Modeler. In Layout you cannot add or subtract points from a surface. But the FX button allows you to add a modifier, that combined with the surface (value of 100%) provides a way to adjust values of the selected attribute/function.
- UV – UVs are created in Modeler. In Layout you cannot add or subtract points from a UV. But the FX button allows you to add a modifier, that combined with the UVs value provides a way to adjust values of the selected attribute/function.
You can always check value information for points in the Point Info windows.
- Base – The base value is 0% by default. Changing the base value changes the effective range.
Example: Base=0% (0 – 100), Base=20% ( 20 – 100).
For those interested this is the equation used to calculate the vertex point value. Vp = Vmap * value+ (1- Vmap) * base.
SoftFX has 3 inputs: Motion, Wind and Force.
- Motion Force - Uses the Delay setting based on the motion of the object. The user has the ability to change the amplitude as well as apply an envelope.
- Motion Force Delay check box - Activates the Delay setting for Motion Force.
- Wind Force - Uses the Delay setting based on wind present in the scene. The user has the ability to change the amplitude as well as apply an envelope.
- Wind Force Delay check box - Activates the Delay setting for Wind Force.
- Force Direction - Forces the object to move along the axis selected (X, Y, or Z).
- Force Direction Delay - Activates the Delay setting for Direction Force.
- Force By Key - Only works when an envelope is applied. Takes the keyframes in the envelope and applies a force for every key.
- Force - The value that Force Direction uses. The user has the ability to apply an envelope.
Operator Tab
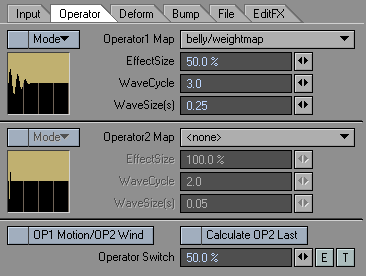
- Operator 1 and 2 Map – a deformation can be applied to nothing, everything or a particular Vertex Map.
- Mode - How the Operator Map affects the objects deformation.
- None – default (no change)
- Square – Dampens the Operator Map so that the map is affecting the object deformation 0% at the start of the map to 100% at the end of the map.
- Invert - Reverses the Operator Map’s original effect on the objects deformation.
- Quad - Divides the map’s effect on deformation into 4 equal regions.
- Inv Square – Reverse of “Square”. 100% at the start of the map and 0% at the end.
- Inv Quad – Reverse of Quad.
- Effect Size - increases the amplitude of the deformation.
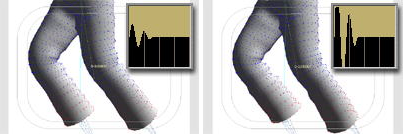
Left: Effectsize 50%; Right: Effectsize 200%
- Wavecycle - number of cycles inside the deformation.
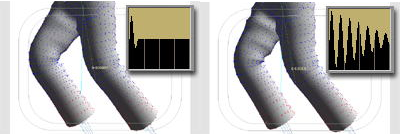
Left: Wavecycle 1.0; Right: Wavecycle 8.0
- Wave Size(s) - the frequency of the deformation.
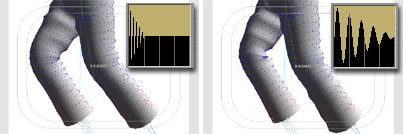
Left: Wavesize 0.1; Right: Wavesize 0.4
- Op1 Motion/Op2 Wind- Limits the operator 1 map to the motion of the object and limits the Operator 2 Map to the wind. By activating these, the motion input affects the Operator 1 Map, and the wind input affects the Operator 2 Map.
- Calculate Op2 Last - Applies operator 2 after everything in SoftFX has been calculated.
- Operator Switch (blend operator) - if set to 50% it uses both Operator 1 and Operator 2 Map equally. If set to 0%, it uses 100% of Operator 1 Map. At 100%, it uses 100% of Operator 2 Map. You can also have a Texture Map which will control this blending.
Deform Tab
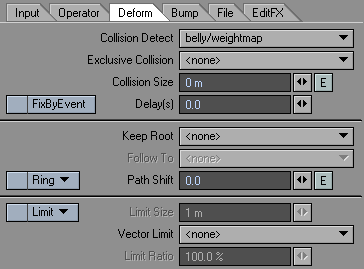
- Collision Detect - reflects the influence of other objects upon the motion of an object. This lets you create complex motions caused by obstacles. The simulation is performed by taking an object that collides (the collision object) with the elastic body model (dynamic object) into the calculation.
- Exclusive Collision - Selecting an item from this list will exclude all other collision objects from the calculation.
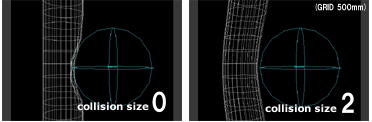
- Collision Size - Determines how the force of the collision is distributed across the SoftFX object.
- Delays - Delays the reaction of the object returning to its original shape.
- Fix By Event - This function will fix points that pass through a collision object that is set to “Event” mode.
- Keep Root (keep original size) - object will keep its original size through SoftFX calculations. For example, you start with a 12” ruler. With Keep Root unchecked, this ruler might stretch to 14”. If Keep Root is checked it will maintain 12”.
- Follow To - Uses these modes:
- Path - Deforms the object along its motion path.
- Wind – Deforms the object in the direction of the wind.
- Gravity – deforms the object based on the gravity emitter.
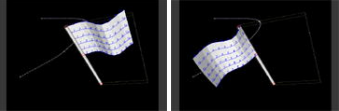
Normal , Follow To Path
- Path Shift - shrinks the root size (original size).
- Ring - Ring does for a cylinder what Keep Root does for a straight line. You are limited to only 4 rings for calculation but can use Hard link or Meta link to apply it to objects with more then 4 rings.
A Circle is one Ring. A Cylinder contains 2 Rings.
- Limit Size - Drop down menu- When activated:
- Max Size -Will limit the size of the deformation by clipping it to the limit size.
- Resize - Will limit the size of the deformation by shrinking it to the limit size.
- Limit - Amplitude setting for the Limit.
- Vector Limit - Constraining the movement to a particular axis, Normal, and object radius.
- X - Becomes deformed only in the x direction.
- Y - Becomes deformed only in the y direction.
- Z - Becomes deformed only in the z direction.
- X (local) - Becomes deformed only in the local x direction of object.
- Y (local) - Becomes deformed only in the local y direction of object.
- Z (local) - Becomes deformed only in the local z direction of object.
- XY - Becomes deformed only in the XY direction.
- YZ - Becomes deformed only in the YZ direction.
- ZX - Becomes deformed only in the ZX direction.
- XY (local) - Becomes deformed only in the local XY direction of object.
- YZ (local) - Becomes deformed only in the local YZ direction of object.
- ZX (local) - Becomes deformed only in the local ZX direction of object.
- Object radius - Becomes deformed only in the spherical direction, which centers pivot.
- Normal vector - Becomes deformed only in the normal direction.
- NV-Front - Becomes deformed only in the direction of normal grain side.
- NV-Back - Becomes deformed only in the direction of normal reverse side.
- Limit Ratio -percentage of the Vector Limit.
Bump Tab
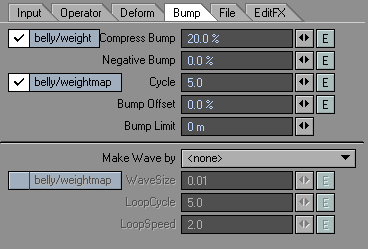
- Compress Bump - Applies bump (bulge) to polys that are under compression (push) and maintains the object’s volume.
- FX Button - Allows you to use a Vertex Map to control the value of an attribute (spring, viscosity, etc) or a function (delay, wave size, compress bump),
From the Effects drop down menu the user can select a Vertex Map as well as change the base value.
- Vertex Map – Will be displayed by name and type.
Example: “LeftArm/Weightmap”
- Weightmap – The weight value of each point is defined in Modeler when you create a Weight Map. In Layout, you cannot edit Vertex Map values. But the FX button allows you to add a modifier, that combined with the original values of the Vertex Map provides a way to adjust values of the selected attribute/function without changing the original Vertex Map value.
- Pointset – A pointset is created in Modeler. In Layout, you cannot add or subtract points from a pointset. But the FX button allows you to add a modifier, that combined with the pointset (value of 100%) provides a way to adjust values of the selected attribute/function.
- Surface – Surfaces are created in Modeler. In Layout you cannot add or subtract points from a surface. But the FX button allows you to add a modifier, that combined with the surface (value of 100%) provides a way to adjust values of the selected attribute/function.
- UV – UVs are created in Modeler. In Layout you cannot add or subtract points from a UVs. But the FX button allows you to add a modifier, that combined with the UVs value provides a way to adjust values of the selected attribute/function.
You can always check value information for points in the Point Info windows.
- Base – The base value is 0% by default. Changing the base value changes the effective range. Example: Base=0% (0 – 100), Base=20% ( 20 – 100).
For those interested this is the equation used to calculate the vertex point value. Vp = Vmap * value+ (1- Vmap) * base.
- Negative Bump - Applies negative bump (dented) to polys under tension (pull).
- Cycle Bump - Generates bump(s) across the Vertex Map selected. The higher the cycle the more bumps generated.
- Cycle - Number of bumps generated by Cycle Bump.
- Bump Offset - Allows you to create a bump/negative (bulge//dent) without any compressed polys.
there must be a compressed bump or negative bump value for Bump Offset to function.
- Bump Limit - Limits the maximum effect of the bump value(s).
- Make Wave By - Uses the Vertex Map information to create a rolling wave.
- Wave Size - Amplitude of the wave created. At a higher value the total height of the wave increases.
- Loop Cycle - Effects number of waves generated.
- Loop Speed - Effects how fast the waves move across the object.
File Tab
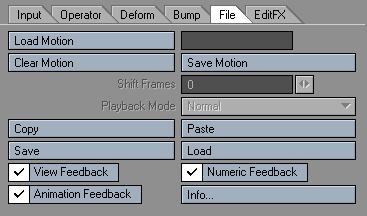
- Load Motion - Loads a previously generated motion file.
- Clear Motion - Clears a loaded Motion file.
- Save Motion - saves the generated motion to a file, which will be used subsequently to deform the object.
- Shift Frames - Shifts the starting playback frame of SoftFX data. By default, the number entered is regarded as a number of seconds to shift the motion of the .mdd file. If you prefer to use frames, enter the number of frames followed by the letter “f”; “-400f”, for example, to shift so that the motion in the .mdd file starts at frame -400.
Playback Mode
- Normal - Plays back setting all motion to .mdd file
- Local - Plays back based on the local translations (move rotate and scale) of the object. Allows an .mdd deformation on an object while respecting new motion applied to that object.
- Copy - Use the Copy button to copy the current settings between dynamic objects.
- Paste - Use the Paste button to paste the current settings between dynamic objects.
- Save - Saves all the settings contained in the SoftFX properties.
- Load - Loads a saved settings file. Similar to using a Preset.
- View Feedback - Set the feedback in Layout when controlling HardFX. When the display is poor or the display speed is slow, you uncheck this.
- Numeric Feedback - Set the numerical feedback in Layout when controlling HardFX. When the display is poor or the display speed is slow, you uncheck this.
Animation Feedback
- Info - Clicking the Info button brings up a window that gives you the version # of ClothFX and MDD file information.
EditFX Tab
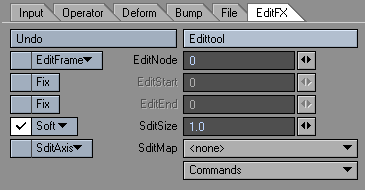
- Edit Tool - Activates the ability to edit points. You will be able to visually see that you’re in Edit Mode in the viewport. All the points that make up the object will become highlighted and all the Edit tool functions will become active.
- Undo - The Edit tool has its own undo. Click this button to undo the last edit made. You can only undo one edit.
- Edit Node - Specify the ID number of the point to be edited. If the Edit tool is activated, you can select from the Layout by clicking on the point.
- Edit Frame - There are 4 modes to edit the Node’s (point) motion path.
- All - will edit the entire Motion Path.
- After - will edit the current frame and everything after it.
- Before - will edit the current Frame and everything before it.
- Current - will edit only the current Frame.
- Edit Start/Edit End - Use the Edit Start and Edit End Fix options to lock off frames from being edited. This is the range of frames that the user will be able to edit. All other frames will be fixed (locked).
- Edit Size - (Edit Range) This field changes the influence range.
- Edit Falloff - This drop down is located to the left of Edit Size. This will change the Falloff settings to either None, Soft, Linear, or Hard. By default the setting is Soft.
- None - It has an influence on all apexes, in other words the whole mesh moves.
- Linear - Deformation in the range of editSize is attenuated to linear.
- Soft - Deformation is attenuated smoothly in the range of editSize.
- Hard - Deformation occurs uniformly in the range of editSize, and is not attenuated.
- Edit Axis - This limits the axis in which the Node (point) can be edited. (All, X, Y, or Z)
- Edit Map - This option lets you limit the portion of the object that is editable by giving the user the option to edit by Vertex Maps.
Command
- Smooth - Referring to the current frame, the movement of the parts that was selected by editNode will be smooth. When editStart and editEnd are not specified, the current position will be copied to all the frames. When editStart and editEnd are specified, it will make the position information smooth from the specified frame to the current frame.
- Makepath - This command will create a Null object whose path is identical to the motion path of the selected part.