Lens Flares
Introduction
LightWave was the first professional 3D package to incorporate lens flares into its arsenal. Simply put, a lens flare is an artifact that appears in the lens elements of a camera when you aim it toward a source of light. It is by all definitions a defect-a limitation of the camera lens. However, by imitating this defect, you can add the realism of using an actual camera to LightWave animations.
While LightWave’s lens flares are easy to use and the effect is often very appealing, remember that lens flares are an artifact that most film and video directors try resolutely to avoid. Judicious use of lens flares can enhance your work, but overuse can quickly detract from it - qv JJ Abrams’ work.
You use lights to position lens flares since lights cause them. Lens flares are implemented as a light property. You can use any type of light; however, Linear and Area lights will generate only a single lens flare, as do the others. The light retains all of its normal lighting functions, but when it appears within a frame, a lens flare is generated.
Make sure that Lens Flares is enabled on the Render tab in the Render Globals Panel or LightWave will not create lens flares.
Understand that lens flares are an additive effect, which means they are added to a rendered image after LightWave calculates the scene’s appearance. Because of this, you can accidentally create too many flares, or flares so hot that they wash out other items in the scene. Of course, this may be a desired effect, such as when a large explosion takes place.
Since lens flares are an additive effect, they will not show up in an alpha channel saved image.
Moreover, since flares theoretically exist only in the lens of the camera, they will not show up in any reflections or refractions in an object’s surfaces.
You can add lens flares to the alpha channel of your render by adding the Flare2Alpha LScript to the Image Processing > Image Filters window.
Lens Flare Options
The central glow of a lens flare light source is white, while the glow around it is tinted by the light’s Light Color. Unlike real lens flares, LightWave gives you tremendous control over how your flares look. Additionally, since lens flares are used by LightWave animators for more than camera lens artifacts, there are some options that help the flares look more like real physical phenomena, like fire, glowing, and explosions.
To set up a lens flare:
- Select the light.
- Click Lights Properties Panel > Lens Flare to turn the option on for the selected light.
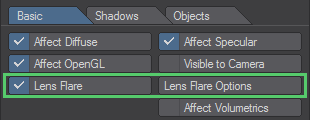
- Click Lens Flare Options and set the options as desired.
Lens Flare Viewport Preview
You can see an approximation of your Lens Flare settings in any viewport using the Camera view. You must activate the OpenGL Lens Flare option on the Display Options Tab of the Preferences Panel (Edit > Display Options). Note that this is just an approximation of how the actual lens flare will appear and the actual rendered effect will likely be somewhat different.

Not all lens flare options can be seen in the preview, so you need to do test renders or use VPR in final mode.
Fade and Dissolve Options
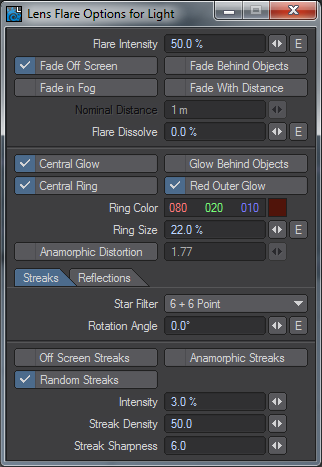
Flare Intensity sets the brightness of the lens flare. The default value is a good starting point.
- Fade Off Screen - For when you want a lens flare light source to reduce its flare intensity automatically as the light source enters or exits at the edge of the screen. This simulates the properties of actual lens flares within a film camera. When this option is not active, the lens flare will remain constant as it moves off screen. ( On by Default )
- Fade In Fog - For when you want a lens flare to automatically reduce its flare intensity as it is affected by the minimum and maximum distances set for fog on the Effects Panel’s Volumetrics Tab ( Windows > Volumetrics and Fog Options ). The further into the fog the lens flare is, the less bright it will be. Once past the maximum fog distance, the lens flare is completely dissolved by the fog. If Fade in Fog is not selected, the lens flare will remain bright no matter how far away it is. ( Off by Default )
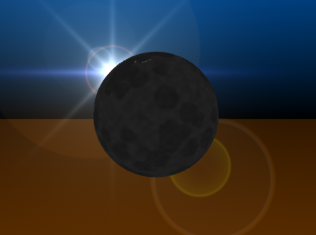
Fade Behind Objects - Select when you want a lens flare to reduce intensity automatically as the light moves behind other objects in the scene. This simulates the properties of actual lens flares within a film camera. Flares even change color when passing behind stained glass windows with the Fade Behind Objects option, which uses ray tracing to determine when lights are obscured by objects. If you do not select this option, flares will appear through objects. ( Off by Default )

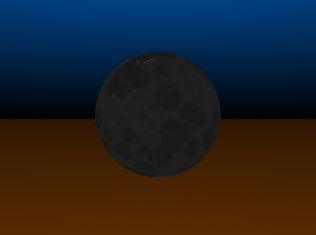
Left: Normal Flare Settings, Right: Fade Behind Objects selected
- Fade With Distance - Selecting this will automatically fade a lens flare as its distance from the camera increases. If you bring a flare closer to the camera, it grows brighter. ( Off by Default )
The Nominal Distance field, active only when Fade With Distance is selected, is the distance from the camera where the flare is at its input intensity. For instance, if your Flare Intensity is 100%, and your Nominal Distance is 10 meters, moving the flare to a distance of 20 meters causes the intensity to drop to 50% (at twice the distance it drops to one-half the brightness). Conversely, at half the distance, 5 meters, it climbs to twice the intensity, 200%. - Flare Dissolve - Enter a value to adjust the transparency of the lens flare effect. This option is handy when you wish to see large streaks of light coming from the lens flare but do not want a bright hot spot at the center of the flare. The higher the Flare Intensity, the larger the streaks (if selected), and the brighter the flare. Flare Dissolve values below 0% or above 100% are not useful, since the flare is either fully visible or fully invisible and cannot be more so.
Glow Options
The second section of the panel is devoted to Glow options.
- Central Glow - is a glow of light at the center of the light source flare. This is the color of the light source. Red Outer Glow is a luminous, soft-edged red glow around the light source, available only when Central Glow is active. You may want this option off for deep undersea environments, where the color red is not visible. ( On by Default )
- Glow Behind Objects - simulates a glow that surrounds a light source. This effect is different from that of a true lens flare, and should not be confused with that effect. A true lens flare is a phenomenon that occurs within the camera lens and thus appears to be in front of all objects in a scene. When the light source that causes the flare is obscured by objects between it and the camera lens, the flare fades or disappears depending on whether the light is partially or completely obscured (an effect that is handled by the Fade Behind Objects option). ( Off by Default )
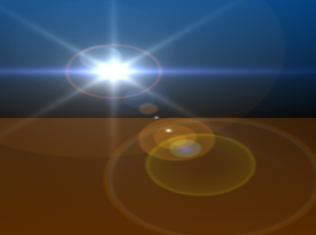
Glow Behind Objects is designed to simulate glows physically located at the light source rather than within the lens. These glows are caused by the illumination of a medium surrounding the light (such as murky water or foggy atmosphere) as opposed to true lens flares, which are caused by diffraction and reflections among the glass elements inside a lens assembly. Unlike true lens flares, glows, at a distance, can be partially visible even if the light source itself is obscured.
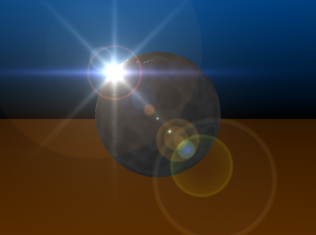
Left: Normal Flare Settings, Right: Glow Behind Objects selected
- Central Ring - is a small ring of light, like a halo, surrounding the light source. The Ring Color option controls its color. The ring’s size is set by the Ring Size value, which defaults to 22%.
Use an enveloped Ring Size for shock waves or other similar anomalies.
- Anamorphic Distortion - causes the lens flare to stretch horizontally. This simulates the effect of the wider lens flares you see in motion pictures filmed in Panavision. The Distortion Factor acts as an aspect ratio control. The height of a flare is determined by its Intensity setting and proximity to the camera. The relative width of the flare is determined by the Distortion Factor.
The default value, 1.77, sets the flare’s width at 1.77 times the flare’s height. A default value of 3 causes the flare’s width to be three times wider than it is tall, and so forth. The higher the value, the more elongated the flare. To distort the flare vertically, enter a value less than 1. The lower the value, the taller the flare.
Lens Streaks
The Lens Flare panel divides in two at the bottom. The first is the Streaks tab.

- Star Filter - this is a pop-up that lets you choose the number of points on the star-shaped streaks that emanate from the flare. The + n secondary options add in-between minor streaks. You can rotate the streaks with Rotation Angle . Positive values rotate the streaks clockwise as seen from the camera. Negative values rotate the streaks counterclockwise.

- Off Screen Streaks - allow lens flares that move off the visible screen area to continue to cast occasional streaks across the LightWave camera and into the scene.
You must activate Fade Off Screen to use Off Screen Streaks.
- Anamorphic Streaks - are elliptical horizontal blue streaks emanating from the lens flare light source. This simulates the effect of similar streaks seen in motion pictures filmed in Panavision.
The Random Streaks options adds dozens of tiny random streaks of light emanating from the light source. The intensity of these streaks is governed by the Streak Intensity, which is a percentage of the brightness of the lens flare. The higher the value, the brighter and larger the streaks. The default value of 3.0% produces streaks that closely match those found in film.
- Streak Density - sets the number of random streaks. The number you enter is used as a rough approximation to determine the actual number of streaks, but your results will be close to the value entered. Higher values make for more streaks.
- Streak Sharpness - determines how defined the random streak edges fall off and blend into the background. Low values blur the streaks together, making for softer, wider streaks. Higher values create very distinct streaks. The default value of 6.0 closely matches streak effects found in film.
A very low Streak Sharpness value (like .0001) will blur the streaks into each other to create a glow-like effect.
Lens Reflections
The Lens Reflections option adds reflections of light in the LightWave camera, as if it were shooting the scene through a standard camera lens assembly. This effect emulates the multiple lens elements that make up a typical lens. Such flares commonly occur whenever you aim a camera at an intense light source.

If either the light source or the camera is moving, then the reflections will move across the screen also. This can be a dramatic effect.

To get the most visibility out of Lens Reflections, place the lens flare light near the side or corner of the camera’s view.
The Polygonal Element Shape will change the shape of the reflections. The sided settings simulate lenses with n-blade irises. Since there’s just one iris per lens on a real camera, all polygonal reflections in a particular flare have the same shape. Settings are global for the scene, which means that different lights can’t have different patterns.
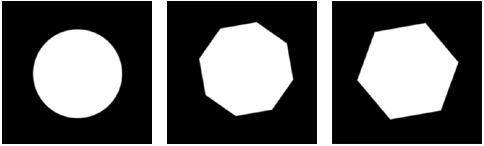
Some of the available Shapes
You can modify the default Element Type, Element Position, Element Size, and Element Color for each of the sixteen reflection elements. To edit an element, first select it using the Current Reflection Element pop-up menu. The elements are aligned in a straight line going through the center of the camera’s view through the light.
By default, the Elements 1 through 16 are aligned starting near the light, then through the center and on to the opposite side. However, each element’s position could be anywhere, if you want it to be. An Element Position of 0 is at the center of the screen, 1 at the light’s position and -1 on the opposite side. You can use values beyond 1 or -1 to move elements past those positions.
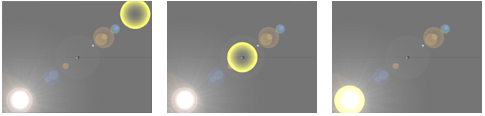
Element 15 (Yellow) Left: Position = -1, Middle: Position = 0, Right : Position = 1
An Element Size of 100% vertically fits the element to the camera resolution. It can be clipped or there can be space to the left and right, depending on the relative Camera Resolution Height setting.
A reflection using a Bright Center Element Type will not be the same size as the Even Center.
The Element Type setting determines the shape and density characteristics of the reflection.


Circle- Bright Center, Even Center, Dim Center , Circular- Ring


Polygon- Bright Center, Even Center, Dim Center, Rainbow Ring
If you select a Polygon Element Type, you should also choose a shape other than Circular as the Polygonal Element Shape.
The viewport display will not show all lens reflection attributes.