Genoma 1
Genoma 1 Presets
Presets are the heart of Genoma. They can be added to so you can build up a library of reusable rig parts or even complete rigs to suit your needs. Opening the Genoma Presets window presents you with two main groups: Complex Rigs and Rig Parts. Complex Rigs are complete rig setups for bipeds, quadrupeds and insects. Rig Parts are where things get interesting since their Atomic structure allows you to mix and match elements to build your own rigs, or expand on those that already provided.
Atomic Element (SubRigs)
Unlike normal skelegons where every skelegon is an independent entity that can be detached or removed, Genoma subrigs can consist of multiple skelegons dependent on each other. Each one is required to correctly convert the subrig, and removing any skelegon in that subrig carries the risk of breaking the rig. As a result, while individual skelegons not used for Genoma are normally atomic elements, a Genoma atom can consist of multiple, inseparable skelegons.
Connectors
Connectors are special types of Genoma skelegon that serve as weld targets. They can be thought of as an input port to which things can be attached. Any time two or more subrigs are attached (welded) to one another, a connector must be used between them.

The two orange connectors in this picture of the wrist part of a rig should never be deleted. The four Magenta connectors can all be safely deleted to separate parts of a rig from each other.
- Orange connectors should never be detached or removed.
- Connectors added by the user are generally colored Magenta.
Use the Color Wireframe viewport display mode to be able to see the different colors of the Genoma items.
Root
If you want to start your rig from scratch, begin with a Root. This will be your character’s Center of Gravity (CoG). When converted in Layout, the root’s green box will be converted to provide a controller to enable you to position your character.
Active and Passive Connectors
In Modeler there are two types of Connector that can be added to rigs. The Active button creates connectors that have a bone strength of 100% and will deform your mesh while the Passive button creates connectors with a bone strength of 0%.
FK Controls
All controllers with the same number but a different suffix are identical in use, just with a different appearance to better suit different parts of your model.
Pitch Alignment and Control Size Elements
The Pitch Alignment Element and the Control Size Element. Their respective control points are selected.
The green arrow-shaped elements let the user define the Pitch direction of the bone once the rig is created in Layout.
Not every Subrig needs this kind of control. For example IK Chain alignment is automatically calculated by Genoma. Forward Kinematics subrigs with a Green element may need orientation by the user.
Some Subrigs present a Green box, that can be used to define the size of the controls that will be created in Layout by Genoma. When the Box is not present, it means that the size of any control for that SubRig will be automatically calculated.
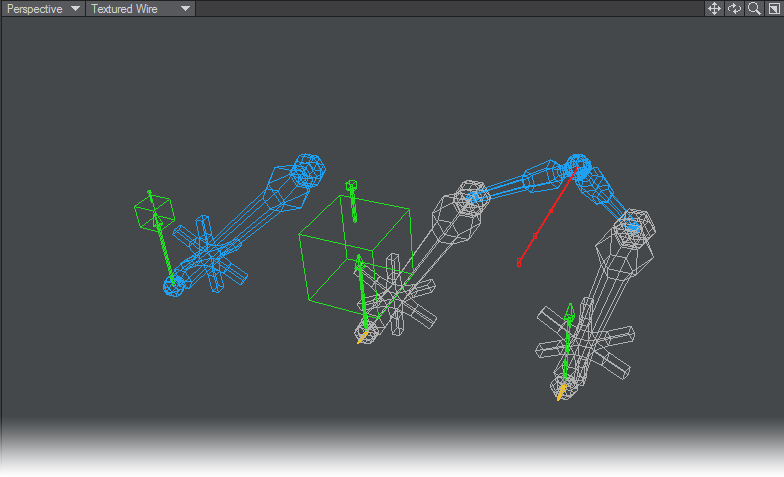
Parenters
A Parenter is seen as a red line coming from a rig part. Here in the left image we can see the human_head_02 subrig and in the right a close up on the eye part of the rig showing the red line marking a Parenter. The single point at the end of the Parenter is selected for better visibility. To parent the eye control to another element on the rig, you just need to weld this point to the tip of another connector so that moving that connector will also control the eyes in this case. Parenters are available on other subrigs for a variety of different purposes.
Spines

There are several different spine rigs in this category, the only difference between them is the number of bones in each.
Spline Control
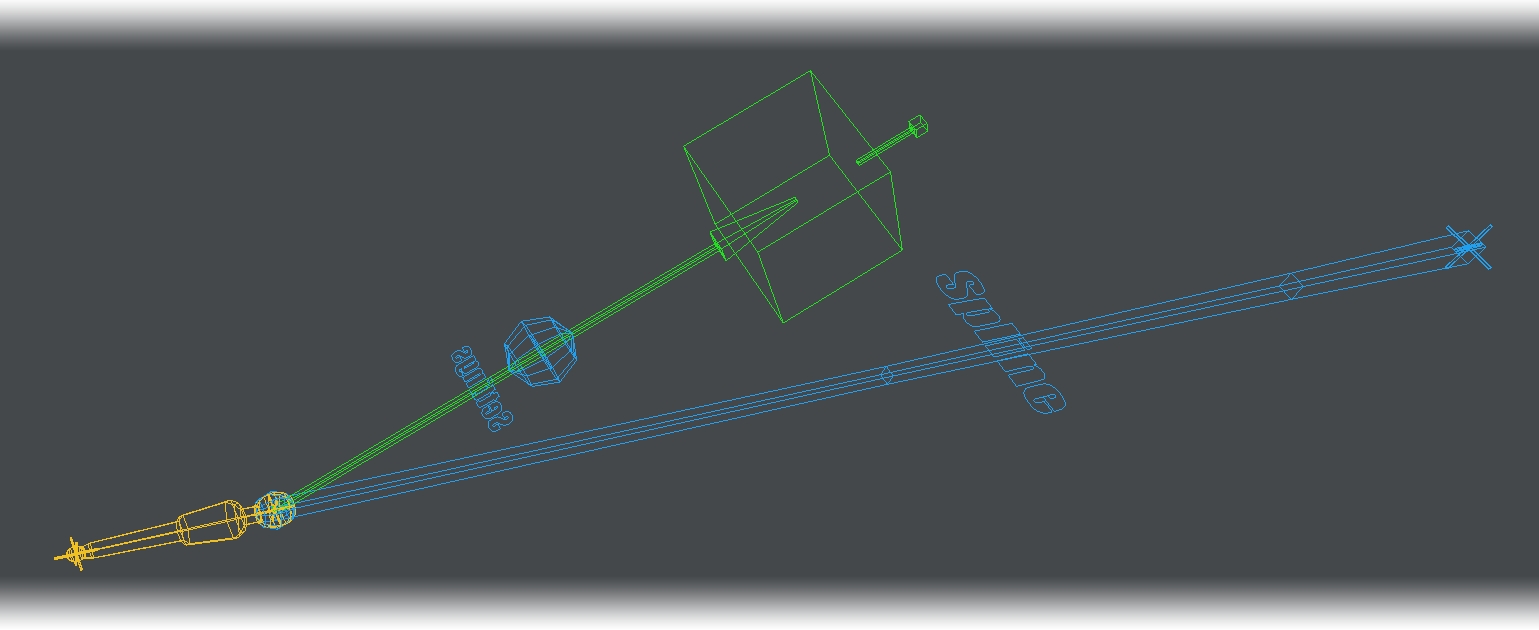
In LightWave 11.6 a subrig Spline Control part was added to go with the Spline Control feature. It can be found in the Genoma Presets under Rig Parts/04_Spines. There are two versions.
- Spline Control 01 - independent controls, no rotation apart from bank. Great for individually animating the controls, not so good if you wish to animated multiple controls at once, such as rolling up a tentacle for instance.
- Spline Control 02 - The controls are in a hierarchy, with rotation controls in addition to the move controls present in the first version.
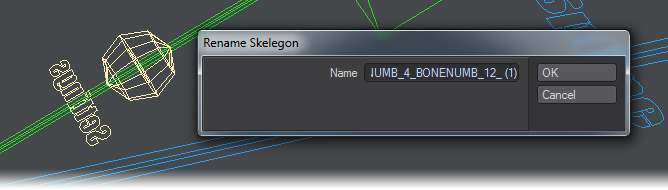
By default, both rig parts present four controls and 12 bones. By selecting just the Settings section of the subrig and choosing Rename Skelegons from the Setup tab you can adjust these numbers as you choose.
For animating along a spline you should select Spline_bone_1 and only change its Z position. You can also select all the bones in the spline and change them from Linear Distance to Fit to Spline in the Bones Motion Options panel if you’d rather have a spline-based object to animate.
Example: Animating a rollercoaster train
- We’ve made a subdivided box and beveled the top to make a simple rollercoaster train. We added a Genoma SplineControl_1 subrig and sent the object to Layout, where we created the Genoma rig.
- Stretching out the four control nodes, we use the Bank control (RMB) to tip some into the curves we have created.
- Going to a frame at the end of the scene, selecting Spline_bone_1 and moving along the Z axis will animate the passage of the rollercoaster train along the spline.
Example: Animating an Octopus tentacle
- Kept the same box, but removed the bevels and added tentacle suckers. Used the Genoma SplineControl_2 subrig and elected the Settings part of the Genoma subrig and hit Rename Skelegon. Changed the quantity for controls from 4 to 6, and the number of bones from 12 to 24.
- Sent to Layout and Created rig on the Setup tab in the Genoma section.
- Selected all the Genoma Rotate controls and gave them a twist to curl our tentacle nicely.
Arms, Legs and Hands
Arm_02 has a controller that can be sized and placed. Leg_Foot_01 is a bipedal leg suitable for a human character and Right_Hand_01 has one control for each finger. Using the Right mouse button will curl the fingers.
They are several choices for each of these elements.
Arms:
- Arm_01 - The user cannot choose the size or position of the controls and the Pole Vector follows the IK Controller’s movement.
- Arm_02 - The user can choose a size and placement of the controller and the Pole Vector is independent from IK Controller movement.
- Arm_simple_01 - The simplest Genoma arm rig. No control sizing, no shoulder or wrist twist.
- Arm_simple_02 - Like Arm_simple_01 but with its Pole Vector reacting to IK controller movement.
Legs:
- Insect_Leg_01 - Simple insect leg subrig. The user cannot choose the size or position of the controls and the Pole Vector follows the IK Controller’s movement.
- Insect_Leg_02 - Additional segment and Pitch Alignment and Control size are available. It also has an additional FK control.
- Leg_Foot_01 - A humanoid leg with reverse foot.
- Quadruped_leg_01 - Creates the hind leg of a quadruped animal.
- Three_part_leg_01 - A generic three-segment IK element that can be used for many purposes.
Hands:
- Finger_01 - An additional finger to add to a hand subrig or act as a horn or similar for your character. This finger has one control to curl or uncurl the finger. Finger_02 has a control per joint.
- Left_hand_01 - Creates a five-fingered hand with one control per finger for curling and uncurling (using the right mouse button). There is a matching right hand.
- Left_hand_02 - Creates a five-fingered hand with three controls per finger for curling and uncurling. There is a matching right hand.
Heads
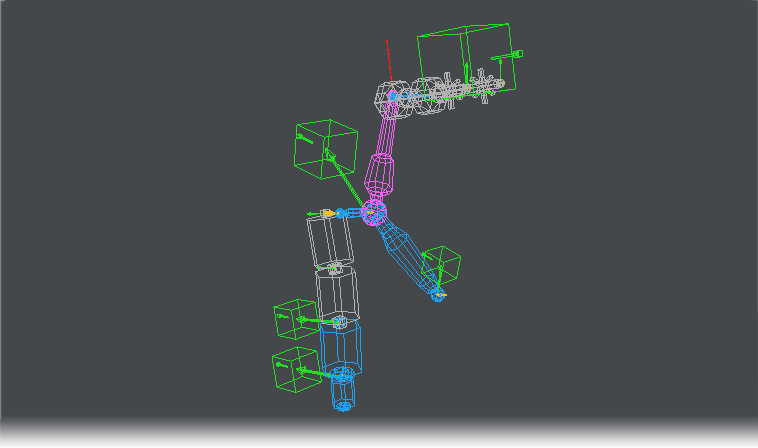
There are two head rigs included in the Genoma Presets in 11.5. The first (human_head_01) has the green Pitch Alignment and Control Size elements for several parts of the subrig. The second subrig (pictured) also has a Parenter for the eyes.
Muscles and Targets
This group contains muscles, targets and tendons. Muscles and Tendons are related so we’ll describe those first.
Muscles
There are two Muscle subrigs. Muscle_01 creates a single bone in Layout where Muscle_02 creates two bones. The effect they have is best shown by this simple example.
We have modeled a simple subdivided cylinder (01). To that we add a connector_01 to each end (02). Next we add Muscle_01, as can be seen it needs scaling up (03) . When scaled appropriately, weld the points shown to attach the connectors to the muscle (04). 05 and 06 show the muscle stretching and squashing the cylinder. As can be seen in image 04, there is a parenter that can drive the muscle through another are of the rig.
Tendons
Again there are two tendon subrigs, once with a single bone and one with two. The two-bone tendon makes even more sense than the two-bone muscle since it can have its two Parenters aligned to separate parts of the rig giving a nice twist to the tendon.
The steps for adding a Tendon to this cylinder are identical to the muscle placement, but the difference is that a tendon doesn’t have the bulge or stretch of a muscle as shown by images 05 and 06.
Target Controls
A variety of single eyeball or eyeball pair subrigs, with and without Parenters.
Overview
There are two short sections in the Setup menu in Modeler and Layout for Genoma. For Modeler there are three menu items:
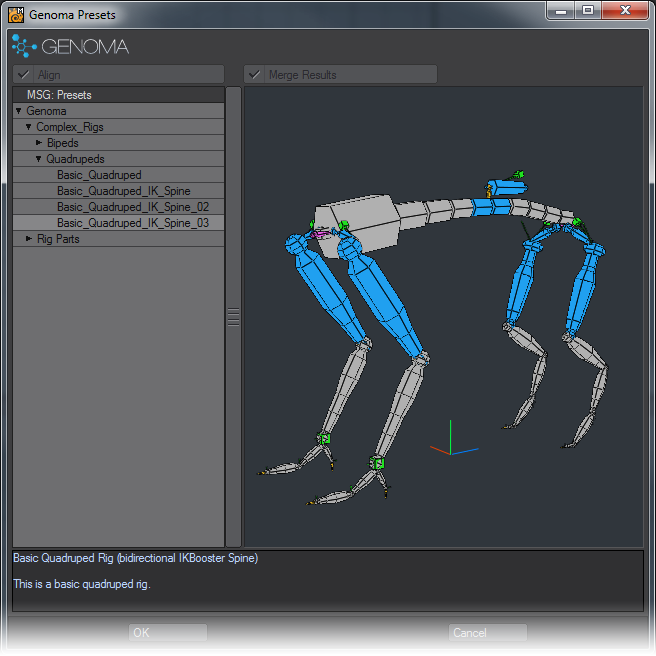
Genoma Presets - This opens a window with a set of premade rigs and rig parts to enable you to swiftly create your own customized rig. There are two buttons at the top of the window that are available if you open the Genoma Presets window with a connector already selected:
- Align - This will align the new connector with your existing rig. If you untick it the Genoma Presets window will show you what you will get instead.
- Merge Results - If you untick this option, the new subrig element you add from the Genoma Presets window will not be attache to your existing rig.
Connector Group - There are two commands in this group, Passive and Active. Both create connectors to extend your rig, but before you create a connector you need to select two points on your geometry - the base of one part of the rig with the top of another part. Clicking Active will now place a Genoma Connector between the two points you selected with a bone strength of 100%. Clicking Passive will create a connector not designed to affect the mesh that has a bone strength of 0%.
In Layout there are two commands for Genoma in the Setup tab..
Create Rig - This takes the rig you have created in Modeler and converts it into an IK/FK skeleton. Your OpenGL viewport should be switched to Bounding Box before you click this button.
Update Rig - If you realise that some deformation is ugly or you need more flexibility in a body part, you can edit your rig in Modeler and then update it here. Existing animation will be lost.
Editing
In general any Modeler tool can be used to edit the Genoma Rigs. That makes adapting a pre-existing Genoma Preset to any character mesh fast and easy using tools that are familiar to the LightWave user such as Move, Rotate, Drag, Mirror and so on. It is possible to Copy and Paste Subrigs without problem. Select a subrig starting with the magenta connector to ensure that you are selecting the atomic elements that make up the subrig.
Some general rules that have to be followed:1) Never “break” a SubRig. None of its parts can be deleted or detached.2) Connectors attach different SubRigs. All SubRig elements have a Connector just for this.3) You can weld the tip of any Connector to the Base of any SubRig. Or the tip of any Connector to the base of a new Connector.4) You can attach more than one Connector to the tip of another Connector.5) You can attach more than one SubRig to the tip of any Connector, just use the Base of the SubRigs.6) You can tell the Base of any SubRig from its color (normally Blue).
Creating Presets
Building your own Genoma presets is a simple operation. Build your rig as you need and save the object. Move the resulting LWO file into the LightWave/support/Genoma/rigs folder structure.
To hide everything except your mesh in Layout, create a selection set of all the items in the scene apart from the mesh and then you can hide or show that selection set easily. Selection sets will stop working if you update your rig, so do not create a selection set until the rig is finished and you start animating.
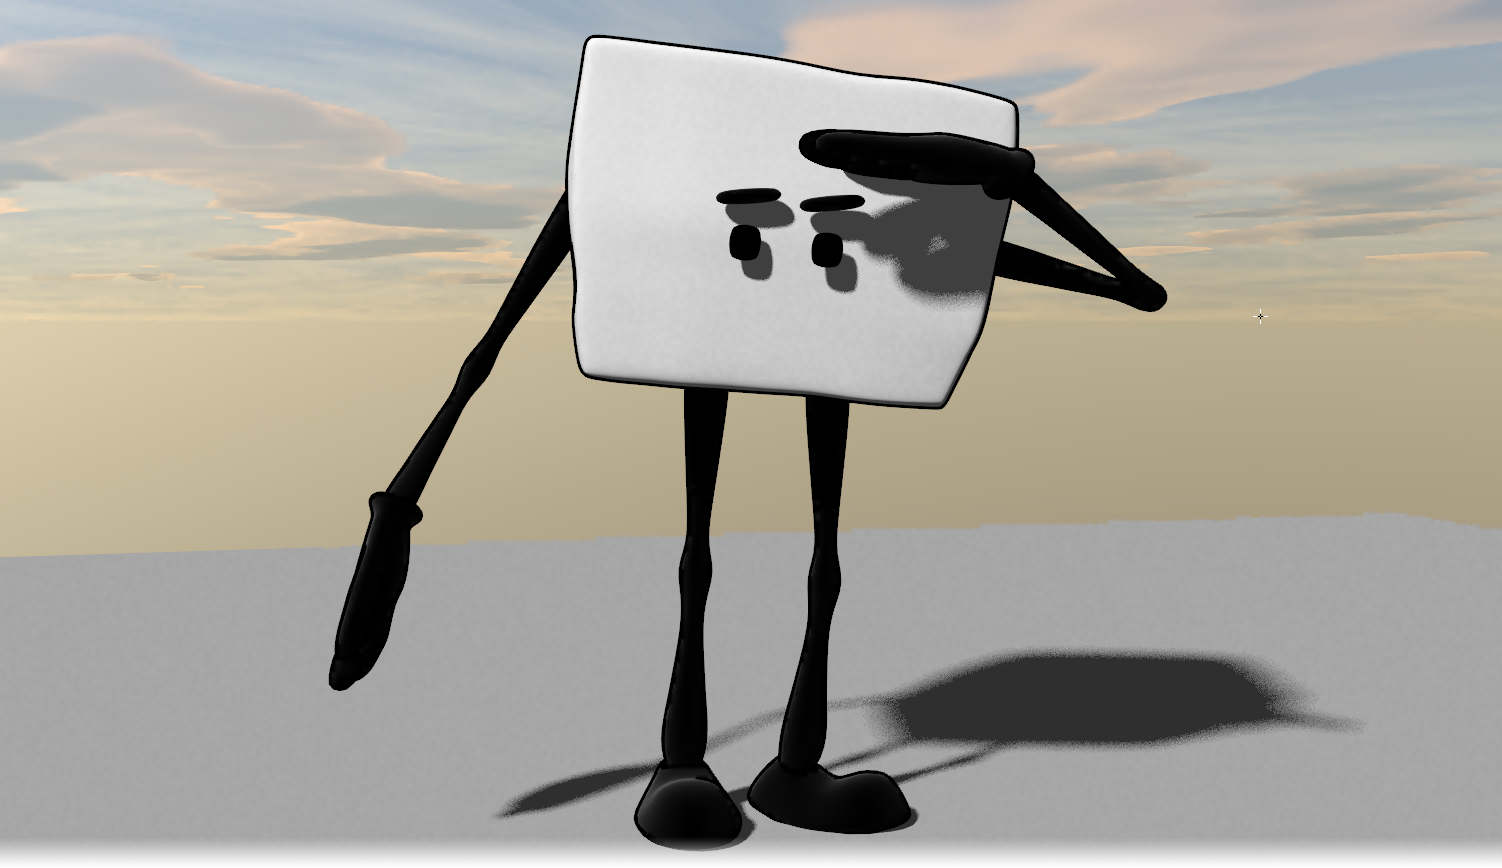
 Example: Rigging the Cube
Darkside Animation has provided a cute little character for this example. As you can see it won’t exactly fit one of the preset rigs - it has no spine or separate head and the limbs are somewhat outsized. The only solution is to build a new Genoma rig from scratch. To avoid that this tutorial spans 100 pages on its own you will need to pay careful attention to the images accompanying it.
The eyes and brows are using Endomorphs for their animation so we won’t be covering how to do those.
This character is provided in the content in both rigged and unrigged versions for you to play with.
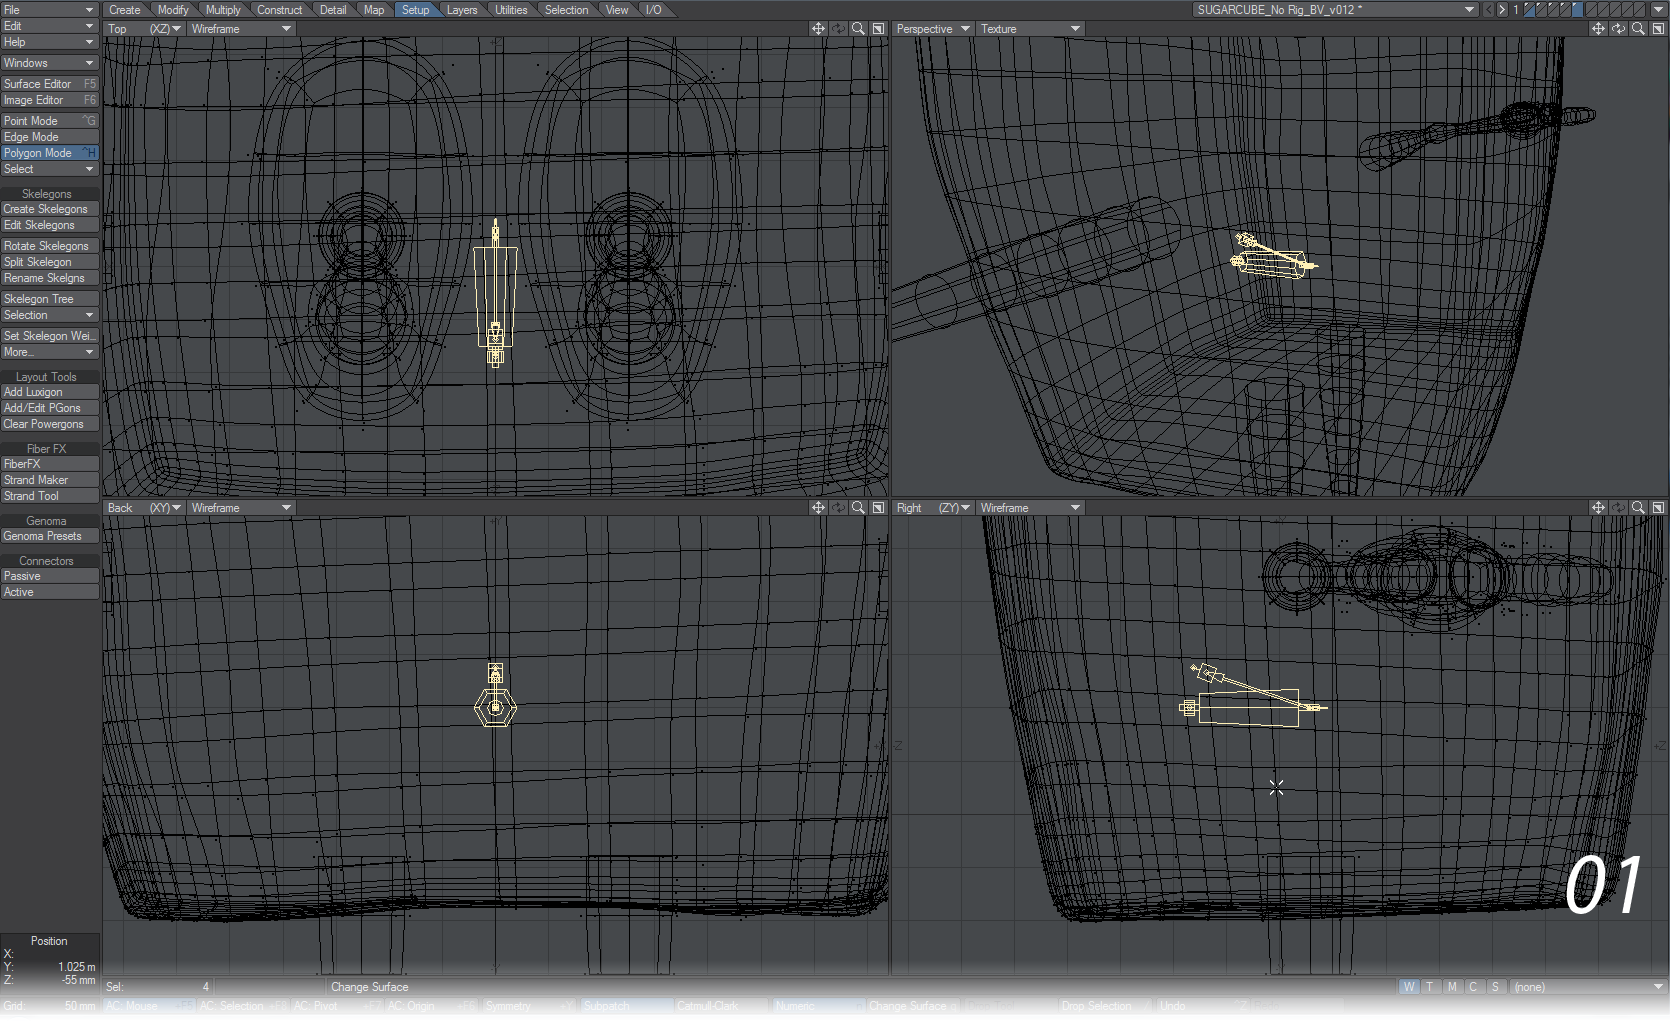
Step 1: Starting the rig
We have the geometry in Layer 1 and we’ll rig on Layer 2. To begin any rig with Genoma you need a root to indicate the center of gravity (CoG) of your character. Add Genoma Presets > Rig Parts > 02_Roots > Root_01. Put it in the center of your cube as shown (01).
With the Root still selected, return to the Genoma Presets window and choose Genoma Presets > Rig Parts > 01_connectors > connector_05. This will be welded to the end of your Root (02).
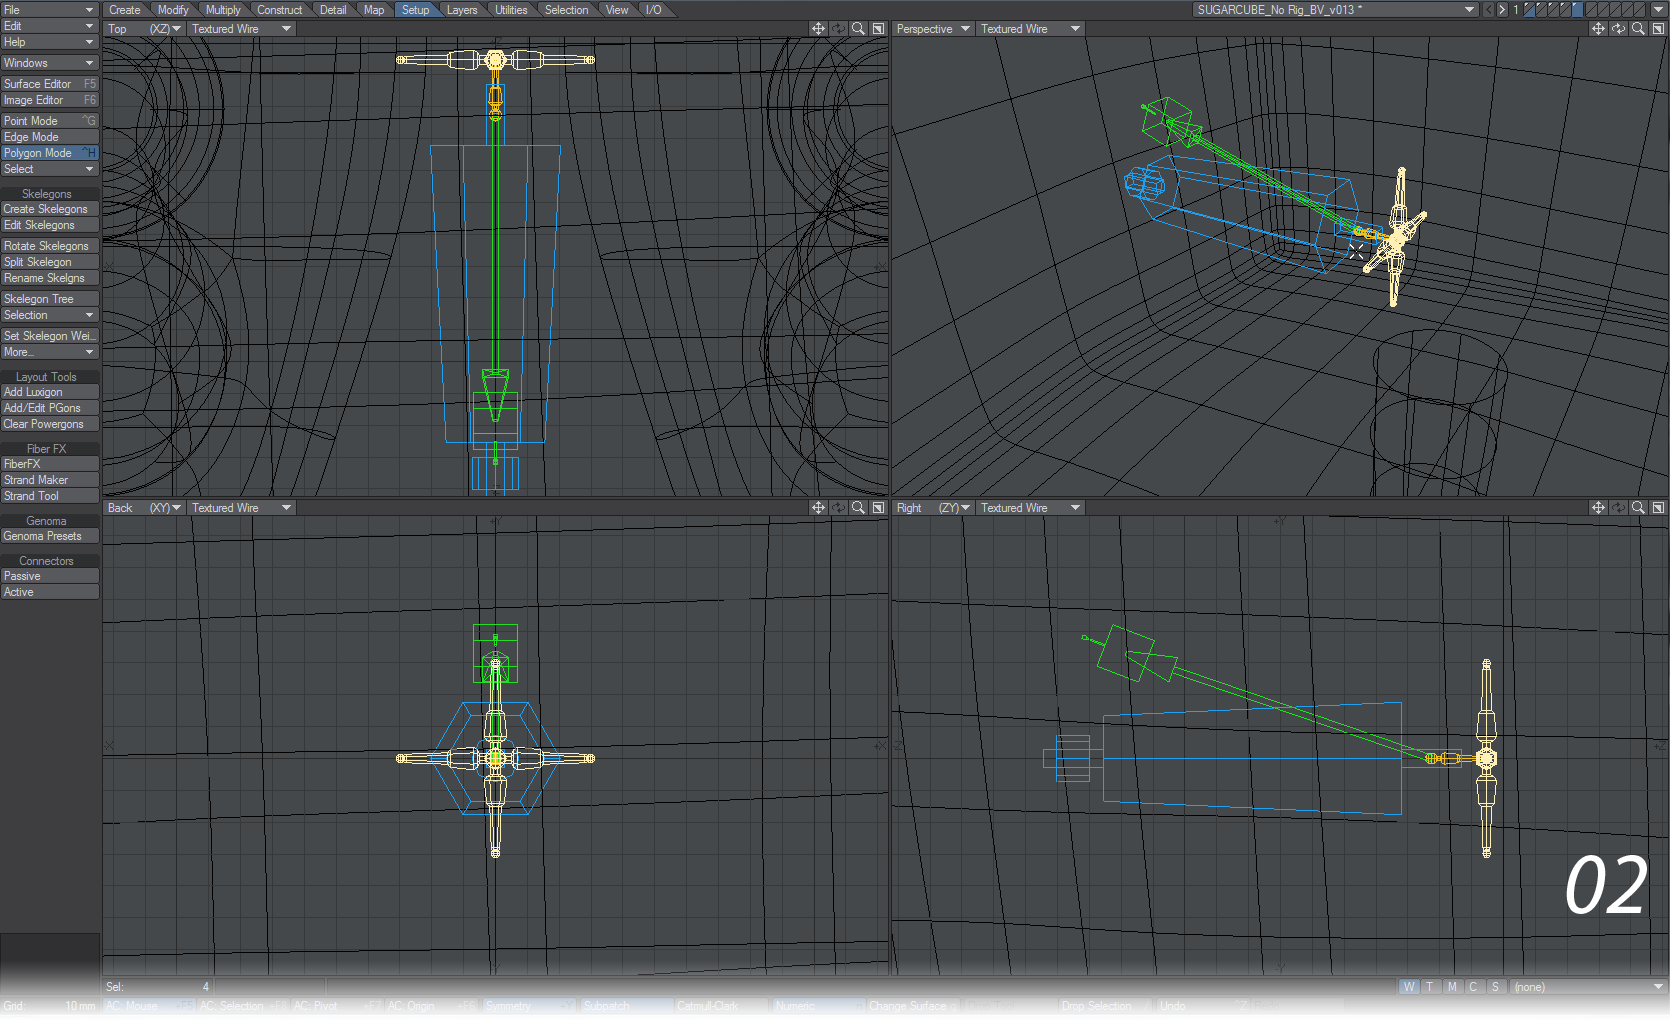
The four arms of this quad connector are going to serve as “head”, “shoulders” and “pelvis”. We’re going to take a moment to shift all those components into place. To do so, make sure Symmetry is engaged and use Drag to pull the end of the right “shoulder” into place. The “pelvis” needs to be at the bottom of the cube between the legs and the “head” can be moved upwards a little (we aren’t going to use it in this example) (03).
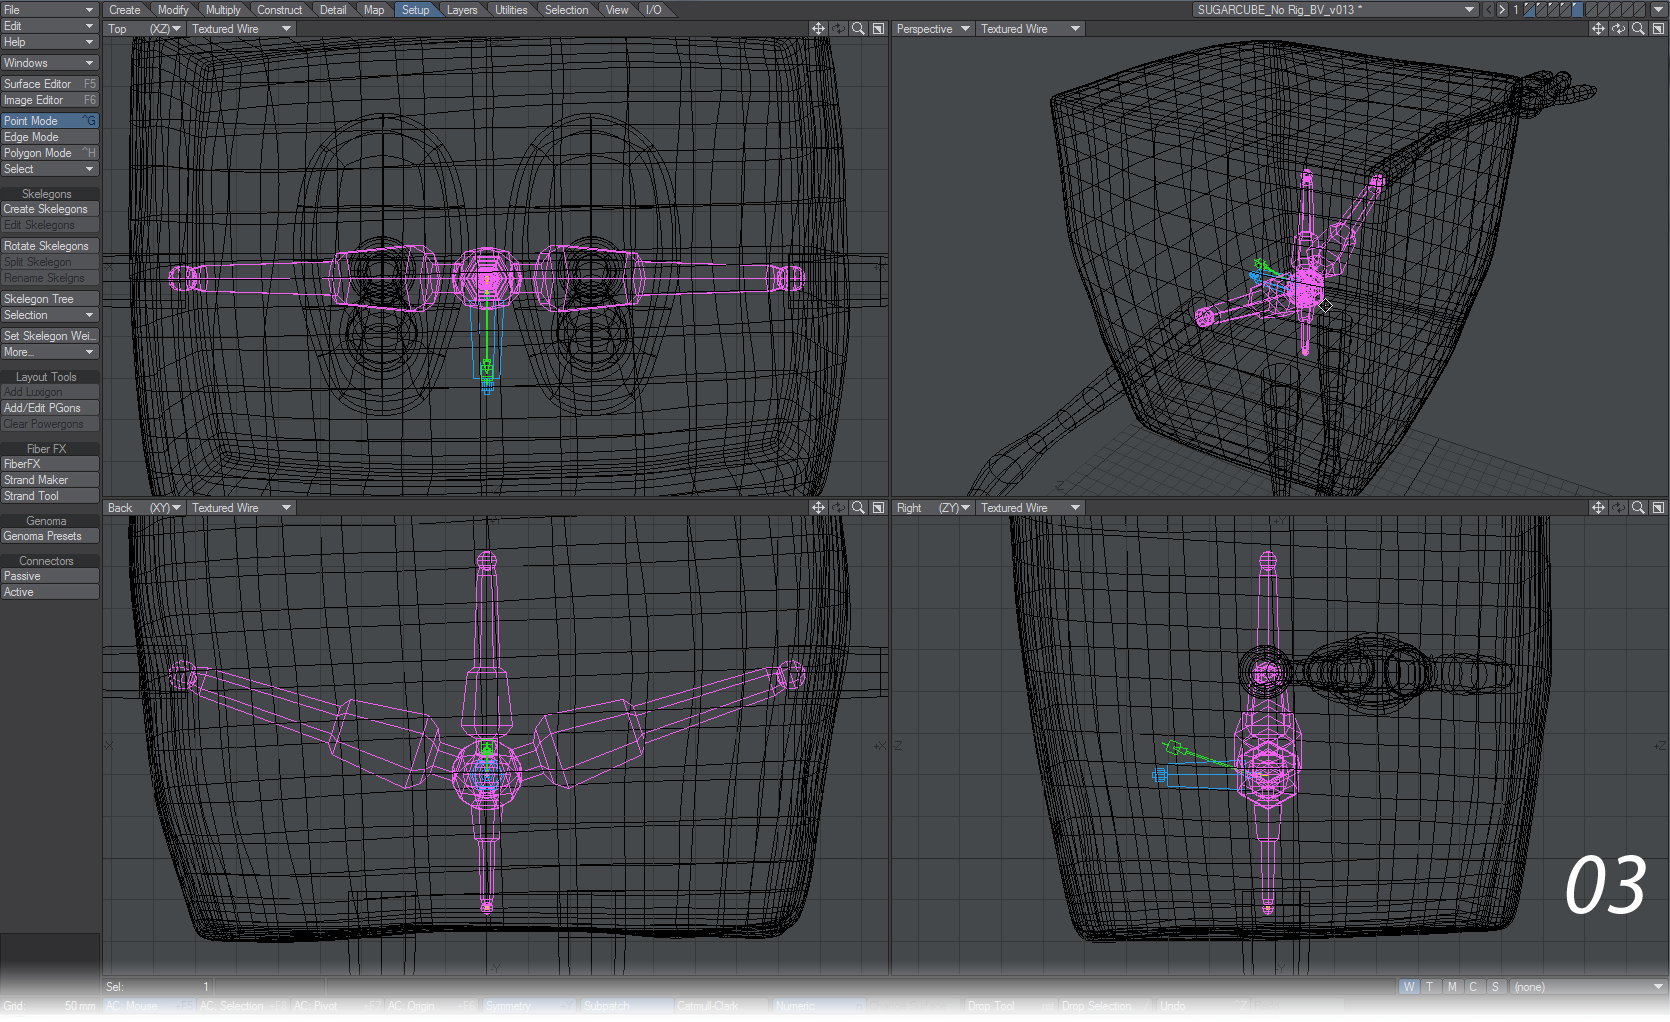
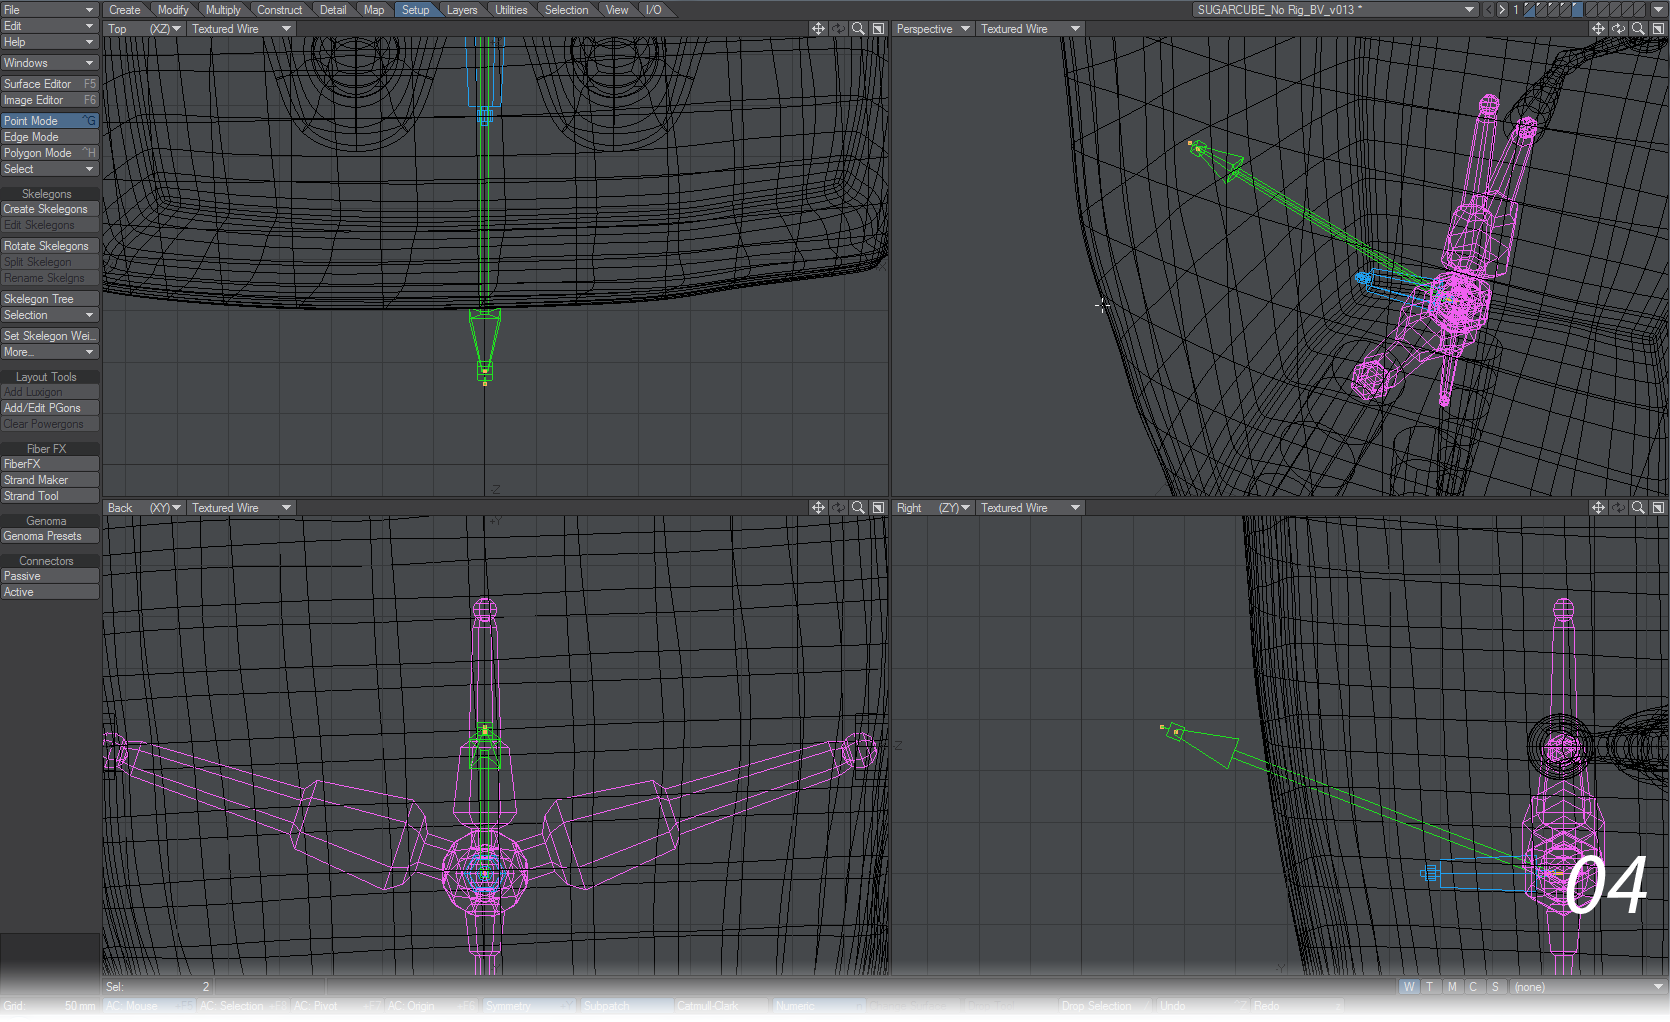
We also want the Root to be more easily accessible, so select the points shown and pull them out of the back of the character (04).
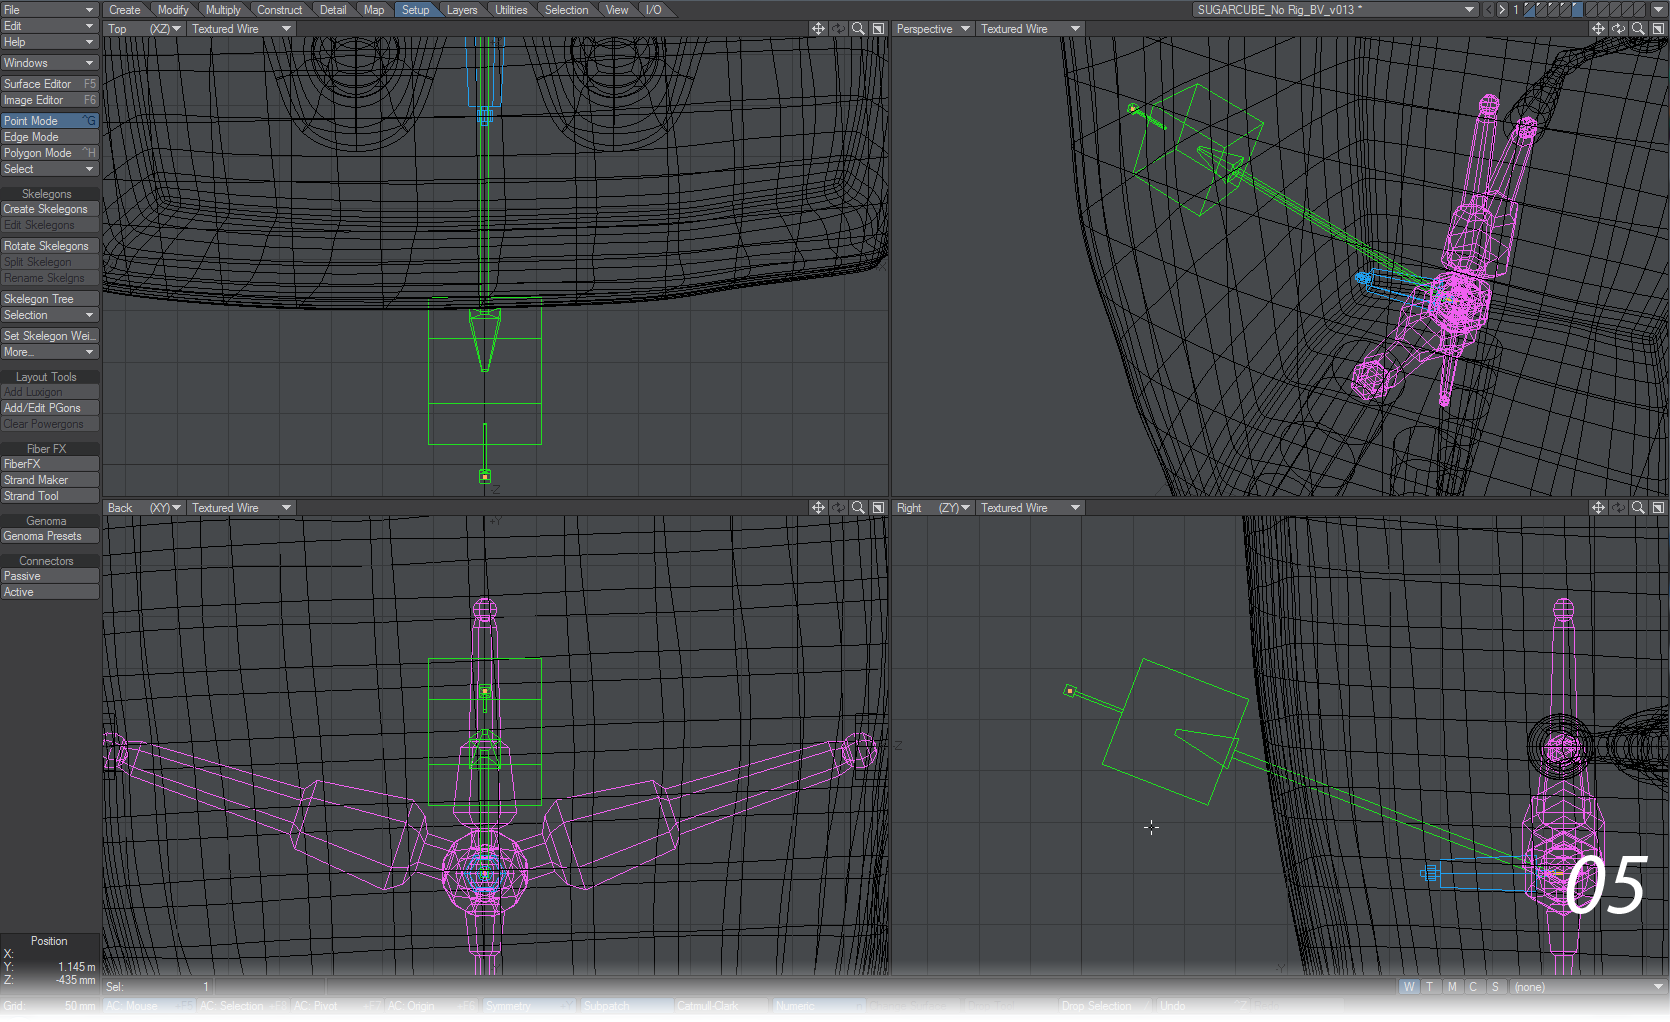
To scale the green box, which will be the controller itself, just deselect the arrow point and pull to make the box bigger (05).
Step 2: The arms and hands
Switch to Polygon mode and select the magenta “shoulder” connectors. Now choose Genoma Presets > Rig Parts > 05_arms > arm_02. This should bring in an arm on each shoulder (06).
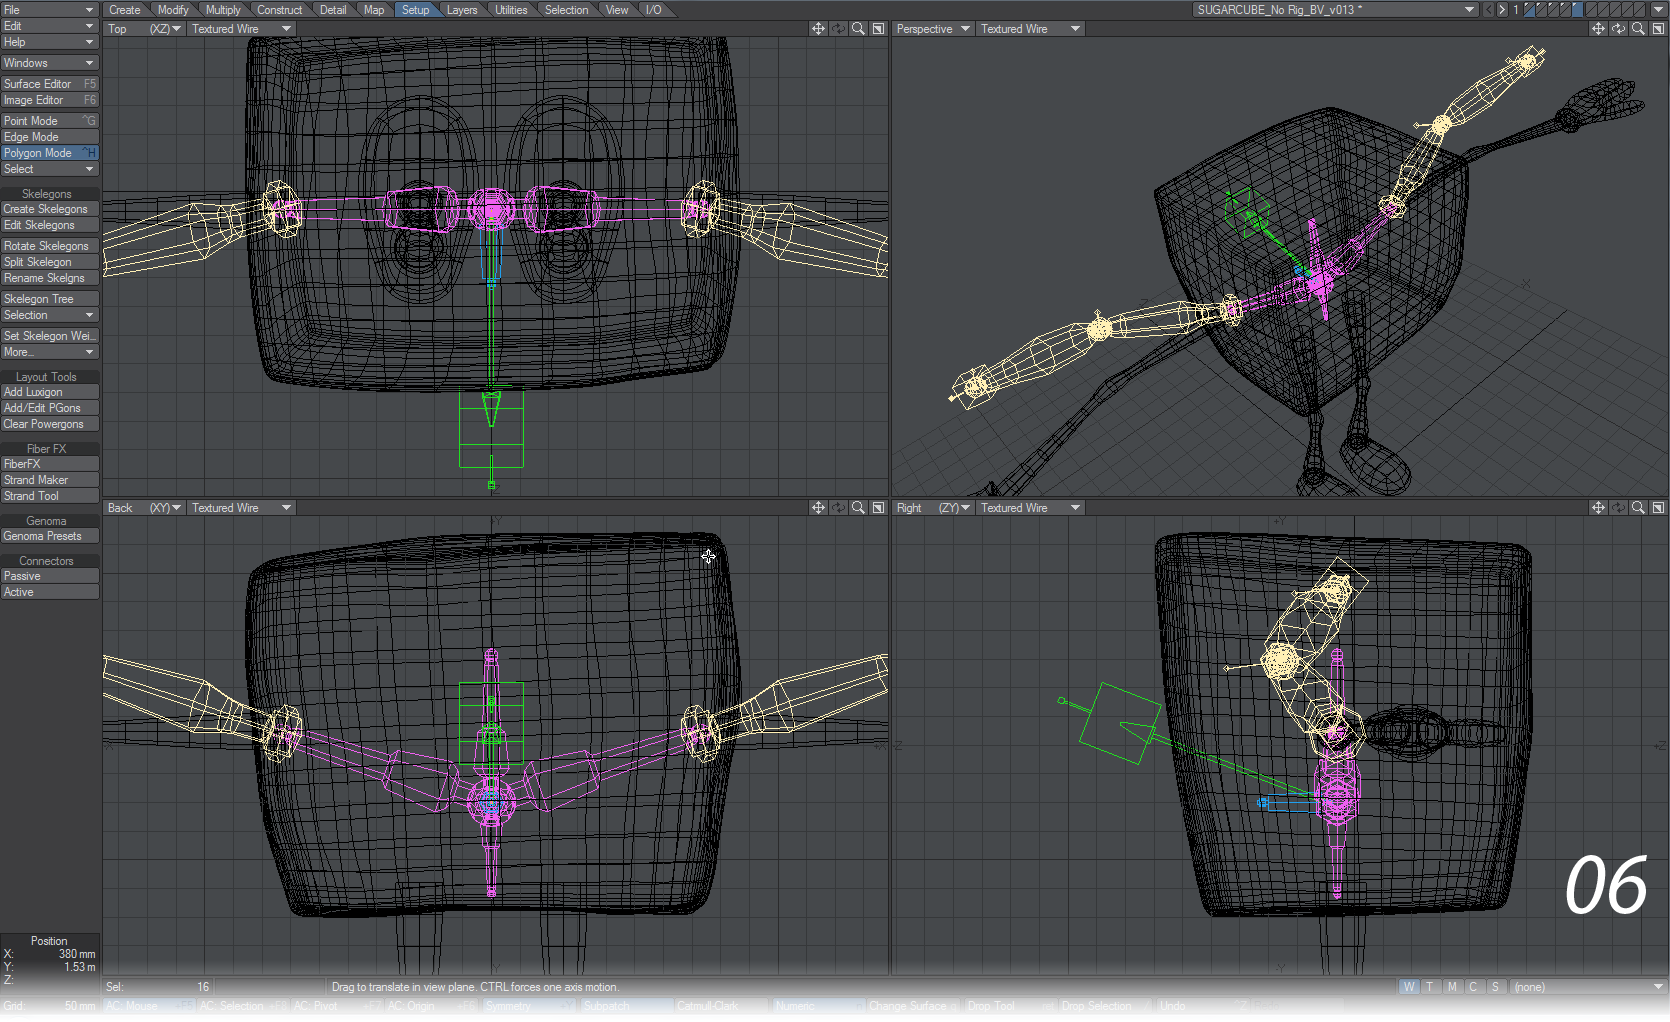
Now you need to switch between Point and Polygon modes and move and drag the parts of the arm rig into place so that it matches the geometry (07).
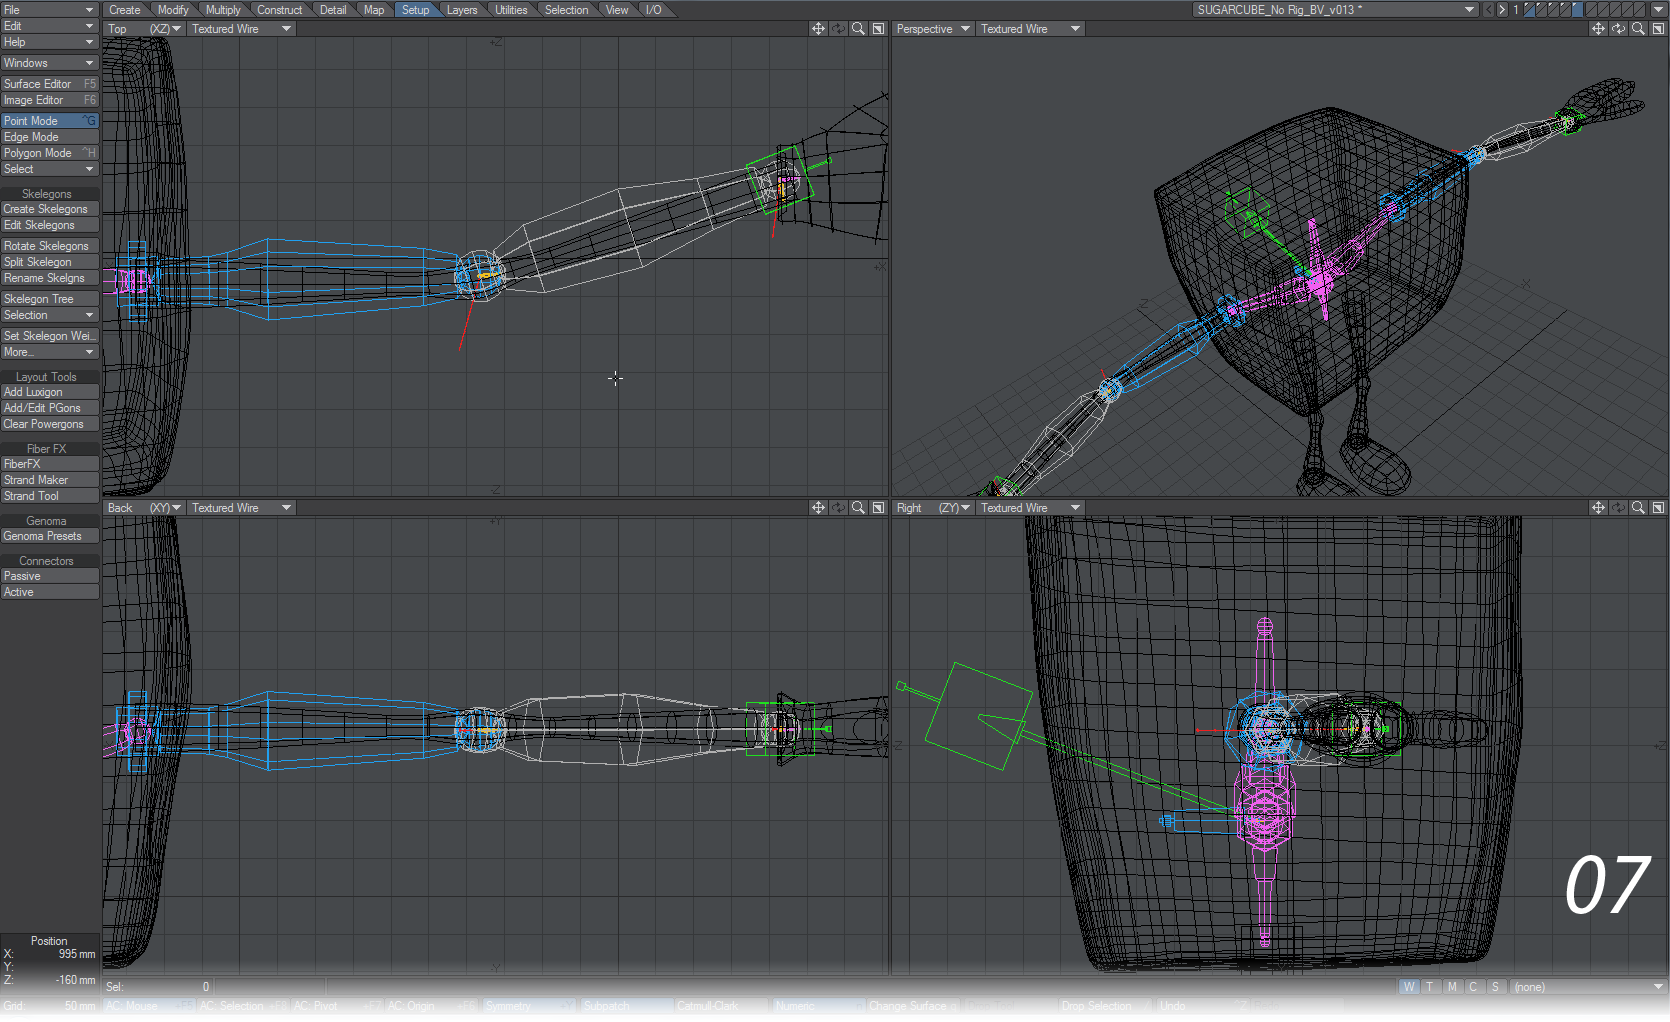
When in Point mode get used to using the right mouse button lasso to select the general area you wish to work on since Genoma will have several parts that should all be moved/rotated together.
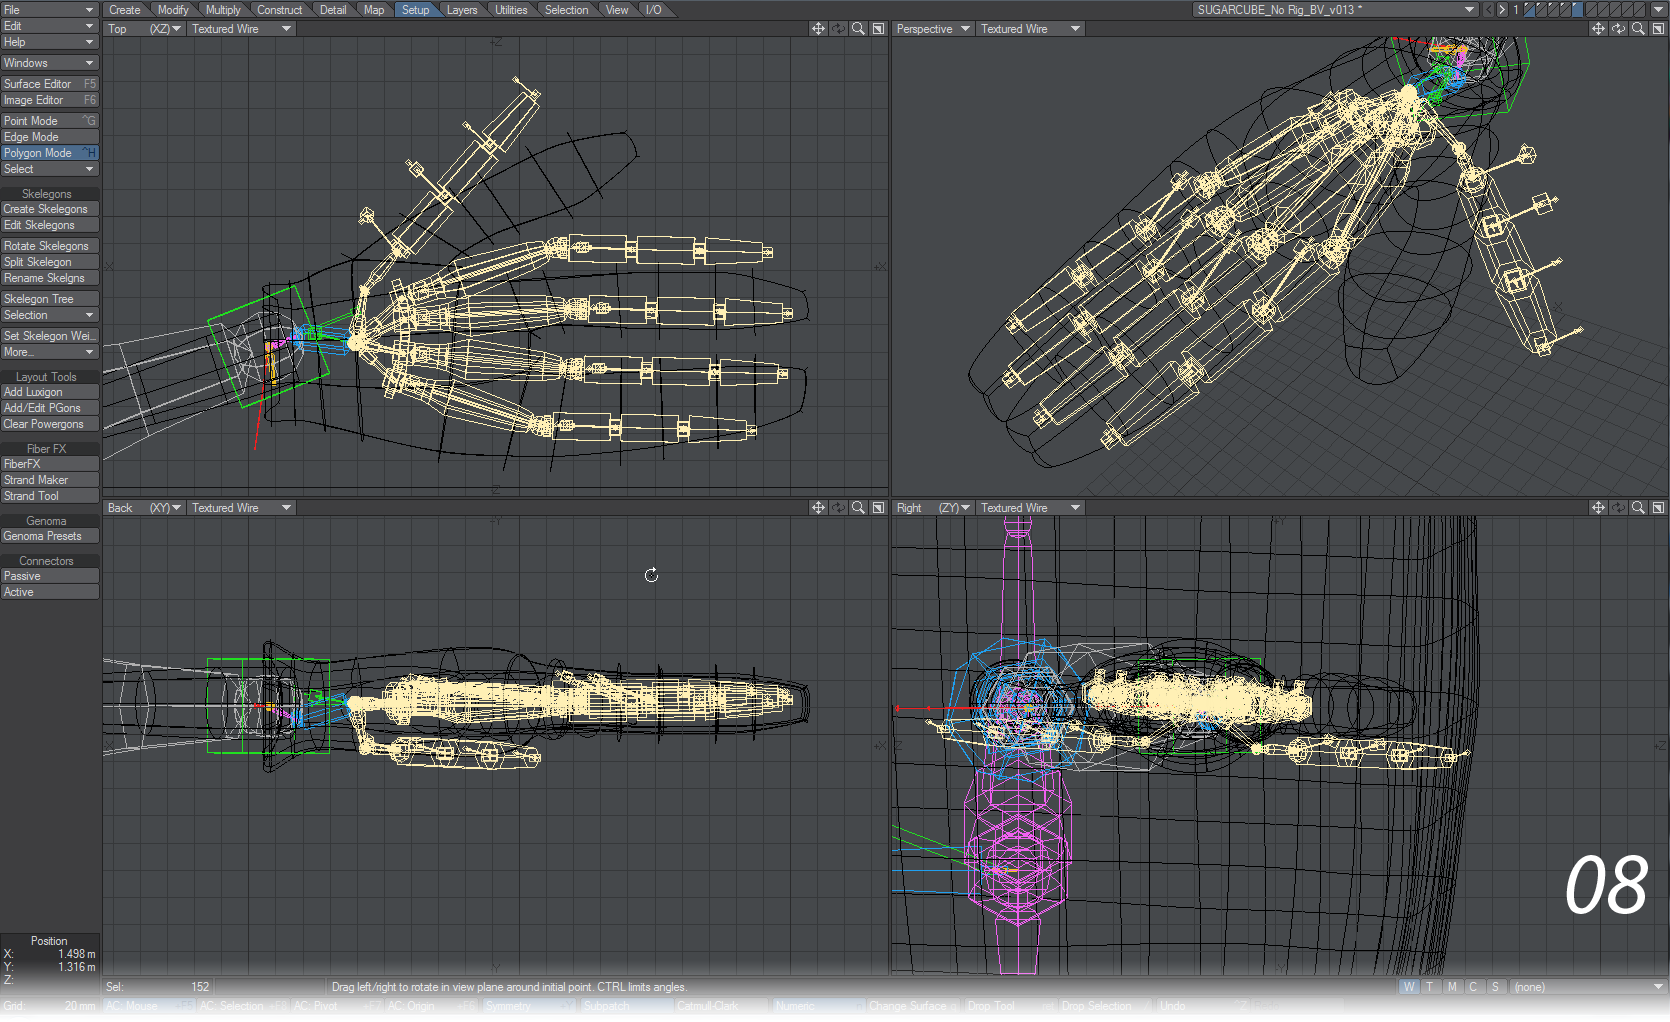
Switch back to Polygon mode, turn off Symmetry and select the connector that comes out of the right wrist. Choose Genoma Presets > Rig Parts > 07_hands > right_hand_01. This will weld a hand to the wrist but there are two problems with the preset hand for this character. The first is orientation, the second is two fingers too many. Re-orient the hand until it looks like (08).
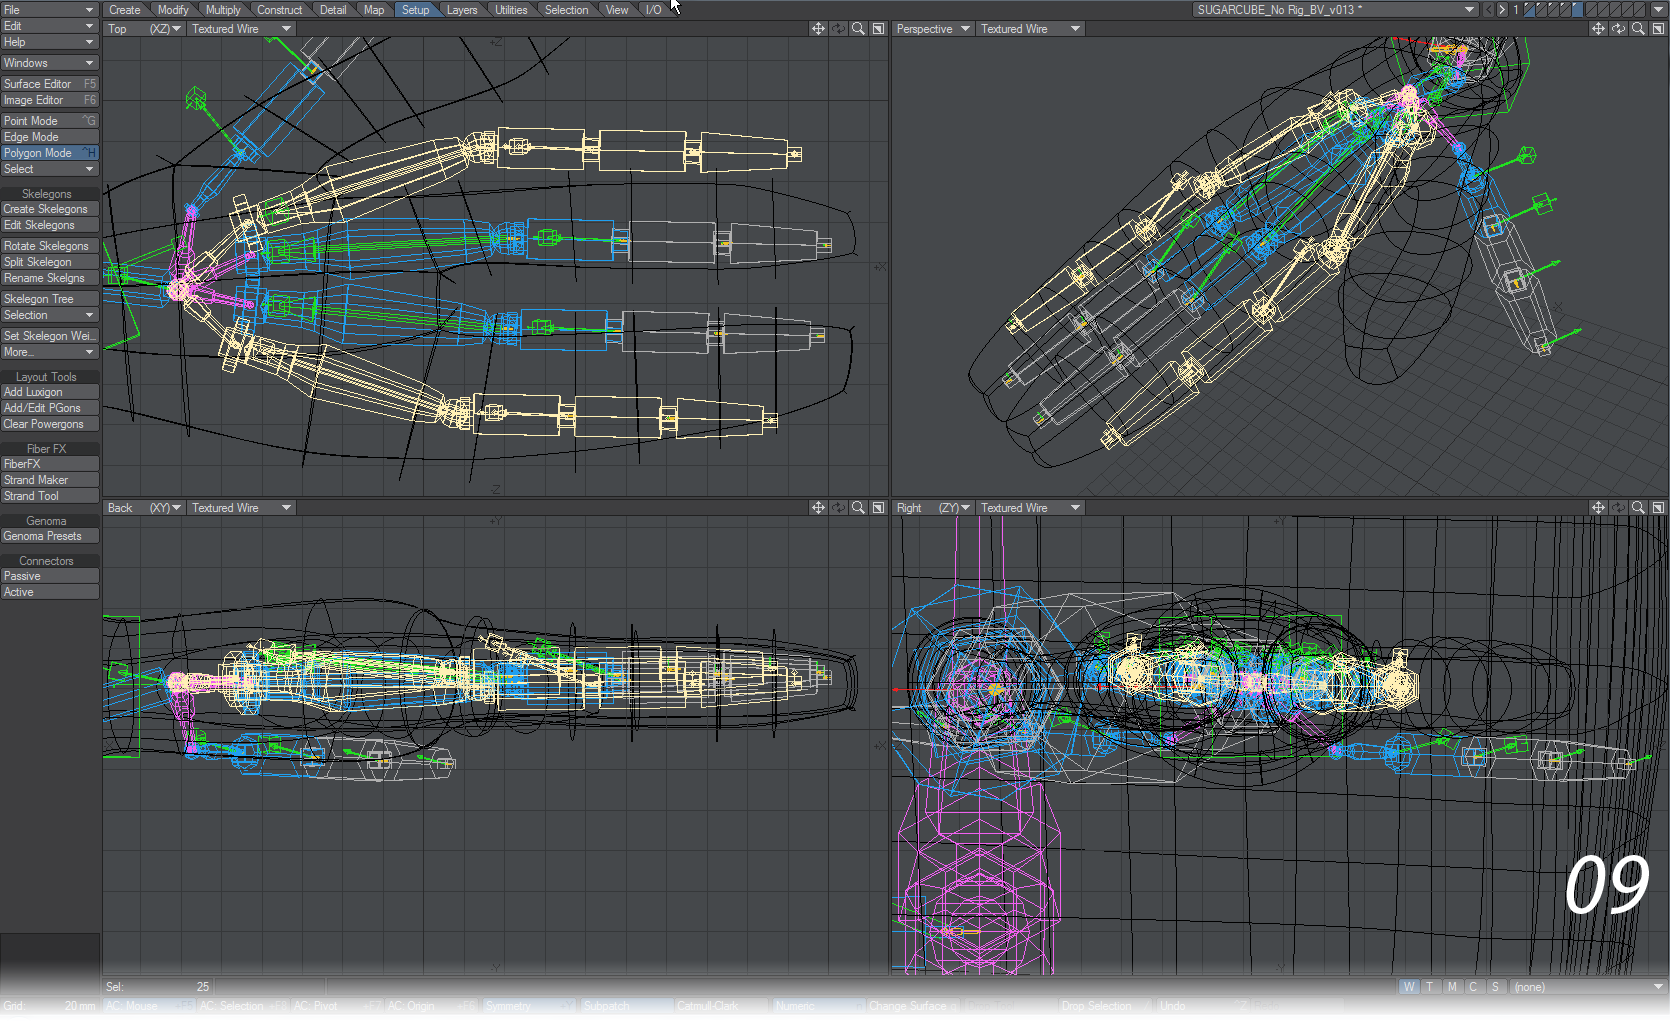
Now we need to ditch two fingers so select the outer two down to their magenta connectors (09).
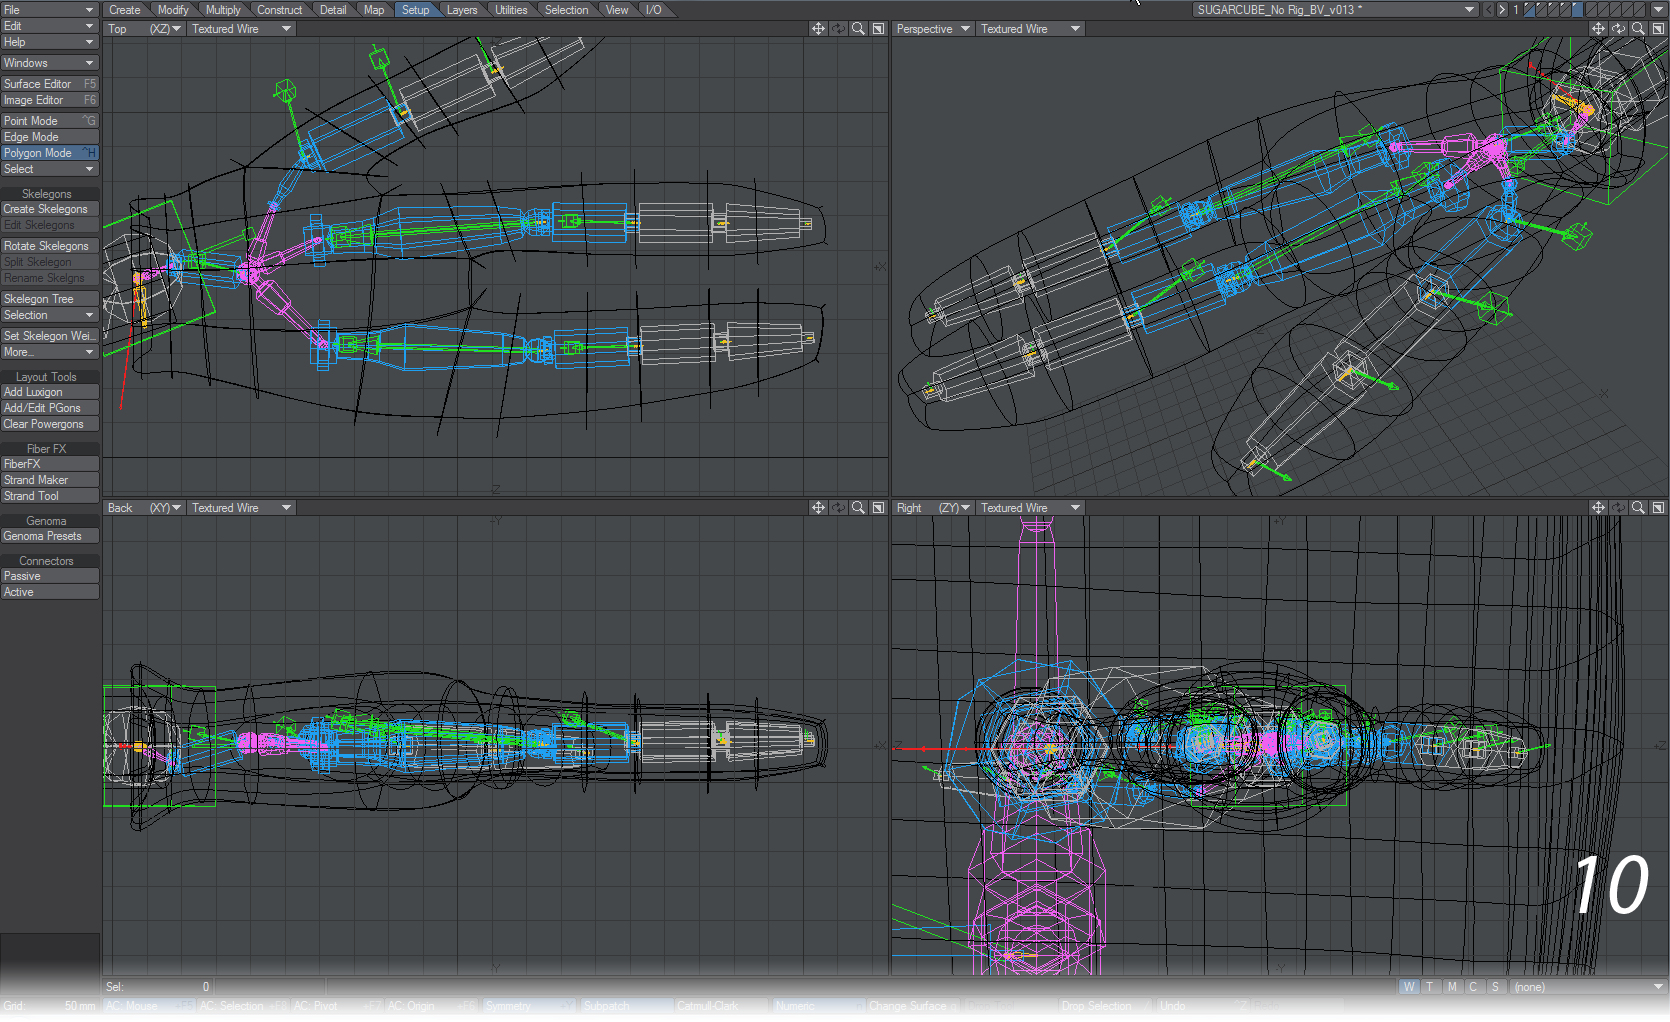
Then you need to reshape the remaining fingers so they fit the geometry nicely (10).
That’s fitted the right hand now. Because of the way Genoma works, all we need do is select the right hand up to the pink connector and mirror. Just weld the left-hand magenta connector to the end of the left arm and we’re good to go.
Step 3: The Legs and Feet
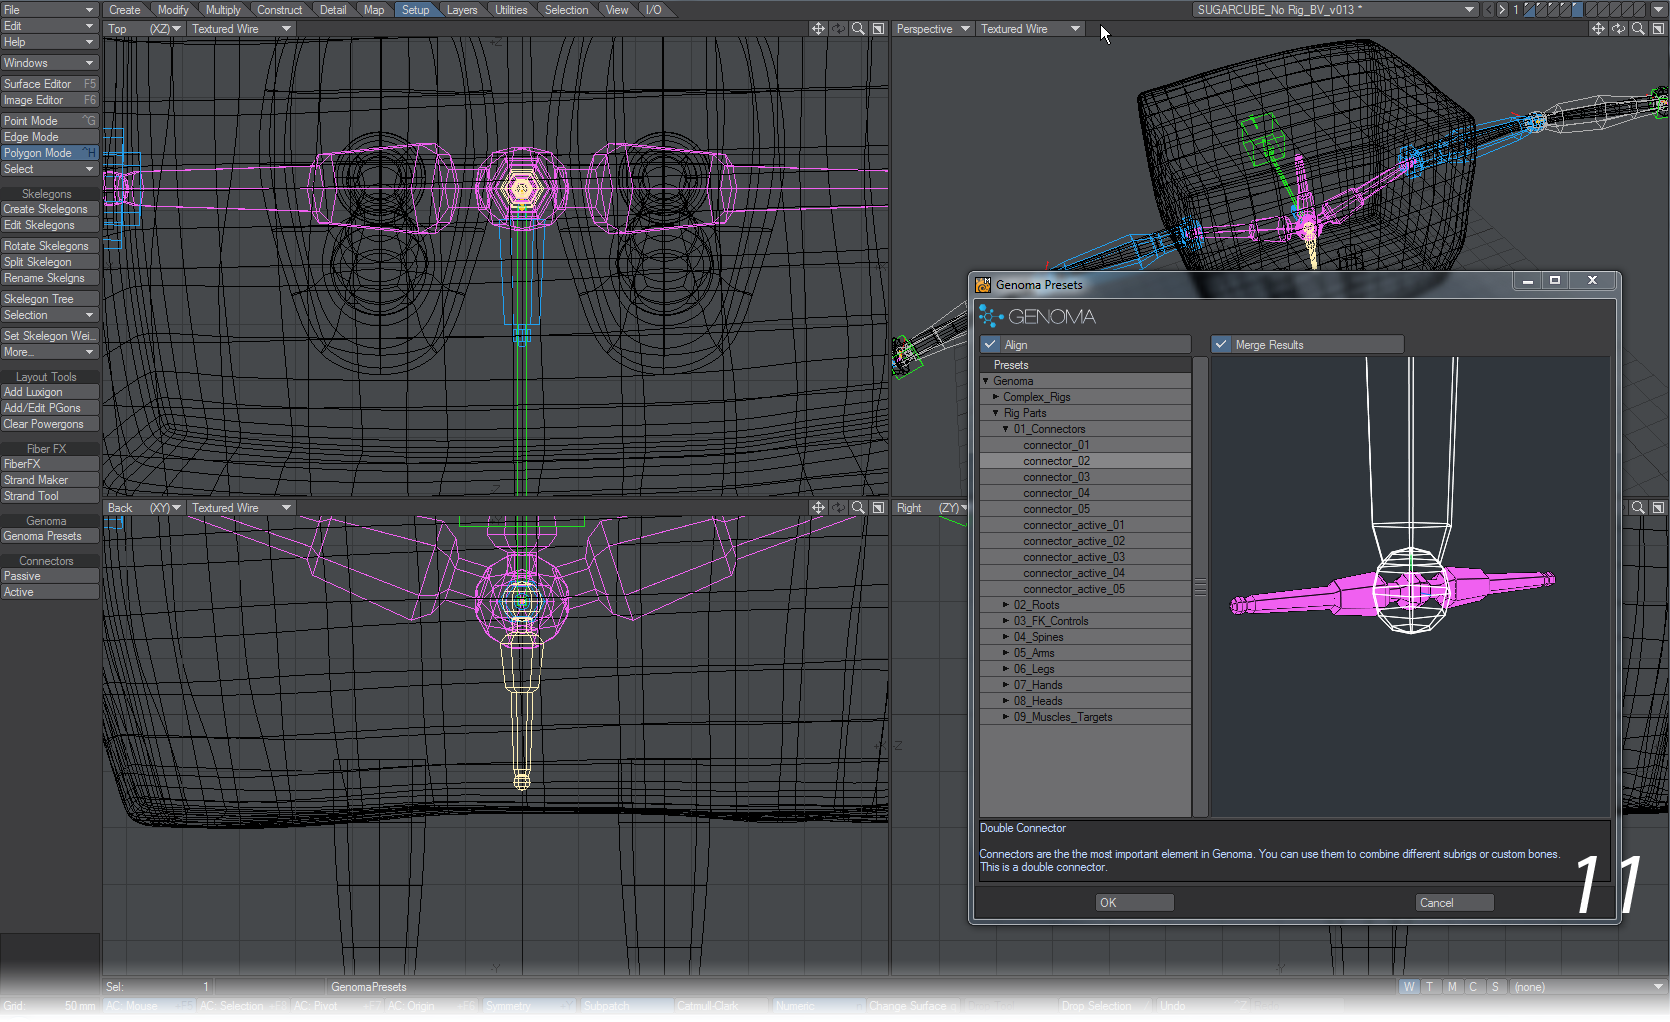
To add legs and feet to our character we add a connector to our “pelvis”. Select the “pelvis” connector and choose Genoma Presets > Rig Parts > 01_connectors > connector_02 (11).
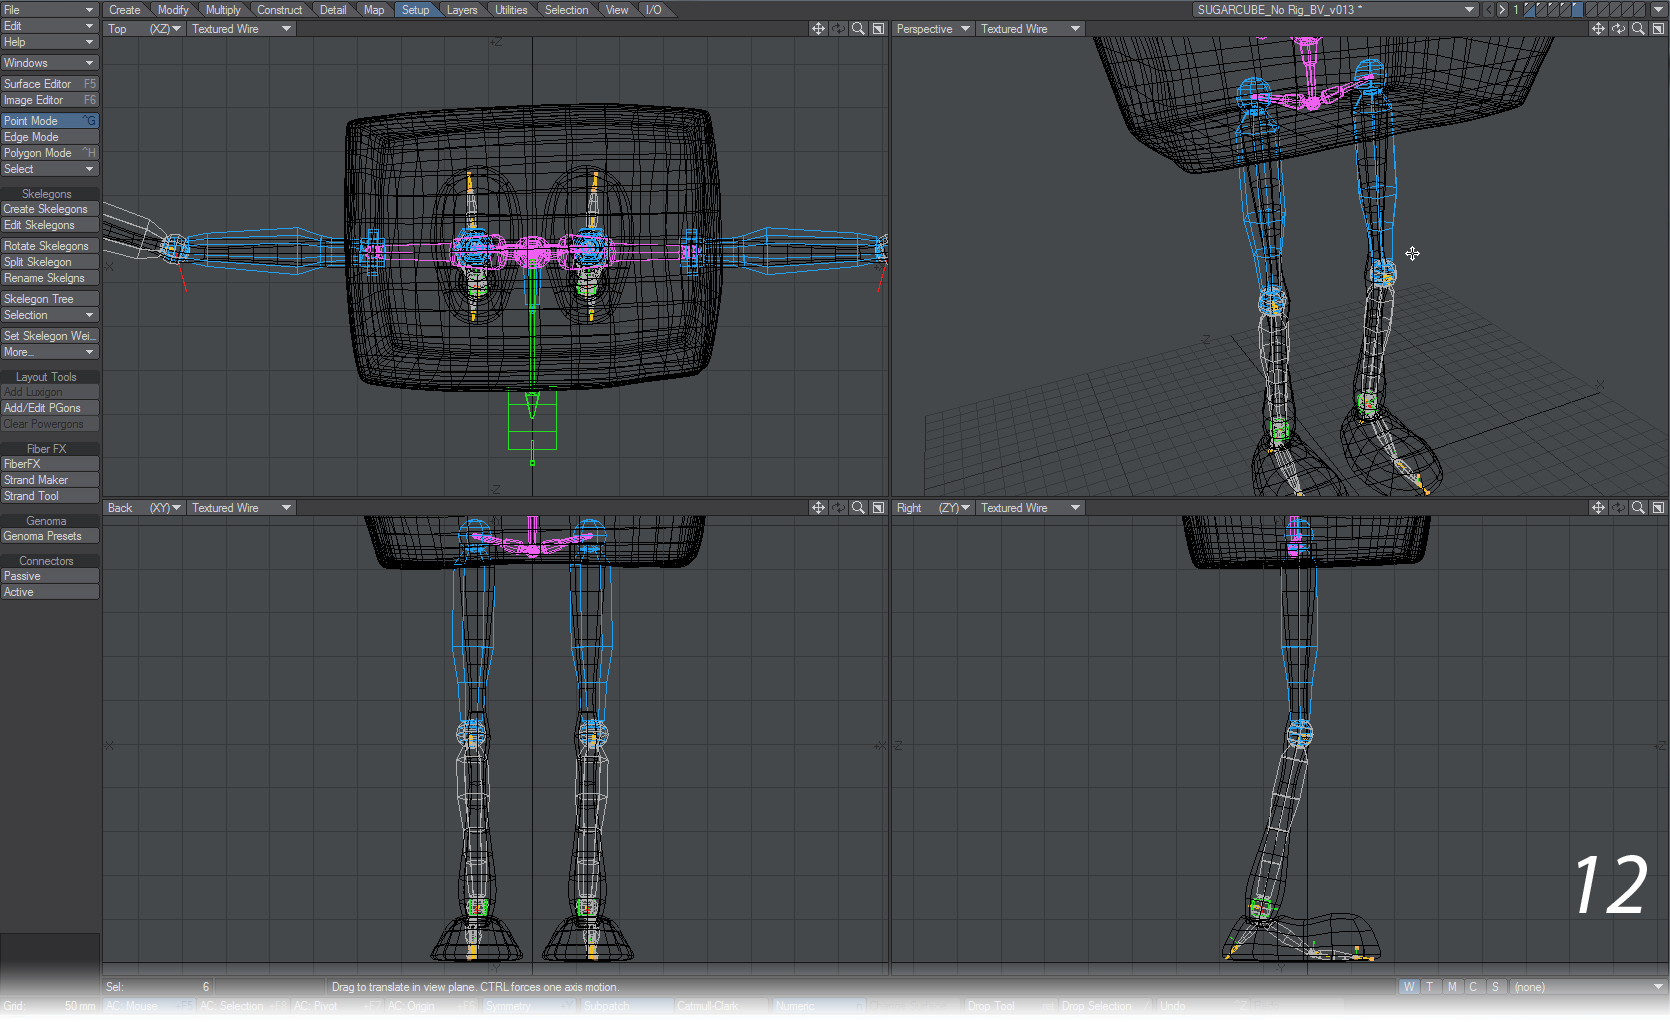
Using Symmetry move the ends of the connectors into place over the middle of the legs and go to the Genoma Presets window again. This time, choose Genoma Presets > Rig Parts > 06_legs > leg_foot_01. The legs will come in horizontally, but make sure Symmetry is still on and rotate them into position. You will need to do some massaging to get the joints into position and fill out the foot (12).
Step 4: Moving to Layout
The rig is now done and almost ready to send to Layout. There are a couple of steps to perform first in Modeler to make sure everything works. First weighting. Weight maps have already been created for the model, so assign the parts of the rig that make up each arm, each leg and each finger using the updated Set Skelegon Weight tool. You should then select the parts of the rig that are in the cube itself and assign them the ROOT weight map. Lastly, Genoma requires that your model only contains one layer and that the bones-to-be are in it with the geometry so cut the rig from the layer it’s on and paste it into the same layer as the geometry.
Now we send our object to Layout. Normally it is recommended to change the display mode to Bounding Box to speed up the conversion of a rig to bones, but because our sugar cube is very simple you can go ahead as it is. Go into the Setup tab and hit Create Rig in the Genoma section.
After a moment, during which messages about cyclic dependencies will appear that are nothing to worry about, you will get the following message:
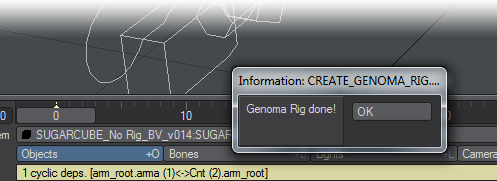
You can now test how your character deforms and moves. Use the controllers that appear on your character, don’t try to use individual bones. If you need to change something, revisit Modeler and make your changes. When you are satisfied return to Layout and use Update Rig. Any animation you have applied to the rig will be lost as the rig is remade, so deformation should be thoroughly checked before you start animating in earnest. Once the rig is to your satisfaction, a suggestion is to use the object picker to filter out everything that isn’t the model.