Screamernet OSX
Introduction
LightWave’s LWSN (LightWave ScreamerNet) allows standalone, batch and network rendering across multiple platforms including Mac OS X.
LightWave’s Config Files are plain text files that store basic configuration information for LightWave and LWSN. It’s very important that you know where these config files are located so that both LightWave and LWSN can access them. It’s also important to understand which LWSN relevant settings are stored in the config file, and how to use them.
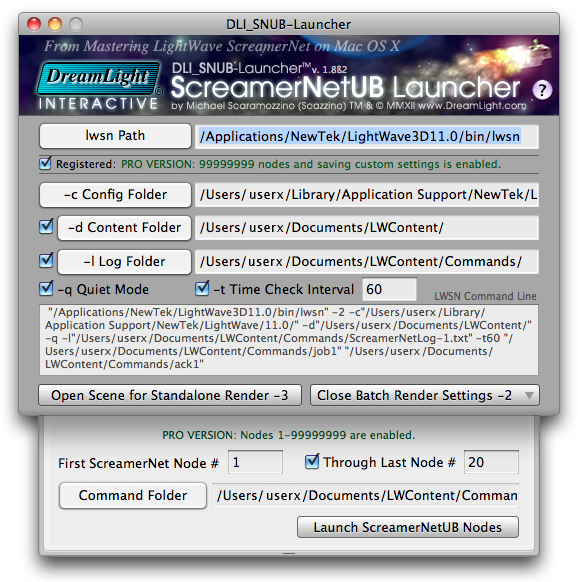
The explanation in these docs is mainly written by Mike Scaramozzino from DreamLight Interactive and are published here with his kind permission. Mike has spent many years rendering using Screamernet and has created a tool to make it all much easier with no use of Terminal required. Visit his site at and check out the DLI_SNUB-Launcher.
Updating LightWave’s Config Files
LightWave only updates the config file when you quit the program. Therefore anytime you make changes to any of the config settings you must be sure to quit LightWave to ensure that the changes are written to the config file itself. LWSN only reads the config file when first launched. Therefore, if you wish to make changes to the config file for LWSN and you are using a single config file for both Lightwave and LWSN, you should perform the following steps:
- Quit LWSN.
- Launch LightWave.
- Make changes to the desired config settings in LightWave, as discussed later.
- Quit LightWave to write the changes out to the config file.
- Launch LWSN again so it reads the updated config file.
- Launch LightWave again if you are using the built-in network controller to manage LWSN.
LightWave’s Config File Path on Mac OS X
On Mac OS X the default location of the config files is:
YourHD/Users/username/Library/Preferences
Replace YourHD with the name of your hard drive where your home directory is located and replace username with your user name.
Keep in mind that, by default, the config files are stored in the Library:Preferences folder that’s inside your home folder, not in the Library:Preferences folder at the top level your system hard drive.The config files for LightWave 2019 on Mac OS X are named as follows:
- Extensions 2019 - Complete list of file paths to all available plugins
- Hub 2019 - Basic Hub Settings
- Layout 2019 - Basic Layout Settings
- Modeler 2019 - Basic Modeler Settings
You don’t need to specify any of these config files by name, only the path to the directory where they are stored, and that’s only if you decide to keep your config files in a location other than the default. If you leave the config files in their default location, you do not need to specify their path for LightWave, Modeler, the Hub, or for LWSN. In this case each individual Mac OS X user would also have their own configs, since they would be stored in each user’s home folder.
You may wish to store your configs in different locations in some advanced situations, such as:
- When running different versions of LightWave on the same machine.
- When different users use the same Mac and you all wish to use a single set of configs.
- When running ScreamerNet over a network with a common set of configs for all nodes.
- When running ScreamerNet over a network and using separate configs for machines with varying resources, such as available RAM or number of processors.
Creating a New Set of Config Files
The following steps will show you how you can easily create a fresh new set of config files in a new location if desired.
- Locate your LightWave installation, typically: YourHD:Applications:NewTek:LightWave2019
- Inside the LightWave2019 directory, create a new directory named Preferences.
- Start Layout and Modeler and quit them. You will find your Preferences folder contains config files for LightWave.
If you run into various problems with LightWave and suspect corrupted config files, you can delete them and use the above steps to recreate a fresh new set of config files in their current location.
Config Settings for LWSN
The following settings are stored in the LightWave Config file named: LightWave Layout 2019 Prefs and are used by LWSN: Content Directory, Command Directory, Default Segment Memory, and Multithreading.
Content Directory
ContentDirectory YourHD:Applications:LightWave2019:Content:Along with a full complement of paths to the Content Directory’s special subdirectories, such as :Images, :Objects, :Scenes, etc. If you wish to use LWSN successfully you must learn to properly use LightWave’s Content Directory structure to package your projects correctly.
A Content Directory in LightWave is very similar to a Web site’s root directory. When used properly, all necessary file paths are specified relative to the root directory, and all files are located in subdirectories of the root directory. This means the root directory is a self contained unit that may be moved as desired, including to other machines, without breaking all the dependent file/directory links.
In LightWave, the Content Directory itself may be named whatever you like, but there are some specific subdirectories that LightWave expects to find inside the Content Directory that you should not rename or move. These special subdirectories are named Images, Scenes & Objects. They are where you should store all your image, scene and object files respectively, for a project. You may name your files anything you wish (being sure to use proper file extensions), as long as you place them in the proper subdirectories.
Command Directory
CommandDirectory YourHD:Applications:LightWave2019:bin:The Command Directory is the directory that contains the job command file and the acknowledgement file. These are two plain text files that the network controller uses to communicate with an instance of LWSN during batch or network rendering.
The communication goes like this:
- The network controller creates a job file.
- The network controller writes a command into the job file.
- LWSN reads the command from the job file.
- LWSN attempts to perform the command.
- LWSN creates an acknowledgment file.
- LWSN writes a reply to the acknowledgment file.
- The controller reads the reply from the acknowledgment file to decide what to do next.
These files are named: job# and ack# where # is replaced with the number of the LWSN node to control. If only one instance of LWSN is being used these files would be named job1 and ack1. For a second instance of LWSN, they would be named job2 and ack2, and so on. As in config files, no “.txt” extension is used. Also note that there is no leading zero, space or anything else between the number and the words job or ack.
LightWave defaults the Command Directory to the LightWave bin Directory. LWSN on Mac OS X however uses the Content directory as the default Command Directory. This means it will not run as configured with the defaults, you must at least change one of these two settings.
Both the user running the network controller (typically LightWave or a third party controller) and the user running LWSN (if different) must have read/write access to the same Command Directory. Non-administrator users don’t typically have write access to the Applications directories on Mac OS X. Therefore, it is suggested to use a shared Content Directory, with read/write access for all users, and keep everything relative to this shared Content Directory, including my Command Directory.
A typical Content Directory , with its own Commands directory may look like this:
Here’s a step-by-step example of how to configure such a simple self contained Content Directory with its own Command Directory.
- Launch LightWave.
- Set LightWave’s Content Directory with: Edit > Set Content Directory… to your desired Content directory, or by loading the scene you want to render.
- Select Utilities > Network Render .
- Click the Command Directory button.
- Navigate to the same Content Directory you set in step 2.
- Create a new folder named Commands inside the Content Directory.
- Click the Choose button to close the dialog and accept the changes.
- If asked to initialize the ScreamerNet, click No.
- Quit LightWave to save your changes to the config file.
- When using the Terminal to launch Screamernet (fully explained later) use the following Content relative command file paths, replacing # with the number of the LWSN node:
“:Commands:job#” “:Commands:ack#”
Starting an LWSN Session
ScreamerNet lwsn is a Unix executable that runs in the Mac OS X Terminal. You can use a variety of command line parameters to manually configure and launch lwsn in Terminal.
There are a few common command line parameters that are used to tell ScreamerNet lwsn what to do. The following general command line parameters may be used when running ScreamerNet lwsn in any mode. Additional mode specific command line parameters are discussed later.
The general command line syntax is as follows, all on one line.
<mode#> [-c<config directory>] [-d<content directory>] [-l<log file>] [-q] [-t]
Rendering Mode
-<mode#> : The mode number parameter specifies which rendering mode to use.
- -2 - Signifies batch or network rendering mode which may render multiple scenes on multiple nodes.
- -3 - Signifies standalone rendering mode which renders a single scene on a single node.
-c Config Directory
-c - Optional: Path to the folder that contains the config file.
An example of this parameter with the initially searched Config Directory path is as follows:-c”/Applications/NewTek/LightWave3D2019/Preferences”
-d Content Directory
-d - Optional: Path to the folder that contains your content.
An example of this parameter with a sample Content Directory path could be as follows:-d”/Users/username/Documents/LWContent”
Where username should be replaced with the current user name. This example would be to use a folder named LWContent in your Documents folder as your content folder. If this option is not specified, the content directory defaults to the content directory specified in the config file through LightWave. Therefore, if you set your content directory in LightWave itself, and you have ScreamerNet lwsn on the same machine using the same config file as LightWave (which it does by default), you do not need to specify this option in the ScreamerNet lwsn terminal command line, unless you wish to use a content directory that is different than the one currently set in LightWave. You would also need to specify this path if you were running ScreamerNet lwsn on a different machine than you are running LightWave.
Please review Config Files: Content Directory, for important information about using LightWave’s Content Directory properly.
-l Log File
-l - Optional: Path to a text file to write the ScreamerNet lwsn output into.
An example of this parameter with a sample Log File path could be as follows:-l”/Users/username/Documents/LWContent/ScreamerNetLog.txt”
Where username should be replaced with the current user name. This example would use a Log File named ScreamerNetLog.txt in a LWContent folder in the current user’s Documents folder. If this option is not specified then the text messages generated as output would appear in the Mac OS X terminal window that is running ScreamerNet lwsn. The current user must have read/write permissions for this file.
-q Quiet Mode
-q - Optional: Suppresses terminal output during frame rendering, still reports as each frame finishes.
Normally while ScreamerNet lwsn is busy rendering it outputs quite a bit of text information to the terminal interface. This can be useful for monitoring progress and troubleshooting problems such as missing plug-ins, etc. Once everything is up and running however, all this text writing to the terminal may be unnecessary. The -q parameter turns off all the output during the rendering of an individual frame. You’ll still get text output during the scene loading and between rendered frames, but not during frame rendering.
Here’s an example of what the output for one frame normally looks like, without the -q parameter:Scene loaded. Allocating frame buffers. Allocating segment buffers. Frame: 1. Segment: 1/1. Pass: 1/1. Updating geometry. Moving DLI_Floor_01F (1). Moving DLI_SuperBall_01H. Moving DLI_Floor_01F (2). Preprocessing Frame.... Computing preliminary radiosity solution.... Rendering frame 1, segment 1/1, pass 1/1. Image Reconstruction. Image Reconstruction : 0%. Image Reconstruction : 4%. Image Reconstruction : 8%. Image Reconstruction : 13%. Image Reconstruction : 17%. Image Reconstruction : 22%. Image Reconstruction : 26%. Image Reconstruction : 31%. Image Reconstruction : 35%. Image Reconstruction : 40%. Image Reconstruction : 44%. Image Reconstruction : 49%. Image Reconstruction : 53%. Image Reconstruction : 58%. Image Reconstruction : 62%. Image Reconstruction : 67%.
Image Reconstruction : 71%.
Image Reconstruction : 75%.
Image Reconstruction : 80%.
Image Reconstruction : 84%.
Image Reconstruction : 89%.
Image Reconstruction : 93%.
Image Reconstruction : 98%.
Freeing segment buffers.
Allocating filter buffer.
Freeing filter buffer.
Allocating segment buffers.
Writing RGB image to /Users/user/Documents/DLI_SuperBalls/Renders/DLI_LW-SuperBalls-Anim_001.jpg.
Frame completed.
Last Frame Rendered: 1.
Rendering Time: 1m 9s (69.3 seconds).
Freeing segment buffers.
Freeing frame buffers.
Here’s what the the same output looks like with the -q parameter included:Scene loaded. Last Frame Rendered: 1.
-t Time Check Interval
-t - Optional: Time check interval in seconds.
An example of this parameter with a sample Time Check Interval could be as follows:-t60
This sample would have ScreamerNet lwsn attempt to check the job file every 60 seconds for status or abort commands when rendering in batch/network mode -2. Other commands in mode -2 are ignored. When rendering in standalone mode-3 ScreamerNet lwsn would report its current status every 60 seconds.
Normally, once ScreamerNet lwsn begins rendering a frame, it does not check the job file for any further instructions until the frame finishes rendering. During the initial setup and testing of your render farm or when testing a new scene, it may be useful to allow ScreamerNet to check the job file for abort or status commands. Particularly if individual frames take a long time to render. This way, if you notice a problem at the beginning of rendering (a missing plug-in for instance), you can abort the rendering without having to wait for all your nodes to finish rendering an entire frame each or force quitting each node.
For instance, if your frames use ray tracing, area lights, radiosity, caustics, high antialiasing levels, motion blur and/or depth of field, they may take a long time to render. In this case you could set -t to 60 seconds, then ScreamerNet would try to check the job file every 60 seconds to see if the job should be aborted or if status information should be written to the output. During certain processing, ScreamerNet may still take longer than 60 seconds before it can check, but it doesn’t have to wait for an entire frame to render before being able to stop or report status. Once you are sure everything is running smoothly, it is best to remove this option, so that no extra time is taken checking the job file or reporting status unnecessarily, especially if you are network rendering many frames.
Batch/Network Mode (-2) Command Line Syntax
The batch & network mode (-2) specific command line syntax is as follows, all on one line.
-2 [-c<config directory>] [-d<content directory>] [-l<log file>] [-q]
[-t<check interval>] <job file> <ack file>
The first five parameters are explained above under General ScreamerNet Command Line Syntax.
Job File
<job file> - job# File path & node number for lwsn to read commands from.
A sample job file path could be as follows:“/Users/username/Documents/DLI_SuperBalls/Commands/job1”
This example reads the job1 text file in a Commands folder in a DLI_SuperBalls folder in the user’s Documents folder, where username should be replaced with the current user name.
The number should immediately follow the word “job” without any spaces and there must be no file extension, such as “.txt” added to the end of the path.
Make sure that your job# and ack# both use the same number. This number is what actually determines the CPU number of the ScreamerNet node so that the ScreamerNet network controller may communicate with this lwsn render node.
Ack File
<ack file> - ack# (acknowledgment) File path & node number for lwsn to write replies to.
A sample ack file path could be as follows:“/Users/username/Documents/DLI_SuperBalls/Commands/ack1”
This example writes to the ack1 file in a Commands folder in a DLI_Superballs folder in the user’s Documents folder, where username should be replaced with the current user name. The current user must have read/write permissions for this file.
Standalone Mode (-3) Command Line Syntax
The standalone mode (-3) specific command line syntax is as follows, all on one line.
-3 [-c<config directory>] [-d<content directory>] [-l<log file>] [-q] <scene file> <first frame> <last frame> [<frame step>]
The first five parameters are explained above under General ScreamerNet Command Line Syntax.
Scene File
<scene file> - Full path to the scene file.
A sample of a full scene path could be as follows:“/Users/username/Documents/DLI_SuperBalls/Scenes/SuperBalls-Anim.lws”
Where username is replaced with the current user name. Be sure to use a full path to the scene file rather than a Content Directory relative path because Content Directory relative paths may not work on some versions of ScreamerNet UB lwsn on the Mac. Also be sure to enclose the entire path in double quotes, especially if it contains spaces or other special characters.
Frames to Render
- <first frame> - First frame to render. Normally less than last frame but may be greater than last frame if frame step is negative.
- <last frame> - Last frame to render. Normally greater than or equal to first frame but may be less than first frame if frame step is negative.
- [<frame step>] - Optional: defaults to 1, may be positive or negative.
Frame step specifies which frames to render between the first and last frame, and in what order. When set to 1, ScreamerNet would render every frame from the first frame, up to the last frame. When set to 2, ScreamerNet would render every other frame from the first frame up to the last frame. If set to -1, ScreamerNet would render every frame from the first frame, down to the last frame and in this case the first frame should be greater than the last frame to render in reverse order.
Mac Alternatives
For using Screamernet on the Macintosh, Dreamlight Interactive’s DLI_DSNUB Launcher is a simple drag and drop configurator for Screamernet, removing the need to use the Terminal.