VPR
VPR (Viewport Preview Renderer) is Layout’s native Interactive Render. Essentially, VPR is the LightWave renderer in a next gen interactive form. The VPR Interactive Renderer handles Radiosity, Ray-Tracing, Reflections, Refractions, and Transparencies - pretty much anything in short - to provide stunning LightWave renders as quickly as possible.

VPR is activated in the Viewport Display menu by selecting VPR instead of one of the standard OpenGL view types. Once activated the viewport will begin rendering using the settings in the Render Globals panel. VPR will continually update when changes are made.
VPR Render Controls
The render settings for VPR are located in the top-right section of each viewport. Look for the highlighted button.


- Draft Mode - an optional way for VPR to start, is an optimized setting for VPR which has limitations but results in faster image iterations. Using this mode does not affect any of your F9 renders. This setting is also available in the Viewport Options menu.
- Render Alpha - Available only when not in Draft mode and checked by default. See below
- Half Resolution - will cause VPR to render only at half-resolution.
- Pixel Smoothing - Affecting the initial drawing of the VPR image, Pixel Smoothing interpolates between the power of two pixel sizes resulting in a more “readable” image earlier.
- Render Outside Camera - Unchecked by default. This renders only the view seen by the camera. If you want the whole viewport rendered you can check this option.
- Volume Shadows - will render shadows resulting from volumetrics in the scene. This includes fibers generated from Fiber FX.
- Normalize Display - Designed for viewing buffers in VPR that would normally exist in a 0-1 representation that results in a white screen in VPR. Buffers like Depth just present an all-white screen in VPR, but the information is there. Using Normalize Display will convert the depth values into a 0-255 scale.
- Interactive FPS - is the frames per second VPR will attempt to update the render. A Render FPS setting of 30 will attempt 30 redraws per second, while a Render FPS setting of 1 will attempt only one redraw per second.
VPR Progress Meter
![]() 2019.1 adds progress bars to VPR viewports to give a better guide to completion. A progress bar is added for each VPR viewport:
2019.1 adds progress bars to VPR viewports to give a better guide to completion. A progress bar is added for each VPR viewport:


With one, then two VPR viewports above, but also more:

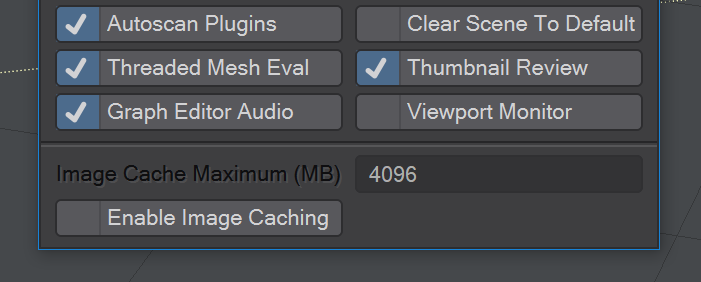
This meter is switched off by default, so don't be surprised if you don't see these bars right off. Visit Options (O), and at the bottom of the first tab you'll see a new option, Viewport Monitor.
Normalizing
Normalize Display shows spheres at varying distances from the camera in the Depth buffer
If your normalized depth buffer is only showing black or white for geometry, make sure the Depth Buffer options are set correctly for your scene. Visit Render Properties (Ctrl+F9) > Buffers > Depth and set the Options to an appropriate range for your scene.

Alpha Channel Support for VPR
VPR supports the saving of images with Alpha channels. This functionality is limited to Final quality VPR images, not Draft. Images will take a very small amount more time to render to completion, but all image savers listed as 32 in the Image Saver list will save with an Alpha Channel. Savers that only have 24 listed will still not have Alpha Channels.
VPR Save and View Controls
These settings are applied to the Save button in the viewport that will save an image with the settings here without dialog. Images will not have OpenGL overlays and will be saved at the moment you hit the button, which means that they might not be in a final state.

- Type - is the image file type.
- RGB Files - is the location where an image saved with the viewport button will go and with what base name, by default Image .
- Color Space - sets the color space options for the saved image.
- Alpha Color Space - The Color Space for the Alpha channel. Normally, this should be left at Linear.
Add Display
You can send the VPR viewport to an external display. Provided is 3D Vision Pro for use with NVidia graphics cards and suitable 3D viewing hardware.
Additional VPR Controls
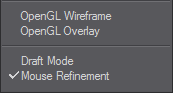
More options are available in the Viewport Options menu:
- OpenGL Wireframe will display the wireframe of the mesh over the VPR rendering.
- OpenGL Overlay will display the OpenGL components such as the grid and transform widgets over the VPR render.
- Draft Mode presents a faster render, but with limitations, as described below.
- Mouse Refinement was added in LightWave 2018 and concentrates rendering on where the mouse is over the viewport. It means that you can have a faster preview of an area of interest without having to wait for the whole render to finish. Mouse refinement doesn't start immediately, there needs to be a level of rendering complete overall before it can work.
When VPR finishes rendering, information about the Render Duration and the number of Rays per Second fired is shown in the Tool Tips.
VPR Draft Mode Limitations
VPR’s Draft Mode is designed to show you renders as quickly as possible, however, it doesn’t support everything of which VPR is capable. Here’s a list of VPR Draft mode limitations:
- Motion Blur is disabled
- Depth of Field is disabled
- The Adaptive Threshold is set to 0.1
- Minimum Samples is set to 1 and Maximum Samples is 9
- Oversampling is set to 0.5 and uses Filter Radius
- Light, Reflection, Refraction and Scattering samples are limited to 4.
- Ray Recursion Limit and Reflection Bounces are set to 4 but the Reflection Recursion Limit is set to 2
- Diffuse Bounces is set to 1
As you can see, to get a true view of your render, better to get out of Draft mode as you are nearing project completion, especially if you are going to require an F10 render sequence and want no surprises because your rendered images don’t look the same as your VPR previews.
VPR Examples
Some pictures of the Layout interface showing VPR’s different modes. We haven’t shown Stereoscopic or Depth of Field but both require VPR to be in Final mode.

OpenGL Textured Shaded Solid

OpenGL Textured Shaded Solid Wireframe

VPR Draft

VPR Final

VPR Final with OpenGL Wireframe

VPR Final with OpenGL Overlay

VPR Final with limited region. Useful for when you just need to verify a detail but don’t want to wait for a complete render.
VPR Final with all the overlays

VPR Final with Depth of Field and Stereoscopy
Creating a VPR Preview
While VPR is running, you can create previews just as with any other viewport display mode. You also have the choice of either making the preview in a viewport or as a separate window. To do so, visit the Display Options tab of the Preferences window (D) and check Undock Preview Win. You can also choose to use the Camera Resolution, but beware with this that your camera resolution isn’t bigger than your screen resolution (you can hit Esc to leave the window). This setting is only kept for the scene you are in, so when you create a new scene you will need to Undock the preview window again if you so desire.
The last option is to set the Preview Scale Level. This setting applies whether you undock the Preview window or create a preview in a viewport and offers a dropdown with a choice of Antialiased at the top down to Every 32 pixels at the bottom. Obviously, the lower the resolution, the faster the preview will render. It’s up to you to determine what level of detail you require from your preview.

Antialiased

Every 4th Pixel
