Flocking
About Flocking
LightWave’s flocking system is based on 3D computer models of coordinated animal motion, things like flocks of birds, herds of animals or schools of fish. It can be used with LightWave’s instancing system or HyperVoxels.

The flocking algorithm itself is based on just three principles in order to create this seemingly complex motion. These are Separation, which keeps your flock from getting overcrowded; Alignment, which keeps the flock all heading in roughly the same direction; and Cohesion, which is effectively the opposite of separation and keeps your flock bunched together.
Flocking can be seen in OpenGL and VPR. Instances and HyperVoxels controlled by Flocking can be motion blurred and use Depth of Field like other instances. Hypervoxels, like other volumetrics need the camera to be moving to be compatible with Photoreal Motion Blur (PRMB).
Flocking doesn’t currently work with negative frames.
When using Flocking with network rendering (LWSN, for instance) you must bake your Flocking results.
Using Flocking
In order to set up Flocking in LightWave you will need a flock and at least one director. This director can be a goal or something to avoid, meaning you can either lead or chase your flock. An effector can be as simple as a null object though you can attach a director to geometry - for instance, the leader of the pack or the nasty predator chasing the herd.
The director needs to move to excite the flock into movement of their own. Although an unmoving goal will draw the flock to it, it’s not very interesting behaviorally. It should also be stated that the behavior of the flock is completely deterministic, there is no fractal randomness here. A flock animated on one machine will work in exactly the same way on another, and more importantly will render the same too.
Setting up a Simple Flock
- We’ll start with an empty scene of 200 frames to which you add Flocking from the Windows menu, or the FX Tools tab.
- In the Flock Master window add a Generator . The defaults won’t give us a very interesting result, so change the following values:
Count X : 10.0 Count Y : 10.0 Count Z : 10.0 Size X : 4.0 Size Y : 4.0 Size Z : 4.0
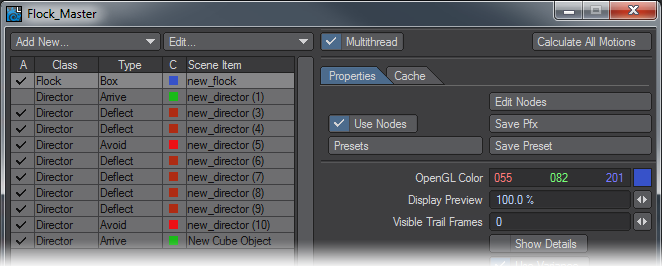
This will give us a flock of 1,000 agents ready to fly. - Add a Director - Goal to your scene and move it off in the distance. For this example ours is moved about 20 m in the Z. If you hit Calculate All Motions now and then Play on your timeline your agents will all head off to the goal, avoiding bumping into each other, but otherwise not interesting until they reach the goal, at which point they overshoot and try to reach it again, and again.
- So we’ll give them something to avoid. Add a Director - Deflect and change its Deflect Core and Strength to 5.0 and 3.0 respectively. Position it about halfway between your flock’s starting point and the goal. Hit Calculate All Motions again and you should get something like the image below:

To get the pretty colored trails for your flock, increase the Show Trails number. It represents the number of frames before and after the current one that will be shown.
Make sure you hit the Calculate All Motions button each time you make changes to your flock or directors before you press Play on the timeline again.
Overview of Controls
Flocking is composed of several custom objects all controlled through a central Master Window as we saw in the first simple example. You can always control your flock and directors through the Object Properties > Geometry > Custom Object window and your settings will be duplicated in the Master Window. For simplicity, this documentation will only describe the presentation of the settings through the Master Window interface.
This window has three main sections. Across the top we have two dropdown menus and the Calculate All Motions button. Down the left we have a familiar listview of all the flocking elements in the scene. On the right, the settings for each individual element broken down into tabs.
Menus
- Add New...
- Generator - will create a Null-based flock generator.
- Director - Goal - will create a Null-based director that your flock will gravitate towards.
- Director - Avoid - will create a Null-based director that will repulse your flock directly away.
- Director - Deflect - will create a Null-based director that will push your flock away tangentially.
- Director - Arrive - will create a Null-based director with deceleration rules for your flock.
- Director - Path - Will create a null-based director that will be the basis of a Path director. You will need to animate the null over the course of the scene for it to work.
- From Scene Items
- Generator - This allows you to add a Flocking generator custom object to an existing scene item.
- Generator from Mesh Points - If you use this option it turns the points in the object into placement for your initial flock giving the opportunity to create initial flock shapes other than the default box or sphere.
- Generator from Mesh Polys - As above but uses the mesh’s polygons to place the flock. In both cases, flocking rules apply so if the points or polygons are too closely spaced the flock will initially explode outwards.
- Director - Goal, Arrive - Adds a Director custom object to an existing scene item.
- Director - Avoid, Deflect - As above.
- Director - Path - Will create a Director from a null that you have animated over the course of the scene..
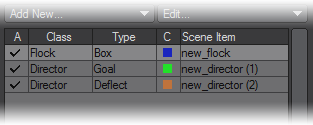
- Basic Setup - Creates a Generator and a Goal Director , both will be placed at the origin. This is simply a rapid way of adding flocking to a scene, since in most cases that is what you will do.
- Predator-Prey - This will create a pair of flocks - one predator, one prey. The prey will have a Goal Director attached to it so that the predator flock will rush towards the prey flock. The predator flock has an Avoid Director attached so as it rushes toward the prey they scatter. You will want to adjust the base values
- Edit...
- Remove Selected, Remove All - Removes either the selected flocking generator or director, or removes them all at once.
- Duplicate - An exclusive operation (copy operations outside the Flocking window do not affect what you have copied inside it) that allows you to duplicate Flocking elements .
- Rename - Renames the selected item.
- Multithread - A toggle to optionally multithread flocking calculations. Some calculations are actually quicker to calculate single-threaded, which is why this is left as an option.
- Full Evaluation - Forces deformations to be evaluated per frame, to make sure the agents react to the final deformed positions of the meshes. If you just use the regular Calculate button Flocking takes a best guess if you need full evaluation or not, since full evaluation is about ten times slower…
- Calculate all motions - The most important button in the Flock Master window. Make sure you hit it every time before you hit play in the scene. Calculations should not take very long to accomplish, even with complex flocking motions.
Items List
The listview on the left contains the following fields:
- A (checkmark)- Determines whether the element is active in the scene.
- Class - Whether the item is a generator or director.
- Type - What sort of generator or director the item is.
- C - The display color in OpenGL
- Scene item - the name of the item for the scene.
Generator/Director Cache Settings
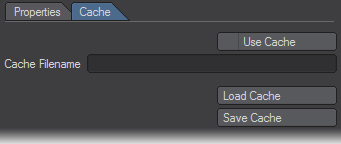
Starting with the Cache tab since that is unique for all flock elements, this tab controls caching for the scene to make it less processor-intensive.
- Use Cache toggle - Ticking this will lock the Properties tab completely, you will not be able to make new changes to the behavior of your flock or directors.
- Cache filename - When Use Cache is on, this field is ghosted and serves only to be able to read the cache filename and location.
- Load Cache - This button is available whether you are using a cache or not and allows you to load a different saved solution for your flock elements.
- Save Cache - Available when Use Cache is not enabled, presents a file requester where you can choose where your cache will be saved.
Director Properties
Directors are the Flocking elements that direct flocks. There are several choices to make when picking the type you want:
- Goal - The flock will be drawn to this director in as direct a route as possible.
- Arrive - As above, but there is a user-definable deceleration zone surrounding the director.
- Avoid - The flock will flee this director in as direct a route as possible. If the Avoid director is large, the flock may stutter as it tries to find its way around.
- Deflect - The flock will flee this director in a more tangential fashion giving a smoother result.
- Path - The animation path for this Director will be used as a path for the flock to follow.
- Plane - The flock will not cross an infinite plane. Multiple planes can be set up to provide a tunnel.
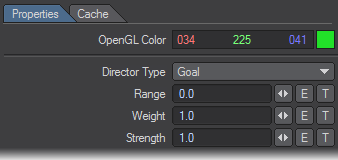
Goal and Avoid directors have the following options:
- Range - Leaving this at 0 will affect the whole scene. If you have multiple directors in a scene you can give them fixed ranges and when entering the range of a second goal some will peel off to go to the new destination. The Range circle shown in the viewport is an indicator of the linear falloff for the attractive power of the goal with maximum at the central point and 0 at the circle edges.
- Weight - For a Goal or Arrive Director this dictates how an agent will make a choice between two equidistant goals. A higher weight makes the director more attractive to the flock. For Avoid or Deflect Directors weight determines how repellent the directors are when there are multiple directors equidistant from the flock.
- Strength - Directors all apply a change in speed to an agent. Strength is a multiplier of that change. For an Avoid or Deflect Director Strength determines how far out from the central point of the director the flock will be permitted to come. Set the Strength high enough and the flock won’t enter the sphere of influence at all.
Deflect directors add a further option:
- Deflect Core - This is the inviolable core of a Deflect director. Flocks will try not to enter it.
Path directors add one additional option to Goal and Avoid directors:
- Steps - Defines the “resolution” of the path.
Arrive directors add two different additional options to Goal and Avoid directors:
- Arrival Radius - This determines the size of the arrival point for the Director.
- Decelerate Radius - This determines at what distance flocks should start to decelerate for landing.
Plane directors have no options.
 Path Example
The Motion Path option for a Director gives you a lot of direct control over your flock, with a little bit of chaos as some fall out of the path you give them. It creates a very natural-looking path-following animation. Here’s a quick guide how it works:
- Set your scene to 600 frames and change your viewport to Top. Zoom out so you can see the whole width of the grid. Create a Null.
- Give it a motion path over 300 frames. To simplify our starting example make sure the path doesn’t get too close to itself over its course.
- In the Flocking Master window choose Add New... > From Scene Items > Director - Path .
- Set the new path’s resolution. You want it to follow the null’s motion path quite closely. Here we have set 24 steps.
- Now Clone the Path null twice and change the two clones animation paths. The fact that the frames used for the paths is the same does not affect how the paths work in Flocking.
- Add a Generator in the Flocking window. By default it comes in at the origin, which is great for our first path.
- Hit Calculate All Motions in the Flocking window and you should see that your scene isn’t long enough for the flock to get to the ends of both paths, but the fact they separate into two groups is nice.
- We have added a couple of Arrive directors to the end of the right path and a Goal to the end of the left path and made our flock massively larger. More paths could be added to further subdivide the flock and the goals are radius-limited to only capture flocks that fly nearby.
Generator Properties
There is a main section common to all Generator types that lists several important things.
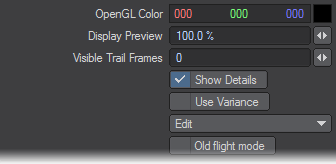
- OpenGL Color - Shows the color that will be chosen for the generator in OpenGL only. This has no bearing on rendered output.
- Display Preview - The percentage of your flocks you wish to show in Layout. If you are creating very large flocking scenes you don’t need the slowdown of showing all the elements at once.
- Visible Trail Frames - This shows a trail leading and following each flocking agent to the extent you request. Setting to 100 will show the path an agent will take both 100 frames in advance and 100 frames behind.
- Show Details toggle - With this on you will see the collision circle around the agent and an arrow denoting its direction and orientation. With it off, each agent is represented by a dot.
- Use Variance toggle - This toggle enables the Agent Variance tab explained below to be used otherwise it is grayed out.
- Edit - This presents a dropdown with the following options:
- Copy - Takes a copy of the current agent settings
- Paste - Pastes previously copied settings into this panel
- Copy to Variant - Copies the current base settings to the Agent Variance tab to reset the values to the same.
- Old Flight Mode - Provided for backwards compatibility with Flocking scenes set up in 11.0 - 11.0.3. Some users also prefer the flowing motion given to flocks by the initial algorithms, but they do not work well with Arrive directors, which were added later.
There are four tabs for Generator Properties as follows:
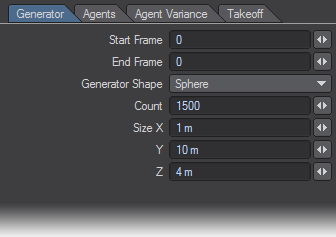
- Generator
- Start/End Frame - If you wish for your generator to begin animating your flock for the whole scene, leave these set to 0. If you wish a delayed takeoff set the Start value to a number greater than 0 and the flock will start to leave the generator at the time you choose. You will also need to change the End Frame for the time that the flock will have completely left the generator. Note that Sphere Generators will begin and end their movements randomly where Box generators are precisely ordered.
- Generator Shape - This dropdown offers two choices for the starting shape of your flock Box and Sphere (a Sphere generator distributes flock members randomly, while a Box generates a specifically-ordered grid). If you have used Object Properties to attach a Flocking Generator to an object you are also given two further choices:
- Mesh Points - There are two options. The Use Max toggle will set an agent at every vertex of the mesh, or you can use the Count field to determine how many you want to create.
- Mesh Polygons - As above. The agents will be placed at the center of each polygon.
- Count X/Y/Z - If you are using the Box or Sphere options, you can decide how many flocking agents you would like in your flock. For ground-based flocks use 1 in Y.
- Size X/Y/Z - If you are using a Box generator this is the length of each side, if a Sphere, the radius in each axis.
- Agents All the following options can be enveloped and driven by Textures.
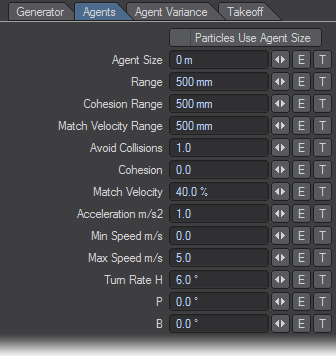
- Particles use Agent Size - This toggle allows you to duplicate the size you set here for particles, to be rendered with HyperVoxels or other particle systems.
- Agent Size - This is a hard sphere radius that agents cannot get closer than. Like marbles stacked in a jar they can touch but they don’t intersect, within the limits of the algorithm.
- Range - This is the range at which the agents attempt to avoid colliding with any other agents. This isn’t a hard collision, it simply directs agents away from each other to maintain a gap between them. All entities in a flock such as birds or fish, will attempt to steer to avoid crowding their neighbours too closely and this is the setting that defines the closest distance at which they start reacting. This couples with the Avoid Collisions option detailed below.
- Cohesion Range - This is the range at which the agents attempt to move towards each other to maintain formation. It can be considered the ‘stickiness’ of a group of agents, whether they stay in a big group or tend to splinter into small groups easily. This couples with the Cohesion setting detailed below.
- Match Velocity Range - This is the range at which agents try to match the direction of travel with their neighbours. In all groups of traveling things there is a general motion, usually each agent moves mostly in the same direction as its neighbors. This couples with the Match Velocity setting detailed below.
- Avoid Collisions - This is the strength of the agents desire to avoid getting too close to its neighbors. High values will make the agent move erratically, low values will produce much slower reactions.
- Cohesion - This is the strength of the agents desire to maintain formation. Higher values would move agents quickly towards each other, low values would produce more flowing movements.
- Match Velocity - This is the strength of an agent’s desire to match the velocity of its neighbors. Higher values will result in very uniform movement, like an army marching; low values will result in very localized motion.
- Acceleration m/s2 - How fast the flock can achieve its maximum speed to chase Goal-type directors or flee Avoid-types.
- Min Speed m/s - If the flock’s speed is not at 0, this is the minimum speed it will move. Use more than 0 to simulate a flock of birds or school of fish.
- Max Speed m/s - How fast the flock can travel.
- Turn Rate H/P/B - Agents move freely in any direction and try to orient themselves toward the direction of travel. This behaviour can be adjusted in the node editor, but the Turn Rate defines in what axes and how fast the agents can turn. Note these axes are relative to each agent. 0 values for any axis prevents rotation in that axis.
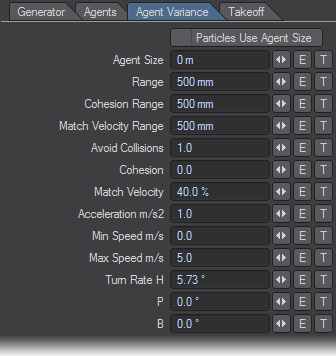
- Agent Variance All the settings on this tab will be ghosted unless you toggle the Use Variance setting above. When you use it then the settings become available. The Variance tab initially uses the default values but you can specify a range for each option that is distributed randomly between the agents. For example, if the Max Speed on the Agent tab is 10 and on the Variant tab it is 20 and Use Variant is turned on, an agent’s Max Speed will be randomly fixed between 10 and 20. The Particles Use Agent Size toggle is common to both tabs, the state of the option is the same regaardless of what tab you’re on.
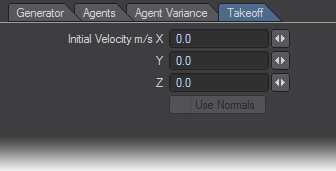
- Takeoff
- Initial Velocity m/s X/Y/Z - Assigns an initial direction for your flock to move in.
- Use Normals - If you have assigned your flock to be generated by the vertices or polygons of an object, you can use their normals as a vector for initial velocity otherwise this control is disabled.
Flocking Nodally
LightWave has nodes for more complex Flocking.
- RayCast(Flocking) - This node is designed to be used with the Custom Object Ray Receiver in order to lock a flock to a surface. It has two inputs ( Ray Origin, Ray Direction ) and two outputs ( Distance, Intersect ). If you don’t specify a Ray Origin or Direction , this node assumes that you are trying to lock agents to a ground plane and so taking the Intersect output from RayCastNode(Flocking) into New Position on the AgentControl destination node will normally lock the agents to whichever object you have applied RayCastReceiver to (in Object Properties > Custom Object ) with no further modification needed.
- AgentInfoNode - this node gives vector information on the Position , Velocity and Bank Up Vector of an agent. It is most useful for adding banking to a flock. To do so, make sure that the Turn Rate for your agents is set in the Agents tab of the Flocking window. You will need some Bank and perhaps Pitch as well if your flock’s motion is in all three dimensions. You can see that we have also added a VectorAdd node. The addition of a small value (0.3-0.6 is suggested) in the Y channel will bias the agent’s Bank rotation towards being upright. If you don’t add this node, the motion of a flock going round bends will be more chaotic with some agents perhaps rolling completely.
Example: Chasing a Flock
This example shows both predator/prey behavior in Flocking and nodal control for flocks. We’ll start with a new 600-frame scene and the new Predator-Prey entry on the Flocking Add New... menu.

- The default entries need some tweaking to get a more predator and prey-like setup. There are never as many predators as there are prey, so we’ll move the Generator away from the Origin and reduce our attackers to only X: 2, Y: 1, Z: 2. Likewise we’ll increase our prey flock to X: 10, Y: 1, Z: 10. You’ll need to increase the box size to X: 5, Y: 1, Z: 5 too. Lastly, we’ll change the Range on the Avoid Director to 8.0 to give the flock a chance to get away.

- We’ll add a hilly terrain with a subdvided, subpatched 100m 2 plane. Go into Object Properties and use a Displacement map to displace the terrain as you see fit. We used a simple Turbulence procedural set to 15 x 15 m and raised some 8.5 m.

- You need to tell Flocking that this terrain is your ground for the flock and their pursuers and you do that by adding a RayCaster to the terrain in Object Properties > Custom Object .

- Now, you need to tell Flocking to tell both your predator and prey to use the ground. Make sure Use Nodes is checked and go into the Node Editor from the Flocking Master window. Add a RayCastNode from the Additional group and take its Intersect output into the New Position input on the Agent Control destination node. Remember to do this for both generators.

- Hit Calculate All Motions in the Flocking window and watch your flock flee over the hills. Interestingly, once they reach the boundary of the terrain they “beam up” since the RayCastNode has no ground to put them on.
Using Objects as Goals or Avoids
Going into Object Properties on scene objects you can set any as Flocking items by visiting the Geometry tab and choosing Flock Director or Flock Generator. If you choose a Goal Director, Flocking will automatically deduce that you wish to use the polygons of your object as a goal, but you need to manually select Avoid Mesh if you wish for an object to become something to be avoided in your scene.