Modeler File Menu
Starting a New Object
(default keyboard shortcut Shift N)
To start editing a new object from scratch, select File > New Object. A new object called Unnamed is created with empty layers.
Loading an Existing Object from Disk
(default keyboard shortcut Ctrl O)
Objects can be created, loaded into Layout, or loaded directly into Modeler.
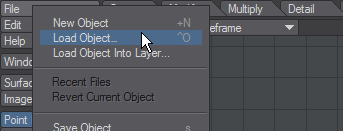
To load an object into Modeler, select File > Load Object. The object becomes the current object and all of its layers are loaded.
You may select multiple objects to load at once, by selecting more than one object at once in the file requester.
Choose File > Load Object into Layer to load an object file into the currently selected layer. If the file contains multiple layers, they will all be loaded into the same layer.Choose File > Recent Files to reload an object that you had recently opened.Choose File > Revert Current Object to put the current object in its last-saved state. Essentially, this is like closing and reloading the object.
Importing an Object
EPS
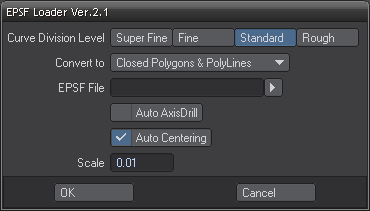
The EPSF_Loader command (File > Import > EPSF Loader) converts Illustrator (.ai) and encapsulated PostScript (.eps) files into two-dimensional LightWave objects, by converting bezier curves into tessellated polygons.
If the EPS uses a gradient fill, you will need to convert it to a solid fill (e.g., using Illustrator) before using this loader.
The Curve Division Level option sets the desired level of detail.
Curve Level - Rough, Standard, Fine, Super Fine
The Convert to pop-up menu sets the type of object that will be created.

- Closed Polygons & Poly Lines - Will create a 2-point polygon chain and Polygons where vector lines are in the file.
- Closed Polygons - Will create closed polygons where vector lines are in the file.
- PolyLines (Line Polygons) - Will create a 2-point polygon chain where vector lines are in the file.
- Spline Curves - Will create splines where vector lines are in the file.
The EPS file is defined by either typing the full path in the EPSF File input field or using the requester button to bring up a file requester.
Auto Axis Drill will attempt to automatically drill holes in faces, where appropriate. (e.g., the two holes in the number 8).
If this option is not checked, the geometry will be created and you will have to manually create the hole.
Auto Centering will center the resulting geometry.
Due to the inherent differences between 2D structured drawings and 3D objects, there will usually be some amount of cleanup required.
This command has been tested with Illustrator files up to version 8.
Pdbreaderv3
The Protein Data Bank (PDB) is an archive of experimentally determined three-dimensional structures of biological macromolecules, serving a global community of researchers, educators, and students. The archives contain atomic coordinates, bibliographic citations, primary and secondary structure information, as well as crystallographic structure factors and NMR experimental data.
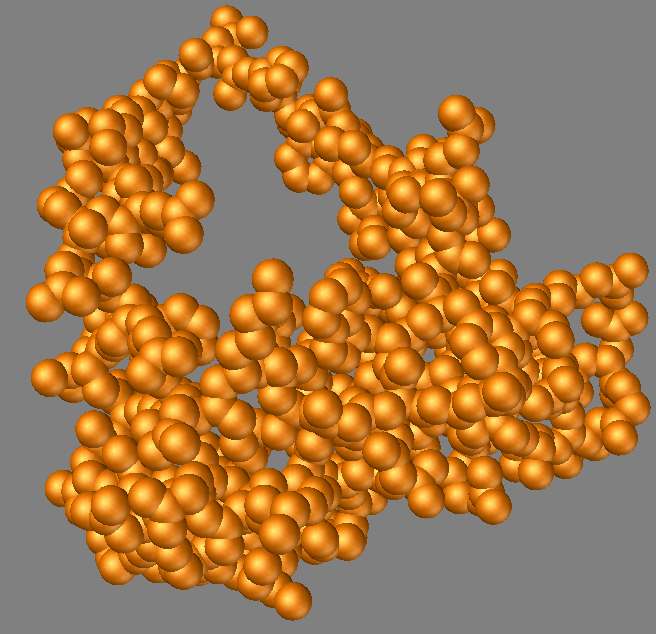
This importer will read the PDB data and convert it to a LightWave Object.
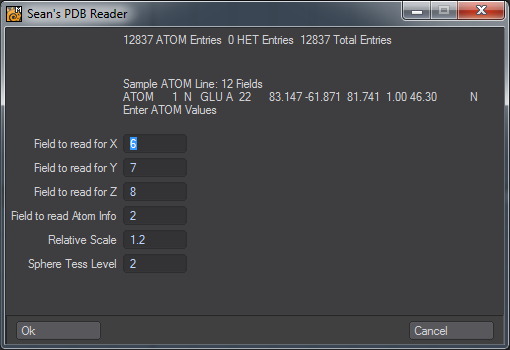
More information about the PDB can be found here: http://www.rcsb.org/pdb
Vertex Loader
Use Vertex Loader in order to edit Weight Maps for bones that were created from scratch in Layout, or bones that were converted from Skelegons.
To use Vertex Loader, choose File > Import > Vertex Loader. First the Load Scene requester opens; select a scene file that has object(s) with bones. After you select a scene file, the following dialog box appears. There you select an object that you want to edit and click OK.
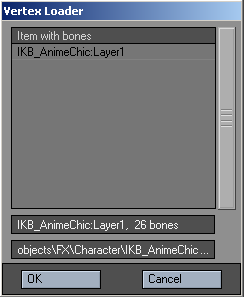
The selected object is automatically loaded into Modeler and displayed in Vertex Paint with its bones. If the object is already loaded, only the bones are loaded from the scene file. Weight Maps set on the Bone Properties Panel in Layout are used for each corresponding bone.
Before launching Vertex Loader, please make sure Layout’s Content Directory setting matches Modeler’s.
Saving Object FilesWhen you save an object, all layers are saved and preserved. You have several options which are all available from the File menu:
- Save Object (default keyboard shortcut s ) - This option saves the current object using its filename. If the object has never been saved before, this is the same as using Save Object As.
- Save Object As (default keyboard shortcut Ctrl s ) - This option opens a file dialog letting you name (or rename) the object before saving.
- Save Layers As Object - Use this to save a foreground layer to its own object file. If multiple layers are selected, they will be saved in a single layer. Make sure you add the .lwo filename extension to your object name when saving.
- Save All Objects - This option saves all files using their filenames. If any new objects haven’t been saved before, you are alerted and given the option of naming them.
- Save Incremental (default keyboard shortcut Shift s ) - This option will give you the ability to save a version of an object by adding incremental numbers to the object’s name. This is handy when you want to save your object in various stages of the Modeling process.
An asterisk will appear next to the names (on the current pop-up menu) of objects that have been modified since their last save.
Closing Object Files
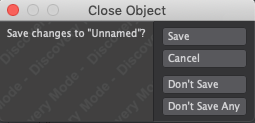
Once you are finished with an object, you can close it by selecting Close Object from the Files pop-up menu. You can close all object files by selecting Close All Objects. If any objects are unsaved, you are alerted and given the option of saving them.
Objects revert to their on-disk version in other Hub applications (e.g., Layout) when you close them or exit Modeler and do not save them first. This will cause you to lose unsaved attributes like surface changes.
 New to 2019, there is now a "Don't Save Any" option for closing objects to make closing multiple objects more rapid.
Sections
- Save-Object-Section - You can use this to save a selected polygon as an object
- Save-Object-Section-Cut - Saves the selected object section, and then cuts it from the object itself.
- Save-Object-Section-Points - Use this plugin to save selected points of an object.
- Save-Object-Section-Points-Cut - Saves the selected points, then cuts them from the object itself.
Exporting Objects
The File > Export menu has several options to export your LightWave object into different formats.
This plugin will allow you to save your object as an encapsulated postscript file (.eps). In the View pop-up menu, select which of your viewports you want to include in the file. The Texture UV View is especially useful for exporting UV projections to use as templates in a paint program. If you want to include the grid or points, activate Draw Grid or Draw Points.
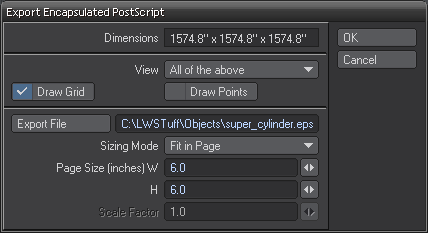
Enter the path and filename in the file input field or click the Export File button to bring up a file dialog. Define the size in inches of the resulting drawing using the W (width) and H (Height) field.
Export 3DS
Use this to Export to AutoDesk 3DS file format. An object can consist of no more than 65,535 polygons that must be triangulated for this format.
Export DXF
Use this to Export to DFX file format. DXF is the standard format for 3D objects and is used by most programs that support 3D content. DXF files can’t contain polygons with more than four points.
Export LightWave 5
Use this to Export to LightWave’s old Object file format. Anything after LightWave 5.7 uses current LWO file format.
Export OBJ
Use this to convert a LightWave object to Wavefront .obj file format specification. UV maps are not preserved in Export OBJ unless you follow these steps:
- Load the object
- Give it a UV texture map.;
- Hit F5 and open the Surface Editor and hit the T next to the Color channel. In the Texture Editor, leave the texture type as Image Map, select UV as Projection and the UV map you created. You do not need to load an image;
- Export as OBJ and then reload the object. You will see that the UV texture map is preserved, albeit renamed..
Path to Motion
Takes a spline from Modeler and makes it into a motion path for Layout.
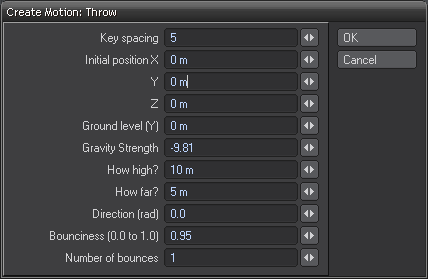
Throw
Calculates trajectory and bounce on given item and inputs - output is a motion file for Layout.
Quit
(default keyboard shortcut Shift Q)
Quit will shut down LightWave Modeler.