Keyframer
Keyframer
Keyframer is essentially a collection of keyframing utilities. Its functions can be applied to currently selected items or defined by an external text file. You can even save and load frame and motion data.
To use Keyframer, choose Utilities > Plugins > Additional > Keyframer. The functions are divided into three different tabs on the panel: Standard, Transfer, and Other.
What is affected
When you choose certain functions, the Select Range and Objects Panel will appear. Here, you set which range of frames, scene items, and channels to affect. All operations only modify items listed in the Affected Channels and Affected Objects lists.
The Start and End values define the range of frames that will be affected.
Affected Channels
The Affected Channels list shows all of the channels that will be affected by operations. You may remove a channel by selecting it with your mouse and then clicking the Remove button.
If you click the Save button, you can save the list of Affected Channels into a text file. You should use the file extension “.lw_channels”. The file contains just a straight list of the channels, like:
- Position.X
- Position.Y
- Position.Z
- Rotation.H
- Rotation.P
- Rotation.B
- Scale.X
- Scale.Y
- Scale.Z
You may replace the list of Affected Channels with the channels listed in a text file using the Load button.
Clicking the Default button returns the list of Affected Channels to the default ones.
Affected Objects
The Affected Objects list will default to the currently selected item(s) in Layout. You can list all scene items by clicking the All button.
If you click the Save button, you can save the list of Affected Objects into a text file. You should use the file extension “.lw_items”. It will be just a straight list of the scene items, like:
- Null (1)
- Null (2)
- Light
- Camera
You may replace the list of Affected Objects with the scene items listed in a text file using the Load button.
The Use selected objects only option, will cause the list to only show the item(s) currently selected in Layout.
The Include all subchildren option will cause all children of the listed items to be shown.If Use custom loaded is enabled, all of the items in the Affected Objects list will be affected. Otherwise the list is always dynamically determined by what is selected in Layout, what the children are, and so on.
Standard Tab
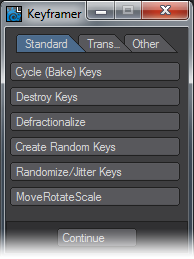
Choose Cycle (Bake) Keys - Keys within the range are copied and pasted after the End frame plus the Cycle Gap. The copy is repeated by the number times set with the Repeats slider.
Destroy Keys - Keys within the range are deleted.
Defractionalize - Fractional keys within the range are rounded to the nearest integer value.Create Random Keys - Creates new randomly spaced keyframes between the Start to End range. The animation curve “should” maintain its shape, if possible.
Random/Jitter Keys - This adds “noise” (i.e., jitter) to existing keyframes between the Start to End range.
MoveRotateScale - Modifies the position, rotation, and/or scale of items. If the Add method is used, the entered value is added to existing key values. If Multiply is used, the existing key values are multiplied by the entered value(be careful using 0!). The Overwrite method replaces existing key values with the entered values.
Transfer Tab
![]()
Node-to-Node Frame Copy - Copies the Position, Rotation, and/or Scale of the Source to the Target at the current frame. If the Use World co-ordinate Copy option is enabled, the target will take on the “world space” values of the source (i.e., not the local values). Note that you will still need to create a key with the copied values.
Node-to-Node Motion Copy - Copies the entire motion of the Source to the Target. (This is the same as saving and loading a motion file.) If All descendants is enabled, all descendants of both the Source and Target will be used and modified. If you are using All descendants, the Source and Target hierarchies should be identical or results will be unpredictable.
Load Single Frame data - Use this function to load the motion data saved with the Save Single Frame data function. Note that the position and rotation channels are loaded regardless of what appears in the Affected Channels list. Also, it will only affect the same item (when the data was saved)-that item must be in the Affected Objects list.
Save Single Frame data - This function will save all of the motion data for the Affected Objects at the current frame. Note that the position and rotation channels are saved regardless of what appears in the Affected Channels list. The file should be saved with the “.lw_frame” filename extension.
Load Clip data - Use this function to load the motion data saved with the Save Clip data function. Use the Start and End sliders to trim data. Regardless of the Start and End, the range is always copied in starting at frame 0. Note that the item must have the same name as the item used to save the data.
Save Clip data - This function will save all of the motion data for the Affected Objects for a defined range of frames. Note that all channels are saved regardless of what appears in the Affected Channels list. The files are saved to a directory you specify.
Only the data at actual keys within the range is saved. If the start of your range is not a key, the data for the next key (in time) is used. Keys retain their position in time even if you don’t save starting from frame 0.
Other Tab
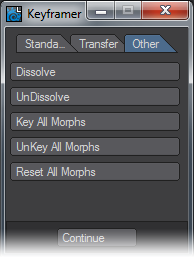
Dissolve - This function adds keys to the Object Dissolve channel (Object Properties, Render Tab). The object will be 100% dissolved at the Start frame up until the End frame, where it becomes 0% dissolved.
UnDissolve - This function is the opposite of Dissolve, described above.Key All Morphs - Sets keys in every MorphMixer channel at the current frame for items with MorphMixer.
UnKey All Morphs - Deletes keys in every MorphMixer channel at the current frame for items with MorphMixer.Reset All Morphs - Sets key values to zero in every MorphMixer channel at the current frame for items with MorphMixer.