Ray Cast Geometry
RayCast Node for Motion, Displacements and Instancing

The easiest way to think of the RayCast node is that it makes objects aware of their surroundings. Cars can stick to roads, lamps to desks, automatically. The node has the following settings:
In:
- Ray Origin - origin of the ray
- Ray Direction - direction the ray is traveling
- Offset - Offsets the ray origin slightly backwards along the ray direction
- Range - How far to look to decide if an intersection occurs
Out:
- Distance - How far the ray traveled before hitting something
- Intersect - World space point of intersection
- Clipped Ray - Full length ray from Ray Origin along the Ray Direction until it hits geometry. If the ray hits nothing a zero length ray is generated
- Hit Normal - Normal of the hit polygon in world space
- Hit Smooth - Smoothed Normal hit
- Inside - Checks to see if the ray cast intersects with an odd or even number of polygons and returns true (or 1) for an odd number of polygons, false for an even number (or 0). Used to see if the ray origin is inside closed geometry - Example.
- Object - The item ID
- Nearest Point Index - the nearest vertex of the found intersection
- Polygon Index - The polygon number hit
Double-clicking on the node gets the following panel:

Most of the time, the only thing that needs to be checked is the object that is being raycast onto. In our example below it would be the Ground Plane. More advanced options can be achieved using the other options in the panel or by connecting incoming nodes.
Getting Started

To begin with we’ll use the simplest of examples. Create a new Ground Plane object using Modeler Tools > Create > Geometry > Ground Plane. Give it 10 subdivisions in X and Z. Once done, click Modeler Tools > Toggles > Toggle Subpatch to make it a subpatch object.

Select the Ground Plane and go into Object Properties with P. On the Primitive > Geometry tab, double click Displacement Map. In the window that opens, change Layer Type to Procedural and hit Use Texture.
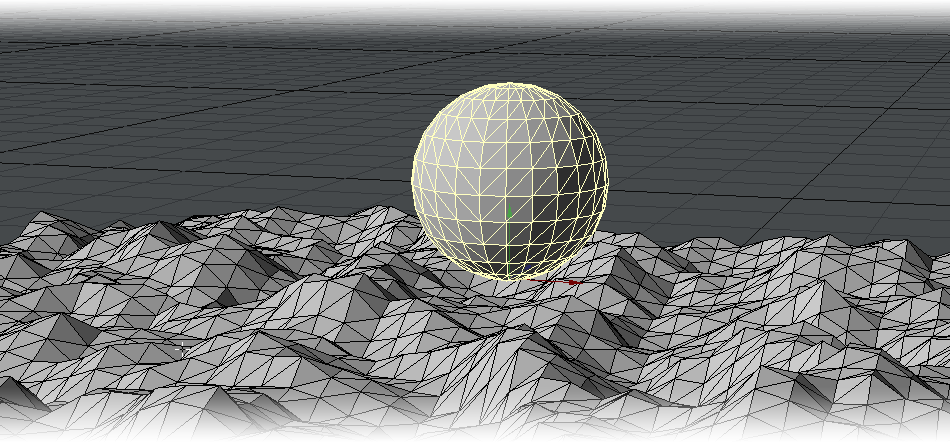
Now use Modeler Tools > Create > Geometry > Sphere to make a ball. In this example we just want to show the ball reacting to the terrain, not rolling. Check Center on Bottom to move the pivot point to the base of the sphere but accept all other defaults, and when the ball is presented move it up to Y = 1 m.

Go to a Top view and animate the path the ball will take across your bumpy terrain and then switch back to Perspective view. If you press Play now the ball will float over the terrain.
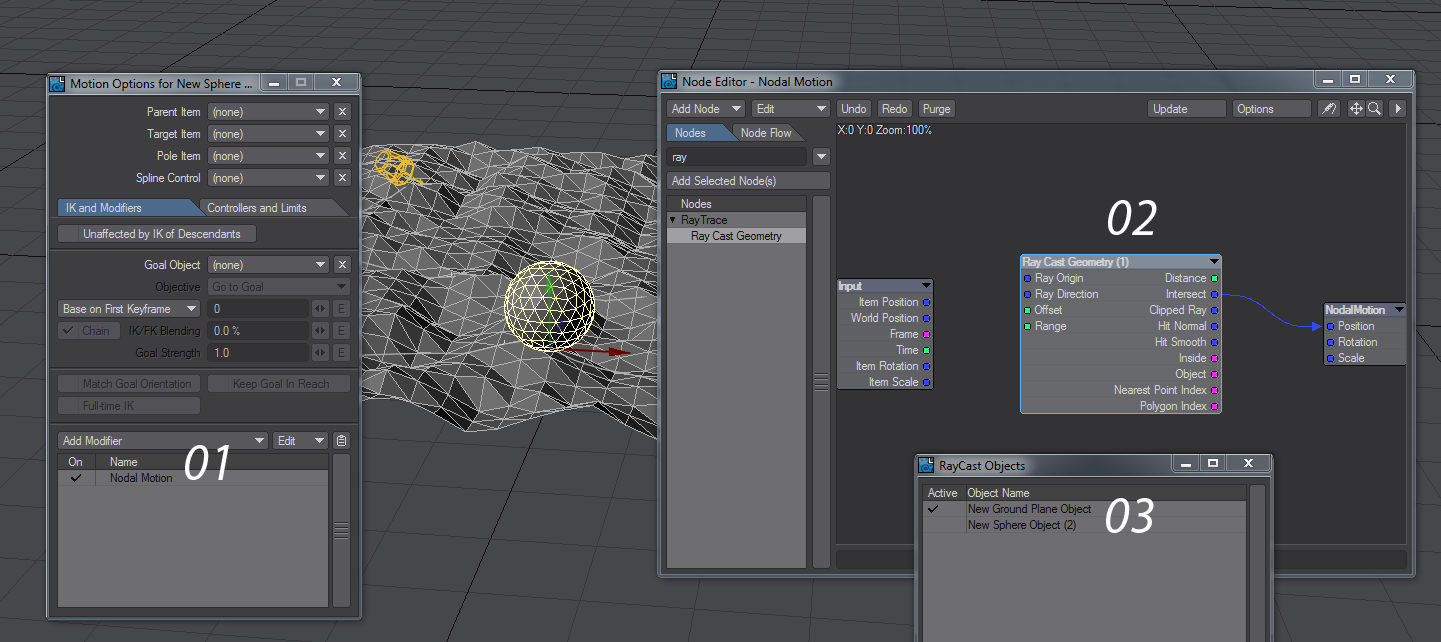
Let’s change that by going into the ball’s Motion Options by pressing M. Click on Add Modifier and choose Nodal Motion (01). Double click on the entry and a node editor will open showing two nodes, Input and Nodal Motion. We’re going to add a third: Ray Trace > Ray Cast Geometry (02).
The only things that need to be done with this new node are to double click it to set the Ray Cast Object(s) to be used, and to connect the Intersect output to the Nodal Motion’s Position input (03). Now press Play again.
Going Further
Perhaps the twisty turny path you have imbued the ball with is trying to avoid obstacles placed on the terrain. We thought the same so wanted to place some concrete pillars in the way of our plucky ball. We used the same RayCast node to position these pillars on the bumpy terrain.

Use Modeler Tools > Create > Geometry > Cube to make a single pillar and give it a Height value of 3 m in Y. Don’t forget to move your pillar up in the Y so it is above the terrain. Copy the Nodal Motion modifier from the ball’s Motion Options and paste it into the pillar’s Motion Options. Now as you drag the pillar about you will see it is stuck to the terrain. Clone it a few times and dot them around the terrain for your ball to avoid.
The Ray Cast Geometry node can be processor-intensive and your scene playback might stutter particularly if the Nodal Motion window is open or you are showing Motion Paths (GL tab in Options). If performance is still sluggish with these options disabled, make sure you bake the displacement to an object by using File > Save > Save Trans Object.