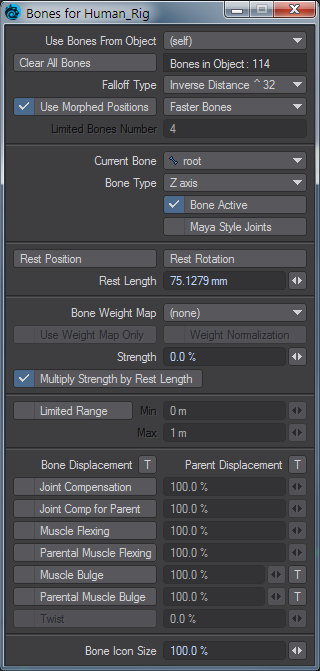
Bone Properties
This panel gives you access to all the settings available for bones in LightWave Layout.
Bone properties can be accessed in two ways:
Select the Bones button at the bottom left corner of Layout and then click the Properties button located in the same corner.

Press Shift B and then P.
Bones Section
Use Bones From Object
This pop up menu allows you to choose a different object whose bone properties you would like to edit. When you first open the Bone Properties Panel, you only have access to the bones of the object that you had originally selected. This allows you to change to a different object without having to leave the Properties Panel.
Clear All bones
As the name suggests, this button will clear all bones from the current object.
Falloff type
Falloff Type uses a mathematical formula to set the falloff strength of a bone’s influence in the current object. An exponent is used (^2, ^4, ^8, ^16) to figure out how quickly the falloff will happen. The larger the number the quicker the influence of the bones will falloff.


Left: Inverse Distance, Right: Inverse Distance ^2

Inverse Distance ^128
Use Morphed Positions
With this enabled, bone deformations will be applied after morphs. This option can adversely affect performance; normally it should be turned off.
 Bone Type
A dropdown with three choices:
- Full Bones - LightWave legacy bone system
- Faster Bones - Each vertex will only be affected by the bones with the four largest weights. This can increase performance in objects with more than four bones.
- Limited Bones - Designed to be more inline with how bones are used with game engines, Limited Bones is more restricted than the other modes for simplicity and speed.
When active, the value in the new "Limited Bones Number" is used. Both Faster Bones mode and Limited Bones mode work by choosing bones with the highest weights, but where they differ is that Faster Bones picks from all bones with the four highest weights (which can be any number of bones if multiple bones have the same weights). Limited bones instead limits the number of bones to the "Limited Bones Number" value.
When Limited Bones mode is set for an object, it applies to all bones used for the object (unlike the other modes, which can be overridden by nulls in the skeleton).
"Use Morphed Positions" is (intentionally) not supported with Limited Bones.
Current Bone
Shows the currently selected bone.
Bone Active
When checked bone is on (active).
Rest Section
Rest Position
This determines the position of a bone at the time it is rested. When a bone is rested in layout it has an effect on every vertex in the object. How much effect it has is called weighting (not to be confused with Weight Maps). How much a point is weighted towards a specific bone depends on several factors. The most important is distance from the bone and bone falloff.
Rest Rotation
This determines the orientation of a bone at the time it was rested.
Rest Length
This determines the length of a bone at the time it was rested.
Weight Map Section
Bone Weight Map
Use this dropdown menu to select a Weight Map to apply to the current bone. The influence a bone has on a point is now modified with the strength of the various Weight Maps on a given point.
Use Weight Map Only
Only uses values attained from an applied Weight Map to set bone influence. Since each vertex can have multiple Weight Maps, various bones can have a distinct influence on a vertex based on the strength of each Weight Map it is assigned to.
Note that if a point has only one Weight Map, the bone assigned to that weight will have 100% influence on that point no matter what the value of the Weight Map is.
In order for a bone to have partial control over a point, that point must have at least two Weight Maps assigned to it. If the total value of the combined Weight Maps exceeds 100%,unpredictable results can occur. The same goes when using negative weights. To insure predictable results in this mode, it is best to also check Weight Map Normalization.
Another thing to know is that in this mode all other bone functions cease to apply.
Weight Normalization
Use this option to obtain predictable results when using Weight Map Only.This feature ensures that the total values of several Weight Maps applied to a vertex never exceed 100%. To calculate the amount of influence a bone will have on a particular point we have to know how many Weight Maps are assigned to bones and what their values are. For example, to calculate the amount of influence a bone will have on a vertex we have to know both the total number of Weight Maps on that point, and also their values. Assuming each Weight Map is assigned to a bone, we will conclude that the amount of influence a bone has on that point is derived as follows:Point A has three weight maps assigned to it named Upp_Arm, Low_Arm and Elbow.What is the amount of influence the Elbow bone will have on Point A ?Point A = Elbow/(Upp_Arm + Elbow + Low_Arm)
Strength
Whenever two or more bones are present, Strength (Bones Panel) will determine the influence one bone has over another when ranges of influence intersect. If the option to limit the bones range is inactive, all points within the object are considered completely within the influence range of each bone.
Multiply Strength by Rest Length
The Multiply Strength by Rest Length option (Bones Panel) causes a bone to multiply its Strength by its Rest Length to determine the influence of the bone. Bones with larger rest lengths will exert greater influence over other bones with equal Strength values, but smaller rest lengths.
Limited Range
When Limited Range (Bones Panel) is active, the Min value determines the sharp cutoff point of a bone’s influence. Any points within this range are 100 percent affected by movement or sizing of the bone. Any points outside of this range are affected to a smaller extent or not at all depending on whether they fall within the Max. In an orthogonal view, the Max setting is visible in the viewport. A short bone will exert a spherical influence, while longer bones exert a more oblong influence.
Compensation Section
The following options only operate on the pitch channel and are all overlays on top of normal bone function.
Joint Compensation
Sometimes bones used to create joints can cause pinching or unwanted bunching, much like a folded garden hose. Joint Compensation (Bones Panel) will remedy this effect by making the affected points tend to maintain the original volume inside the joint. The result is a more realistic-looking joint. You can modify the compensation amount to increase or decrease the effect.
Joint Comp for Parent
This option shears the points affected by the parent bone during the child bone’s rotation. This compensation also alleviates the pinching effect often caused by bones. At the same time the point shear occurs, the bone will also try to maintain the volume inside the joint.
Muscle Flexing
With this option the points affected by the bone will flare out as the bone is rotated. The effect simulates muscles bulging under the skin.
Parental Muscle Flexing
This option is generally more commonly used than Muscle Flexing. For example, when your forearm rotates your biceps flex. The forearm is the child and the bicep is the parent. It would not look natural for the forearm to bulge as it is rotated, but it looks perfectly natural when the biceps flex.
Twist
The rotation axis most aligned with the bone at rest is used. For zero-length bones the bank axis is used. The amount of twist is the change in rotation of that axis between rest and current (limitation: local rotation values are used, so a twist of a bone is not inherited by child bones). There is a Twist toggle in the bone panel (default on), and an input which controls how curly it is (0% is no curl, 100% is curl by the amount of twist over the length of the bone).
Bone Icon Size
Changes the size of the bone icon in the OpenGL display. It does not affect how the bone influences the mesh or other bones.