Metamorphic 2019
The Windows version of Metamorphic has the keyboard modifiers/shortcuts and graphics tablet support listed in the documentation. While Metamorphic is open, keyboard events will be captured and checked against the listed shortcuts. This means that typing in other applications might be affected.
Keyboard shortcuts and graphics tablet support have not been implemented in MacOS
Object Properties blinking when you add Metamorphic is expected. Normally, adding a plugin drops it at the end of the list of modifiers, but Metamorphic has to be placed just before Subdivision so the Object Properties panel needs to be refreshed.
 Introduction
Metamorphic is a multipurpose mesh sculpting and vertex map manipulation plug-in for LightWave 3D 2019 that works in LightWave’s Layout taking full advantage of the new capabilities of the modifier stack.
Features:
- Freeform animated sculpting
- Built-in undo/redo system
- Fully-multithreaded sculpting using all available CPU cores
- Pen pressure support for brush size, strength and hardness (Windows only)
- nodal brush texture support
- Three modes of animation
- Non-linear interpolation of sculpt animation keyframes
- Supports converting sculpt animation keyframes to Endomorphs
- Predictive corrective morph sculpting that works after deformers with built-in driver/driven controller
- Full Motion Blur support
Panel
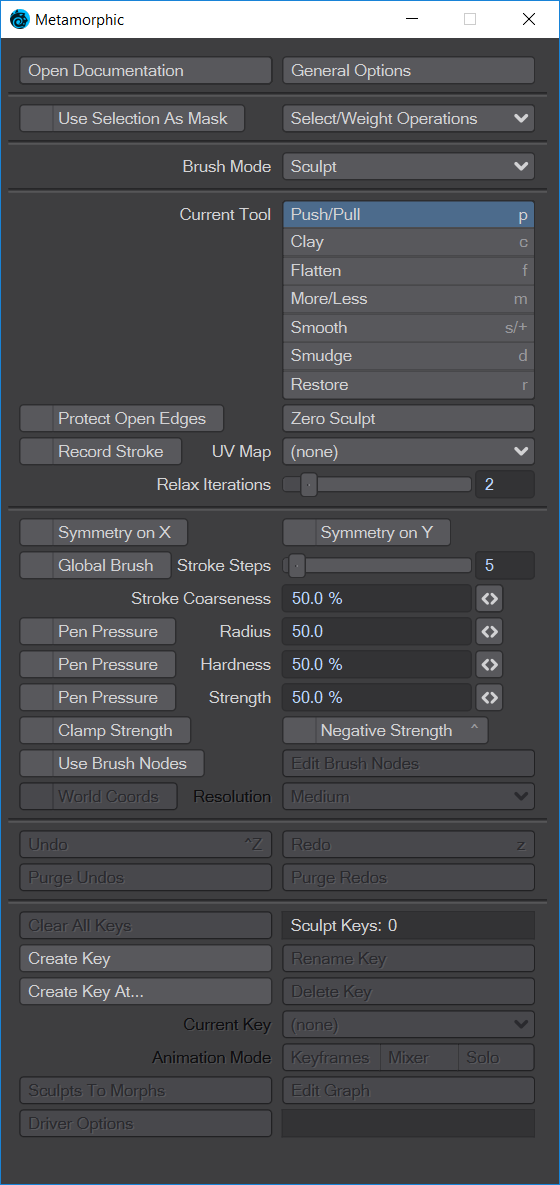
The Metamorphic panel is organized into several different sections. At the top we have buttons to open this page in the Wiki and a General Options for Metamorphic:
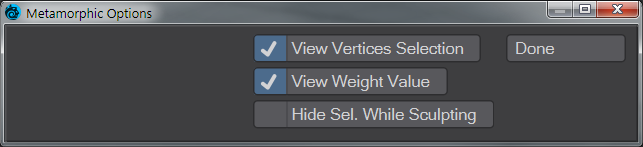
- View Vertex Selection - Shows the selection of vertices on the object
- View Weight Value - Shows the numeric weight value of vertices when in the Weight Brush Mode
- Hide Sel. While Sculpting - Hides the vertex selection while the LMB is held down for all Metamorphic modes and tools
- Use Selection as Mask - When checked, this will restrict all Metamorphic operations to the selected area
- Select/Weight Operations - This dropdown menu offers five global options for selection or weight maps:
- Clear - Clears selection or weight map immediately (shortcut /)
- Grow - The default option, increases selection or weight map area (shortcut })
- Shrink - Reduces the quantity of selected vertices (shortcut {)
- Connected - Selects any polygons connected with the initial selection. Selections are uniformly green and there is no Undo for this action. If you want to increase the strength of selection in areas, clicking Add to Selection is necessary (shortcut ])
Invert - Single click operation inverts the selected vertices (shortcut ")
Brush Mode
The middle section of the Metamorphic window is devoted to the Brush mode tools and parameters. There are seven choices here, six of which surround Layout's OpenGL window with a green line showing that Metamophic is active. The first of the seven, None (default keyboard shortcut - Space), removes the green outline. Here are the other six in order:
Brush Mode Tools
Brush Parameters
These are global options for controlling the brush for performing the operations contained within the six categories.
- Symmetry on X - performs operations symmetrically across the X axis
- Symmetry on Y - performs operations symmetrically across the Y axis
- Global Brush - This selects all vertices for operations but respects Use Selection as Mask if enabled and there is a selection already extant. The direction of the effect is on each vertex normal. This setting is mainly useful for textures that you want to have a global effect or selection.
- Stroke Steps - Sets the distance between segments for strokes. Think of it as "How many steps will I need to take to get to the next segment". A lower number will result in a smoother sculpt. A higher number can result in separation into islands of sculpting
- Stroke Coarseness - Changes the resolution of path interpolation. The value is based on a log(n) expression, so not much difference will be spotted in the middle of the range of values. It's at the extremes that changes will be fully evident.
- The following three are toggles related to using a stylus and tablet. They only work on Windows for now:
- Pen Pressure Radius - The default of 50 % can be changed by typing a new number, using the slider at the end of the field or by right-clicking in a Layout viewport and moving the mouse left or right
- Pen Pressure Hardness - The default of 50 % can be changed by typing a new number, using the slider at the end of the field or by right-clicking in a Layout viewport and moving the mouse up or down. The hardness determines the width of the boundary region between 0 % and the full brush strength
- Pen Pressure Strength - Determines how fast clicking the LMB will result in a 100 % change to the vertices painted over. The number is not clamped to 100 % and can be modified with CTRL-RMB left and right
- Clamp Strength - This toggle will clamp the selection strength to 100 %
- Negative Strength - Inverses the effect of painting with the LMB (Keyboard Modifier - Ctrl )
- Use Brush Nodes - Uses a nodal network to control the shape of the brush
- Edit Brush Nodes - Only available when Use Brush Nodes is checked. Opens the Node Editor for editing the brush shape (Metamorphic Brush Nodes)
- World Coords - Only available when Use Brush Nodes is checked. Uses world coordinates for the brush
- Resolution - Only available when Use Brush Nodes is checked. Three choices for the nodal brush: Low, Medium and High. Obviously, the higher the detail, the slower the brush
Undo and Redo
There are unlimited undo and redo steps for Metamorphic in a separate undo system to the main LightWave one.
Undo - Undos previous Metamorphic operation (Keyboard Shortcut - Ctrl Z )
- Redo - Redo previous Metamorphic operation (Keyboard Shortcut - Z)
- Purge Undos - Clears memory of Metamorphic Undo steps
- Purge Redos - Clears memory of Metamorphic Redo steps
Animation
Metamorphic has its own parallel keyframing system for operations so that they can be animated over time. Each sculpt key is a morph map and contains the relative offsets of each vertex.
- Clear All Keys - Completely destroys all Sculpt Keys for an object. There is a warning beforehand, but no Undo
- Create Key - While Sculpt keys are created automatically, new keys can also be created at the playhead position
- Rename Key - Keys are automatically given names by Metamorphic, but these names can be overwritten with something more personalized
- Create Key At... - Creates a sculptkey at the frame of your choice
- Delete Key - Deletes an individual Metamorphic key. There is a warning before deletion but no Undo
- Current Key - A dropdown list of the keys created in Metamorphic. You can click on an entry in this list to jump to the keyframe in the scene
- Animation Mode - A choice of three options:
- Keyframes - The default mode of Single envelope/Multiple sculpts
- Mixer - Non-linear morph mixer mode
- Solo - Single sculpt edit mode
- Sculpts To Morphs - Converts sculpts into morph maps. Keys can be cleared now, but the object should be saved otherwise the morphs will be lost
- Edit Graph - Opens the Graph Editor with the Sculpt channel active
- Driver Options - Opens a new window to choose a scene item to "drive" morph events, to control them
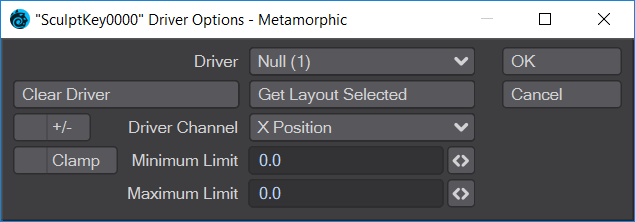
- Driver - Scene item to use to drive Metamorphic
- Clear Driver - Removes the driver
- Get Layout Selected - Uses the currently-selected Layout item
- +/- - Swaps the Minimum and Maximum Limits
- Driver Channel - Choose the animation channel to use for driving Metamorphic operations
- Clamp - Clamps within the set Minimum and Maximum Limits