Add Motion Modifier
This panel allows additional plugins included with LightWave or available from third party sources to be activated. These plugins will allow motions to be controlled or modified in various ways. Next to each motion modifier in the list is a check box. This can be used to activate or deactivate the modifier next to it temporarily.

Alembic Motion Controller

For assets controlled through an Alembic file import.
Anchor
Anchor is a pre-calculated motion modifier for attaching one mesh object to another. The target object must have a UV map.
Camera Trigger
Camera Trigger is an internal plugin with no user-accessible functions. It can be called by tools such as Camera Selector.
Cruise Control

Will move item with constant speed. The direction of motion will be the direction at time 0. There must be at least two keys in the object motion, preferably linear.
CurveConstraint
CurveConstraint moves an item along a curve object, similar to a motion path. The curve object is selected on the Curve pop-up menu. (If there is more than one curve in the object, the first curve is used.)
- Align - Will rotate the object so that it faces along the curve in the traditional “Z axis” manner.
- Start Time/ End Time - These values determine how long the item takes to traverse the curve.
- Curve Influence - The Curve Influence percentage blends the curve motion in or out.
CurveConstraint does not remain locked to the curve but adds the curve’s position to its own keyframed motion. To lock the item to the curve, parent the item to the curve, reset the item’s position then delete all its keyframes. You might use CurveConstraint to move an object along the same curve used to create the geometry (or create the curve from the geometry), just like you would with a roller coaster.
Cyclist
Cyclist will associate the action of one item with a repeatable action (an animation cycle) of another item.

Channels are activated by clicking on the buttons that represent each channel at the top of the Cyclist Panel. All activated channels will have their values replaced by the animation-cycle values of that same channel, but at the time determined by the Cycle Controller. Channels that are not enabled will retain their normal value at the particular frame. For example, you can set up keyframes on wheels of a car, so they revolve continually, while parented to a car. Then, apply cyclist to the individual wheels, setting the car (or master parent) as the cycle controller. When the car moves, the wheels will turn.
- Cycle Frames - Defines the frame range that contains the action that you want to be repeated (i.e., the animation cycle).
- Cycle Controller - Controls the item based on the selected control parameter, defined on the pop-up menu just to the right. The control parameters can be an item’s position, rotation, scale, speed, or the distance it has traveled along its actual path length. The Forward Progress, Side Slip, and Climb parameters take into account the item’s orientation and tell how far the item has been moving forward (Z axis), to the right (X axis), or up (Y axis), respectively. Speed looks at the item’s velocity.
- Controller Range - Defines how much change is required to equal one full animation cycle. The unit of measure for this parameter depends on the selected control parameter. For Position and other Distance settings, the unit of measure is in the LightWave Default Unit defined on the General Options Tab of the Preferences Panel. Rotation uses degrees and scale is a factor where 1 equals 100 percent. Speed is in default units per second.
- End Behavior - Determines what happens after the first cycle completes.
- World Coordinates - Select this button to use the Cycle Controller’s actual (world) coordinates, rather than its relative coordinates. These could be different if, for example, the object is parented to another object.
- After IK - Although the motion of the item will always come from keyframes, the motion can be used to move an IK goal, if After IK is off.
- Additive - this option is for use if you have more than one Cyclist added to an object. It adds Cyclist motions together rather than only taking the last one added.
Effector
Effector causes effector objects to repel or attract the motion path of the affected object. The effector objects may be any objects you wish, but Null objects work best.

- Effector Object(s) Prefix - Use this to set the prefix name. Any object that begins with this name will be an effector, allowing you to have more than one based simply on their names.
- Solid Core Radius - Defines a spherical area, within which all objects are equally affected.
- Falloff Distance - There is a gradual falloff of the effect between the Solid Core Radius and Falloff Distance. Objects outside the Falloff Distance are not affected at all.
Effector Shape - There are two choices, Point or Plane. If you choose Plane, you will need to specify the Axis. The Axis buttons will be grayed out if you choose Point.
The impact of the effector object is set and animated by keyframing its XYZ Size channels. Positive values repel, and negative values attract.
Expression
This is a motion-modifier version of expressions, which can use the results of other motion modifiers, as well as IK. This is not possible with a channel modifier.

Channel
You can select multiple channels from the pop-up menu and apply different settings for each (i.e., you don’t just pick one). They can all share scratch variables (A through Z), and the expressions can be aware of other components of the item’s motion. Thus, H can depend on Z, for example, without trying to reference the item’s object.
Flocking - Item Motion

This plugin gets automatically assigned when you have an item that is part of the flock.
Follower
Using the Follower item motion modifier is similar to parenting an object to another, except that you have control over which motion channels you wish to inherit. You can also modify and delay the inherited value. Moreover, the motion can be inherited from the camera, a light, a bone, or any object in the scene. Follower looks at the pivot point of the item to follow; therefore, certain objects that follow another should match pivots.

- Item To Follow - Use the pop-up menu to define the item whose motion you want to use. This item would be considered the leader.
- World Coordinates - Activate this option to use the leader’s actual (world) coordinates, rather than its relative coordinates. These could be different if, for example, the object is parented to another object.
- Time Delay - The number of seconds entered is added to the current time. A negative number can be used if desired.
Randomize - Is a maximum amount of time (in seconds) to be added to the delay. The actual amount will be between 0 and the Randomize value. This number may be negative or even larger than the Time Delay. (The latter would cause the item sometimes to anticipate the leader’s moves and lag at other times.) The overall delay amount for each item is fixed throughout the animation, so this is useful for basic flocking effects.
The random number seed is taken from the object ID, which should be the same among ScreamerNet nodes and, thus, will cause items to have different delay amounts. The delay stays the same from frame to frame.
- Path Delay - This parameter specifies a fixed following distance along the path of motion of the leader, which is helpful for keeping cars in a train following correctly through accelerations.
- Align to Path - This option will align the follower object to its new path.
- After IK - Allows you to apply Follower taking (or not taking) into account changes from IK.
- Channel - Represents position, rotation and scale.
- Source - Select a Source for any of the leader object’s motion channels you wish to use. Generally, the type of motion channels will match. That is, the follower object’s, say, X Position will be determined from the leader’s X Position. However, the settings can be different. For example, the follower object’s Bank Angle might be derived from the leader’s Z Position. Select none to disregard that channel.
- Multiply By - You can scale the value applied to a channel by inputting a factor other than 1 in the corresponding field.
- Add - The channel value may be offset by inputting a value other than 0 in the Add field.
FX_CLink
Used by FX Linker and cannot be directly addressed.
FX_Link

- Particles - Choose particle group.
- Rotation - This dropdown menu determines which rotation method the particle will have when emitted. The default value, none, has no rotation added.
- Random - gives the item a random starting rotation.
- Align to Path(h) and Align to Path(hp) will rotate the item according to the particle’s path.
- Copy from Emitter - will use the original particle’s motion path.
- Time shift - moves the start of the item’s sizing/rotation motion according to the settings in the drop-list. The None value doesn’t alter the timing of the item’s motion; it plays as it was initially keyframed. The Start Shift and End Shift options move the item’s motion to the beginning or end of the particle’s life. The Start Adjust (distance) and End Adjust (distance) settings will alter the frame rate of the motion according to the value in the Distance/Sec field. As the particle travels a certain distance, a percentage of the motion is animated.
- The Pre and Post Behavior settings indicate what the item’s rotation/scaling state will be when the motion isn’t being animated. This represents the time before the particle is born and after it dies.
- The Stay behavior will hold the first frame of the motion for the Pre Behavior and the last frame with the Post Behavior. The Original setting returns the object to its original state in either the beginning or end of the animation.
- The Size Dissolve setting will dissolve the item in either the beginning or ending of the particles life. So in the Pre Behavior, while the particle is waiting to be generated, it’s not visible. Then for the Post Behavior, after the particle dies, it becomes invisible.
- Size effect applies the particle size to the object. The object’s normal layout size becomes a factor where 0 = 0% and 1 = 100%. You can animate an overall size of particles using normal layout sizing functions.
FX_Motion
Mode Tab

- make key - Generates a key for every frame.
- Group - Select an existing group or create a new one.
- Mode - Three options possible:
- After collision - Choose an action post collision: none, reverse, random, stop.
- Start Frame - Choose what frame to start the effect.
- Start by event - Use this option if you want to trigger the motion upon collision.
- Weight - This option sets an arbitrary weighting value that will influence how factors like gravity affect the item.
- Size - This option affects the outer boundary used for collision detection. It can also be used by volumetric plugins like HyperVoxels.
- Resistance - This option adds an air resistance effect. Items will move slower as this value is increased.
- Momentum - This option adds in a momentum or increased mass effect. Items will tend to resist being stopped or slowed down.
- Rotation Resistance - This option has the same effect as Resistance except that it affects the items’ rotational channels.
- z-Rotation by wind(deg/m) - This option rotates the item in its bank channel as it moves or is affected by the wind.
Vector Tab

- Initial Velocity - Sets the initial direction and force.
- Velocity coordinates - Sets whether these settings use the item’s local axes or world coordinates.
- Initial Rotation(deg/s) - Sets the items’ initial HPB rotation.
- Random Rotation Start - randomizes the initial HPB rotation.
- Update - Updates/refreshes the current seeings in the Layout viewport. This is good to do with a heavy scene.
- Copy - Copies the current settings.
- Paste - Pastes settings in the copy buffer over the current settings.
Gravity
Gravity simulates the effects of the Earth’s gravity on an item’s motion, making it fall naturally and even bounce with varying degrees of elasticity.

- Strength - This is the acceleration due to gravity in units of ‘g’, the Earth’s standard gravity.
- Axis - The object’s position will be altered along the specified Axis.
- Ground Level - Sets the height at which the object will meet the ground. This is measured in the Default Unit (General Options Tab of the Preferences Panel).
- Elasticity - Describes the amount of energy lost on each bounce, which equates to the relative height of the bounces. Thus, 100% Elasticity is completely bouncy, and bounces forever, 0% doesn’t bounce at all.
- Start Time/End Time - The Start Frame and End Frame parameters specify when the effect is applied.
The most natural results will occur if all the keyframed motion within the range of frames is a single linear path. In particular, the trajectory is determined by an object’s initial speed and direction of motion.
Your object must start in a positive position along the selected Axis.
Jolt!
Jolt! is an item motion modifier that simulates the chaotic and uncontrolled movements that occur when physical impacts have enough weight and velocity to cause jarring vibrations. For example, the collision of one celestial body striking another, the impact of a robot’s foot with the earth, the collision of a laser beam with a passing spaceship, and so on. All of these events are good candidates for Jolt!

Jolt! also lets you specify vibration events using keyframes that indicate when a vibration will begin — and be at its most intense. You can also specify the duration of the vibration and its initial intensity. Intensities can be set based on the object’s position (X, Y, and Z axis) and its rotational values (heading, pitch, and bank).
Global Options
- Save Keys/Load Keys - Lets you save and restore Jolt! settings.
- Save Motion/Load Motion - These buttons save and load standard LightWave motion files based on the keyframed data. The Save Motion button is ghosted if no keyframes are set, and both buttons are ghosted when the Events Tab is selected.
- Linear - Motion files saved with the Linear button active have their keyframes set to the (spline control) linear mode.
- Intensity Ramp - Instructs Jolt! to track the movement of a LightWave item (i.e., Camera, light, object, or bone) and based upon its distance from the Jolt! object, increase or decrease the effect of the vibration proportionally.
- Minimum Range - Is the radius in meters of Jolt!s effective range. LightWave items outside of this range will not create a visible effect. If you forget to set this value when you leave the Jolt! interface panel, you will be reminded and Jolt! will disable Intensity Ramp (with a minimum range of 0.0, it is ineffective anyway).
- Shock Wave - With Shock Wave activated, vibration keyframes are adjusted internally to offset for the distance of the ramp object. The further away the ramp item is, the longer it will take for the vibration event to actually trigger, and the later it will trigger from its indicated start time. This option is useful if you use Jolt! on items in your scene other than the Camera. Items using Jolt! that are closer to the ramp item begin their vibration events sooner than items that are further away. With items positioned correctly, this option can produce a visible shock wave effect from the ramp item’s location.
- World Coordinates - If you select an item that is part of a parental hierarchy, Jolt! alerts you and — if it isn’t selected already — suggests that you turn on the World Coordinates option. This option ensures that you get proper movement information from the child item.
- NonLin2 - this button activates an alternate calculation for Jolt!’s motion calculations. It creates motions that are less harsh.
Keyframes mode - The Keyframes section houses the Jolt! key controls. When you want the jolting effect to occur on specific keyframes, you will adjust values in this section. (If you want the effect to occur based on the position, rotation, and/or scale of an item, this is done in the Events section. You can set values for both, but only the selected mode will be applied.) The Jolt Keys slider selects the current frame. The range of the slider will exactly coincide with the number of render frames that have been specified on LightWave’s Render Options Panel — not necessarily the same value that is used in the Preview settings. The << and >> buttons will jump to the previous or next keyframe, if any exist.
Clicking the Create Key button makes a keyframe at the current frame. Use Delete Key to remove an existing keyframe. Note that the current frame must be a keyframe to do this.
Clicking the Populate Key will take the settings for the current keyframe and copy them to every existing keyframe. In other words, it populates all keyframes with the current settings and saves you from the tedious task of copying and pasting settings, frame by frame.- Randomizing Keys - Randomizing (or jittering, if you prefer) provides a means of breaking up potentially monotonous key settings. Although Jolt! will internally randomize settings to some degree as it applies them to the item, unless you are using intensity ramping, the actual key values themselves will not be altered. By using the Randomize button, you can generate variances such that the motion of subsequent keys does not look so similar.
- The randomizing process requires two or more keys in order to function. The settings of the first key are never altered (nor is there any reason to alter them because no other key will look exactly like them after the effect is applied). The degree of variance can be altered by using the Threshold control input field to the immediate right of the Randomize button. This control lets you specify, as a percentage, the maximum amount that each altered key will deviate from its current value.
Effect
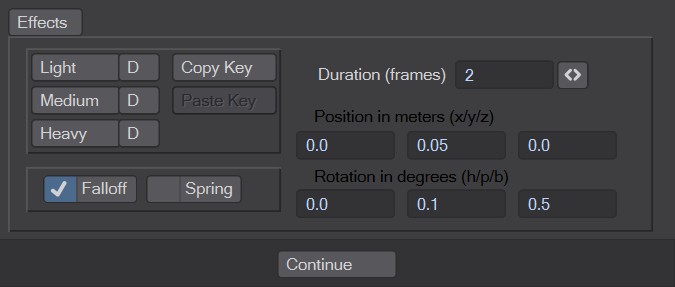
The Effects section at the bottom of the panel sets the actual jolting effect. Clicking Light, Medium, or Heavy will update a keyframe’s Position and Rotation values to reflect preset values for a light, medium, or heavy vibration. This feature can be used for starting points or final settings.
Please be aware that when you press any of these buttons, any existing Keyframe settings will be destroyed.
Clicking the Copy Key button will copy all of the Jolting Effect settings to an internal memory buffer. Clicking the Paste Key button will paste the settings into the fields currently visible. Note that this can affect either the Keyframe or Events Tab interchangeably.
Using Preset Values
You can alter preset values. If you press the D button to the immediate right of any of the presets, then you store the current settings for the key as the default values for that preset. These new default values will persist between sessions with LightWave 3D. (Jolt! stores its preset defaults in a file called JOLT.PRE. You can restore the built-in Jolt! preset values at anytime by deleting this file; however, it can be stored in various places depending on the system configuration. You will need to search your hard drive to find it.)
Applying Turbulence
Jolt! can apply turbulence to your item’s motion path in several ways. When you select Falloff, the turbulence applied will gradually decrease throughout the duration of the event. In other words, at the first frame of the event, the position and rotation values you have entered for the event will be at their strongest, while at the last frame of the event they will be at their weakest. If you do not select Falloff, then Jolt! applies the event values at their full strength at each frame throughout the event duration.
If you select Spring, Jolt! applies turbulence uniformly, and makes it appear as though your item is supported and buffered by springs. Without Spring, Jolt! applies turbulence more chaotically or randomly, which produces more of a true vibration effect.
Key Settings
A Duration value must be specified, in terms of the number of frames, within which Jolt! must complete the effect. Because you can specify the duration and location of vibration events, keyframe data may overlap. Jolt! handles this situation by warning you about the overlap condition. The overlapping key will start before the preceding key ends. If a keyframe is deleted, Jolt! will recalculate all keys to ensure that any overlapped keys are corrected.
The Position controls let you define the maximum deviation on each of the three axes for the item at the current frame. These values are all specified in meters. The higher the number, the more dramatic the initial movement in that direction. A value of zero (0.0) in any position will prevent the item from deviating in that direction. The Rotation controls work similarly but set deviation values for heading, pitch, and bank (in degrees).
Events Mode
In the Events section, you can cause jolting based on the position, rotation, or scale of items. (If you want the effect to occur on specific keyframes, this is set on the Keyframes section. As noted earlier, you can set values for both, but only the selected mode will be applied.) The Watch pop-up menu gives you a list of all the items currently in your LightWave scene. You may select any available item from this list as the watched item, that is, the item that triggers the event. With the watched item selected, click on the Position, Rotation, and/or Scale button to activate the watched attributes. Click either the < (less than) or > (greater than) button next to the input field you wish to set. The Position and Scale fields correspond to X, Y, and Z, from top to bottom and the Rotation fields correspond to H, P, and B.
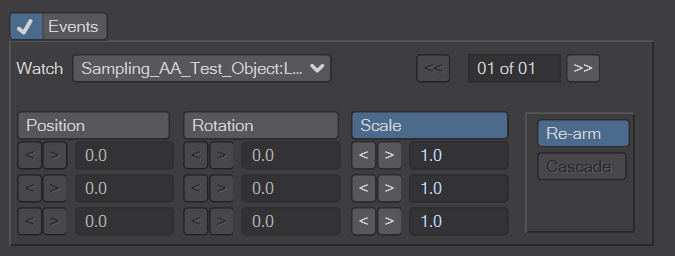
The << and >> buttons let you watch more than one item. To add another watched item, simply click the >> button. The informational display to the left will tell you what item is currently selected and how many there are in total (e.g., 01 of 03). The << and >> buttons are also used to navigate through existing watched items. If you add a watched item by mistake, set Watch to (none). You also cannot add another watched item if the last existing item is set to (none).
Activate the Re-arm button if the item repeats its motion and you want it to trigger the event again. If Cascade is active, Jolt! will ignore the event (i.e., not evaluate it) until the event immediately preceding it has occurred at least once.
The Effects section at the bottom of the panel works as described for the Keyframes section (see Jolting Effect, above).
LeadtheFollower
An example LScript that you can pull apart to see how it works. It is a kind of reverse-Follower.
LScript
Allows you to add an LScript motion modifier to an item.
LScript/RT
Allows you to add a compiled LScript motion modifier to an item.
master
Another demo LScript. This one serves for locking channels. There is no interface, you will need to edit the script so it does what you want.
Mimic
![]() This Motion Modifier is new to LightWave 2019, and is added automatically when the FBX Interchange Bridge is used to import an FBX file using hierarchies for deformation. It can be manually added to a hierarchy to mimic an item in a completely different hierarchy, a bit like a streamlined "Same as Item" function. There is just one control, a dropdown of which scene item to mimic.
This Motion Modifier is new to LightWave 2019, and is added automatically when the FBX Interchange Bridge is used to import an FBX file using hierarchies for deformation. It can be manually added to a hierarchy to mimic an item in a completely different hierarchy, a bit like a streamlined "Same as Item" function. There is just one control, a dropdown of which scene item to mimic.
Mimic doesn't support shearing or off-axis scaling.
MM_MotionDriver
This plugin is for use with MotionMixer and is used automatically as necessary.
Motion Baker
Motion Baker will freeze the motion of an item into individual keys. Motion Baker takes into account not only IK, but also motion/channel modifiers, align to path, and so on. Dragging your frame slider or playing the scene starts the computation.

New Key Mode
- Extra Channels - Places the keys in a special AfterIK channel group - you might use these with expressions.
- Use Existing - Will create normal keys for the selected position or rotation channels.
- Overwrite Keys - Any existing key data will be overwritten. Note that the existing key data will include the effect of Motion Baker recorded on a previous pass.
Motion Baker’s position in a list of item motion modifiers does not matter unless another modifier has an AfterIK option and it is active.
Nodal Motion Modifier

In the motion modifiers for a Layout item, there is a Nodal motion modifier that allows you to apply a nodal network’s vector output to your item’s Position, Rotation and Scale.
Dynamics Part Info
Oscillator
Oscillator applies damped harmonic oscillator motions (i.e., decreasing waves) to selected animation channels of an object’s motion. Examples of this effect are everywhere, from springs and guitar strings to a grandfather clock pendulum.

- Channel - Use the Channel pop-up menu to select an animation channel to be affected.
- Enable - Activate the Enable button to turn on the selected channel. The oscillator value will replace the normal channel value. You may independently enable multiple channels and each channel may have its own independent group of settings.
- Additive - Additive adds the oscillator value to the channel rather than replacing it. If this setting is active, a plus sign (+) will appear next to the channel name. If Additive is off, an asterisk (*) will appear next to each enabled channel name.
- Cycle Time - Cycle Time is the period of the oscillation (i.e., wave), that is, the number of seconds between successive crests.
- Wave Size - Refers to amplitude; the oscillator adds/subtracts this amount at its positive/negative crests.
- Offset - The Offset value is also added to the oscillator value on each frame. Essentially, this sets the value of the horizontal axis that runs through the wave. By default, it is zero.
- Phase - Phase sets where the wave crests with respect to the beginning of the cycle, it ranges from 0 to 360 degrees. Essentially, the wave is shifted horizontally.
- Damping - If Damping is applied, the crests will fall or grow over time, as is appropriate for harmonic oscillators. Damping units are a percent per cycle.
- Start Frame/End Frame - The Start Frame and End Frame parameters specify when the oscillator is applied.
- Copy/Paste - Copy and Paste use an internal clipboard to move Oscillator settings between channels or Layout items.
The formula is: channel value = old value + size * sin( phase + 2*pi*time/cycle time ) * exp(-t*damping factor). Where the damping factor is a special number computed from the Damping percentage.
Parenter
An interactive way of dynamically parenting was added to LightWave 2015. With this Motion Modifier applied, a circular gizmo appears on the item Parenter is applied to that you can drag in the Layout viewport to other items in the scene at the right time. The gizmo can be moved from item to item during the scene and applied to different items as needed. To cancel parenting you can right-click on the gizmo in the middle, but to allow parenting to move to a different item, drag the circle back to the host item.
QuaternionBooster
This plugin is for use with IKBooster and is used automatically as necessary. The plugin has no interface.
Sun Spot
 Sun Spot is a motion modifier that will rotate an item, usually a Distant light or LightWave 2019's new SunLight, to match the sun’s angle at the specified date and time. New to 2019 is the Pick Location tool.

Distance - The radial distance from the rotation center, at which the light is pointing.
Remember that the position of a Distant light is not that important since the light will always come from the direction it is pointing, even behind the Distant light’s position.
- Time Settings - Determine the starting angle. For example, the Hour field should be set from 1 to 24 and Day is the day of the selected Month.
Time Lapse - When Time Lapse is set to 0, there is no sun rotation. A value of 1, will make the sun rotate in real-time, which is very slow (i.e., one second of animation equals one second of sun rotation in the real world). The rotation may be imperceptible in short animations. In such cases, you may want to leave it at 0 to minimize any impact on rendering time from moving lights.
You can accelerate the movement by increasing Time Lapse. For example, 86400 (60 seconds * 60 minutes * 24 hours) will cause one day’s rotation to occur in one second.
- Longitude/Latitude - Set the Longitude and Latitude for the part of the world your sun is (theoretically) shining on.
Time Zone - Time Zone is +/- Greenwich Mean Time (GMT). There are presets provided.
During night hours, the sun will stay at its lowest point at the end of its cycle and then pop to the starting point at the beginning of the next cycle. In other words, it will not revolve in a 360-degree circle.
- Pick Location - Opens the Location Picker window
Textured Motion
Textured Motion lets you apply the contour of texture to a motion. Thus, if you used the same exact texture for a Displacement Map (on a subdivided plane), you could automatically have the item move over it following the contour without much effort!

- Offset - Lets you move the motion in the positive or negative direction along the selected Axis.
- Scale - Acts as a multiplier for the motion. A value of 1 has no effect.
- Axis - Determines the perpendicular mapping axis, as would be the case with an Image Map.
- Texture - Opens the Surface Editor’s Texture Editor so you can set a texture to follow.
LeadtheFollower
To use:
- Create a motion path for an object, and then parent one or more other objects to it.
- Run LTF.LS for each of the child objects.
- Use the Options button to bring up a requester where you can set the number of frames each object should be in relation to the parent object. (If the parent’s motion is set to Repeat, then the child object’s motions will repeat too.)
Simple Constraints
Use Simple Constraints (SimpleOrientConstraints, SimplePointConstraints, and SimpleScaleConstraints) to achieve “dynamic parenting” effects. You can independently inherit (world) position, rotation, and scale from other items in the scene and even use different items for different channels. These modifiers are “keyframe-aware” so you can have different settings at different times in your animation. You can also use Simple Constraints to set up your motion and then “bake” the motion into keys.
To use SimpleConstraints, open the Motion Properties Panel for the item you want to control and add one of the Simple Constraints motion modifiers. SimplePointConstraints is used for positional effects; SimpleOrientConstraints is used for rotational effects; and, SimpleScaleConstraints is used for scaling.
Adding Constraints
The window lists each constraint entry in the order it becomes effective. The number on the left indicates the frame.
To set up a “constraint,” first make sure the Layout current frame is where you want the constraint to start. Click the Add button to add a constraint entry to the list. A panel will appear where you adjust the settings for the entry.
There are three main rows of settings. Each row controls the XYZ position, XYZ scale, or HPB rotation, depending on which modifier you are using. Each channel has its own targeted scene item.
The scene item selected on the pop-up menus will default to the item currently selected in Layout just prior to clicking Add.
The Weight value determines how much the channel is “followed.” The default, 100%, will match the targeted channels exactly. You can use less than 100% or even more than 100%. Note that you can use the Envelope (E) button to animate the weighting.
SimpleConstraints uses the pivot points for the source and target for its computation, so keep this in mind if the effect isn’t turning out like you expect. Also, world space position, rotation, and/or scale are used, overriding the source’s parenting and keyframed data.
Select Null constraint if you want to disable and “bake” (see next section) the constraint at the current frame.
You may disable any channel by “clicking off” the XYZ or HPB button, making it unhighlighted. You can also set the selected item to none.
You can edit an existing entry by selecting it with your mouse and then clicking the Edit button.
Baking
To disable all constraints within a range of frames, but retain the constrained states, you can “bake” the constraint effect into actual keys. However, note that keys are only created where the targeted object has a key, not at every frame. Also, the keys’ Incoming Curve will be set to Stepped. This locks the state at each create key.
To bake the constraints, click the Bake Range button. In the panel that appears, set the sliders to define the range of frames you want to be baked. If you only want to bake the current frame, click Bake Current Frame to set the sliders to only the current frame. Click OK to execute the process. After baking, the constraints falling within the baked range will become disabled. Obviously, subsequent adjustments to targeted items will not affect baked motions.
If you click UnBake Selected, the selected constraint will be re-activated. Any keys created from baking will remain; however, remember that constraints will override them.
Deleting Constraints
To delete a constraint from the list, simply select it with your mouse and click the Delete button.
Simple Constraints vs. Parenter
Simple Constraints are slightly faster than Parenter and allow you to control motion channels separately. In general, you should use Parenter, unless your item hierarchy is deep enough to cause performance issues.
Simple Affectors
The Simple Affector modifiers (SimpleOrientAffector, SimplePointAffector, and SimpleScaleAffector) are set up exactly like Simple Constraints, as described above. The difference is that the object retains its keyframe motion and is merely influenced by the target.