Motion Options
Motion Options Panel (default keyboard shortcut M)
When an item in Layout is selected, clicking the Motion Options button opens a panel containing various controls for the selected item.

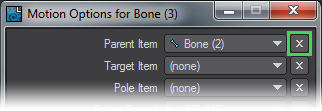
- Parent Item - This dropdown menu allows you to parent the current item to any other item in the list excluding bones, which can only be parented to another bone belonging to the same object or to the object they belong to.
If you select multiple objects in Layout and hit the E key, the objects selected will be parented to the last object selected.
The E key is pressed after each lasso selection to parent one null to the other selected
- Target Item - This brings up a list of items that will allow the currently selected item to target or point at.
- Pole Item - Sets up a link to another item (often a null) that will be used as a Pole Vector. Pole Vectors are to the item’s Bank as Targets are to the Heading and Pitch.
- Spline Control - Determines the Spline Control element that will be used for the selected item.
- Rotation Order -
 In 2020 there is a new dropdown for different rotation orders giving their XYZ and LightWave-style (HPB) names, as follows:
- XYZ / PHB - Autodesk Maya standard
- YZX / HBP
- ZXY / BPH - Unity standard
- YXZ / HPB - LightWave standard
- XZY / PBH
- ZYX / BHP
After all these controls, apart from Rotation Order, there is an X icon. This is used to rapidly de-reference the Parent, Target, Pole and/or Spline Control items without needing to go into the dropdown menu and selecting (none), although that option remains available.
IK and Modifiers Tab
- Unaffected by IK of Descendents - This option is used to define the root of an IK chain. It acts as an anchor for IK based motions and stops the motion from passing back beyond that item.
- Goal Object - This is an item which is usually the “handle” at the end of an IK chain. This handle serves the same function as a control rod on the end of a muppet’s arm or the strings on a puppet.
- Objective Menu - This menu selects how the item uses the goal. The default is Go to Goal , which the familiar way of trying to get the item to be as close to the goal as possible. Point at Goal is similar to targeting in that it aims to make the items Z-axis point at the goal. YZ Plane through Goal the IK solver will attempt to get the YZ plane of the effector to go through the goal position. This menu is only available when a Goal Object is selected and in turn it makes the Goal Strength field available.
- Goal Strength - This option is used to determine how much the end of the IK chain follows or is attracted to the goal object. This is particularly important when using multigoal IK chains. One goal for example could be used to control the placement of a leg/foot and another to determine the orientation of a knee joint. You would want the goal at the end of the leg to have a greater goal strength then the one at the knee. Sometimes this takes a little tuning to get right. With a character that is modelled to human scale, goal strengths from 30 -100 work well. Interestingly enough the smaller the character the larger the goal strength and the bigger the character the smaller the the goal strength needed.
- Base on... - Four choices are presented:
- Base on First Keyframe -
- Base on Most Recent Keyframe -
- Base on Current Time -
- Base on Frame Number - Makes the field next to this dropdown available for adding a frame number, which can be enveloped
- Chain - Activates the IK/FK blending options for the entire chain.
- IK/FK Blending - Will blend the calculations for inverse kinematics and the keyframes for forward kinematics based on the percentage, with 100% being full FK.
Controllers and Motions Tab
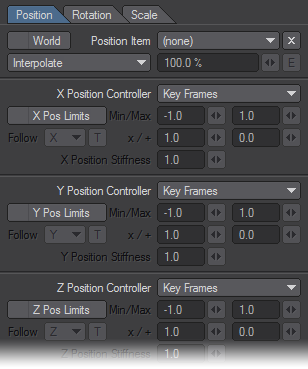
The World options for Rotation will use the world coordinates, rather than the local coordinates.The “Transform” Item option will select the item which influences the current item.
Interpolate uses the blend to interpolate between Same As Item value and channel value.Compensate removes the Same As Item value from the channel value to a degree specified by the blend.
Heading, Pitch and Bank Limits
We can determine a range within which a rotational channel of an item can rotate. This is useful to keep joints from hyperextending or keeping IK controlled joints from “popping”. It is also useful to keep items that are very closely spaced from rotating in and through each other.
Heading, Pitch and Bank Stiffness
This setting allows you to set a stiffness or resistance on the rotational channels of an item. This works when the controller for a channel is set to IK. The Stiffness setting can help to determine which items in an IK chain will bend first or last. Higher values make a joint harder to bend and lower values easier to bend.
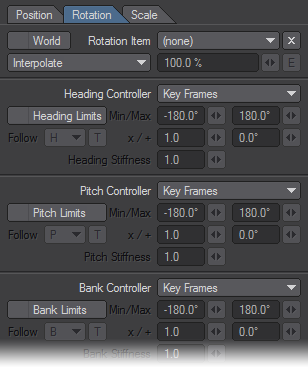
Heading, Pitch and Bank Controllers
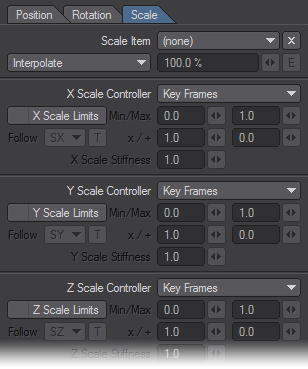
Scale Controllers
Position Controllers
Controller Types
These contain seven options for controlling the rotation, position and rotation channels. Not all options are available for all channels.
- Keyframe - This simply means that you can manually orient an item in that channel and keyframe its position at anytime.
- Point at Target - This allows a particular rotational channel to target an item. Target Item in the main motion panel must be set to some item.
- Align to Path - This allows the rotational channel of an item to align to its motion path. With the Align to Path Look Ahead controller under the IK and Modifiers Tab we can make this channel look ahead or anticipate a turn.
- Inverse Kinematics -This allows IK to control this channel. If other channels are set to FK we can selectively determine which rotational channels are controlled via IK or FK.
- Align to Velocity - The channels controlled by this option will have the same values as the corresponding channels of the set item. The stiffness value can be used to interpolate. The one for position has the option to use the world coordinates of the position item (instead of local). The calculations currently assume that X, Y, and Z are controlled, so the result may not be optimal if not all three position channels are “Same as Item” controlled.
- Align to Pole - This option adjusts the angle of the item so it points towards the pole. It is similar to the target item, and typically used in combination with it.
- Same as Item - The channels controlled by this option will have the same values as the corresponding channels of the set item. The stiffness value can be used to interpolate. The one for position has the option to use the world coordinates of the position item (instead of local). The calculations currently assume that X, Y, and Z are controlled, so the result may not be optimal if not all three position channels are “Same as Item” controlled.
Record Minimum/Maximum Joint Angles
You can interactively set the rotational Min and Max values by rotating the item to the desired minimum direction and choosing Setup > Motions > Limits > Record Minimum Joint Angles (default keyboard shortcut: {). This will activate minimum limits for any rotational parameters (heading, pitch, or bank) that are currently active for the chosen item. Similarly, rotating the item to the desired maximum range limit and choosing Setup > Motions > Limits > Record Maximum Joint Angles (default keyboard shortcut: }) will automatically input the values into the maximum limits for the active rotational parameters.
You should deactivate Heading, Pitch, and/or Bank to avoid setting limits for channels you don't wish to.
Soft IK
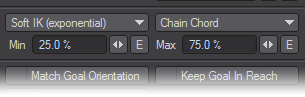
Soft IK can be used with the Go To Goal objective. Its purpose is to smooth out the transition from a bent chain to a straightened out chain. It does this by changing the position of the goal that the chain uses, moving it closer to the chain root. Three types of Soft IK are available from the dropdown that each offer different ways of treating the transition. Experimentation is necessary to see which of Exponential, Linear and Clamp work best for your specific needs.
The threshold at which it starts to do this is set by the Max value. If the distance between the chain root and the goal is larger than that indicated, the soft IK will kick in smoothly.
There are three ways to specify what “the distance between the chain root and the goal” means:
- Chain Chord - the Max value is given as a percentage of the straight-line distance between the chain root and the goal.
- Chain Length - the Max value is given as a percentage of the distance between the chain root and the goal, as measured along the chain.
- Given Lengths - the Max value is used as the distance.
Additionally, as well as a soft IK on stretching the chain, there is a soft IK on squashing the chain as well. If the distance between root and goal is less than a given minimum value, then it will start to push the goal away.
- Full-time IK - When this option is off, IK is not calculated full-time. This means that animating the goal object will have no effect on the items with IK active. The goal object will affect the IK items while posing. The items that are part of the IK chain will have to be keyframed manually. In this mode the Goal object acts as an aid to pose the IK chain. When this option is turned on, as it is by default, IK is calculated full-time.
This allows the goal object to be used to animate with full-time and the items in the IK chain do not need to be keyframed.
- Match Goal Orientation - As stated before the Goal object acts as a sort of handle or the control rod on the end of a muppet’s arm. By turning on match goal, the last bone in the IK chain will match its orientation to that of the goal objects. This allows things like a foot or hand to stay locked in place rather then pivot around the goal object.
- Keep Goal Within Reach - It is possible for the goal object to move away from its IK chain once it exceeds the length of the chain. This is normal but can be disconcerting to some people. If this option is turned on, the goal object will always stay at the end of the IK chain.