Working with Modeler
Multi-Layer Object Standard
Every object can be a “MultiMesh,” that is, consist of an unlimited number of layers, similar to layers in many paint programs. The MultiMesh lets you work independently on specific parts of an object. During Modeling operations, you can set layers independently to be in the foreground or background, so you can work on a combination of layers as if they were in the same layer. Background layers can be used as a reference, but are often required when using certain Modeling tools such as boolean or cutting operations.

When you save an object, you save all layers with it. When you load an object, all of the individual layers remain intact; however, you may specify that certain layers be hidden when you use the object in Layout. You can thus save things like scratch objects - which you would not want rendered - in the same object file.
When loaded into Layout, individual layers of a MultiMesh are treated as individual objects.
Multi-document Environment
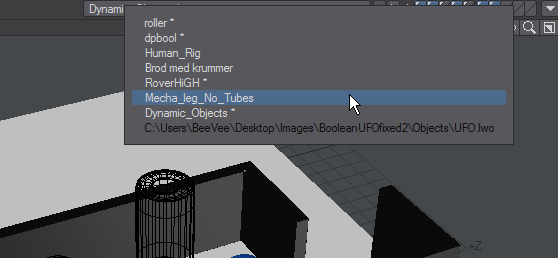
Like files in an image editor, multiple object files can be loaded simultaneously. The Current Object pop-up button to the left of the layer buttons switches from object to object. Object names listed with an asterisk (*) have been changed and may need to be saved. Attempting to close the application triggers a request to save all changed objects. Ghosted objects are ones that have been loaded into Layout, but not into Modeler. Choosing a ghosted object from the pop-up menu will load it.
Layout Communication
If the Hub is running, a small pop-up menu button appears in the top-right corner of the interface, just to the right of the layer buttons.
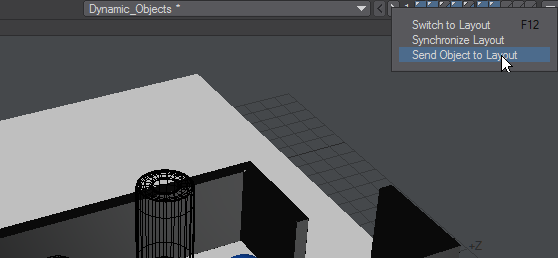
- Switch to Layout - switches to your Layout window if it is open or opens up Layout if you do not already have it open.
- Synchronize Layout - Changes to objects in Modeler are reflected automatically in Layout when you select the Layout interface. You can force this synchronisation by choosing this option.
- Send Object to Layout - sends the current object to Layout. Actually, it sends a pointer to the current object’s file. As such, the object must be saved to your hard drive first.
If you load an object in Layout only, its name is ghosted in the Current Object pop-up menu. Selecting a ghosted item will load it into Modeler and initiate the syncing process.
Layer Navigation
You can use the layer buttons in the top-right corner of the main interface to work with layers in banks of ten. You can apply most Modeling functions across multiple layers simultaneously by placing them in the foreground. You do this by clicking the top part of a layer button; all other layers are unselected, whether they are in the foreground or background. You can add foreground layers by holding the Shift key as you click. You can unselect a foreground layer by holding the Shift key as you click on a selected foreground layer button.
To place a layer in the background, click on the bottom part of a layer button. Selecting a background layer will unselect all other background layers. You can add background layers by holding the Shift key as you click. You can unselect a background layer by holding the Shift key as you click on a selected background layer button.
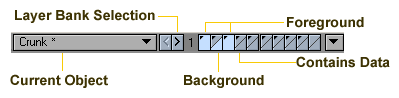
You can quickly swap the state of foreground and background layers by pressing the apostrophe key (‘).
If you notice a tool not working when multiple layers are selected, just select the one layer you need to work on and try the tool again.
You can change which bank of layers - ten layers per bank - are controlled by these buttons. Just click the < or > buttons. Bank 1 controls layers 1 through 10, bank 2 controls layers 11 through 20, and so on. The Bank Selection buttons are mapped to your PgUp and PgDn keys by default. The highest bank number is 99, but you can access higher layers using the Layer Browser Panel.
Layers Panel
Vertex Map Panel
Hide Floating Windows On/Off
Since your screen can often get cluttered with open panels, you can quickly hide/show these floating windows by pressing the Alt F1. This option can also be found under the Windows drop down menu.