Removing Noise workflow
Noise is an inevitable and unwanted result of rendering 3D images. Unless your scene is extremely simple it is likely that you will have some. LightWave's buffer view enables you to track down exactly where this noise is coming from before you launch your scene render.
![]() Updated for LightWave 2020. We're all familiar with upping the Antialiasing samples in order to create a noise-free scene, but some noise can't easily be reduced this way - at least, not in a timely fashion. Adding samples to the wrong areas to improve renders will make them slower and not improve the quality. Working through this checklist will show you better where to concentrate your efforts.
Updated for LightWave 2020. We're all familiar with upping the Antialiasing samples in order to create a noise-free scene, but some noise can't easily be reduced this way - at least, not in a timely fashion. Adding samples to the wrong areas to improve renders will make them slower and not improve the quality. Working through this checklist will show you better where to concentrate your efforts.
 Flowchart Scene
This example scene is enclosed. Click on the box icon to retrieve it.
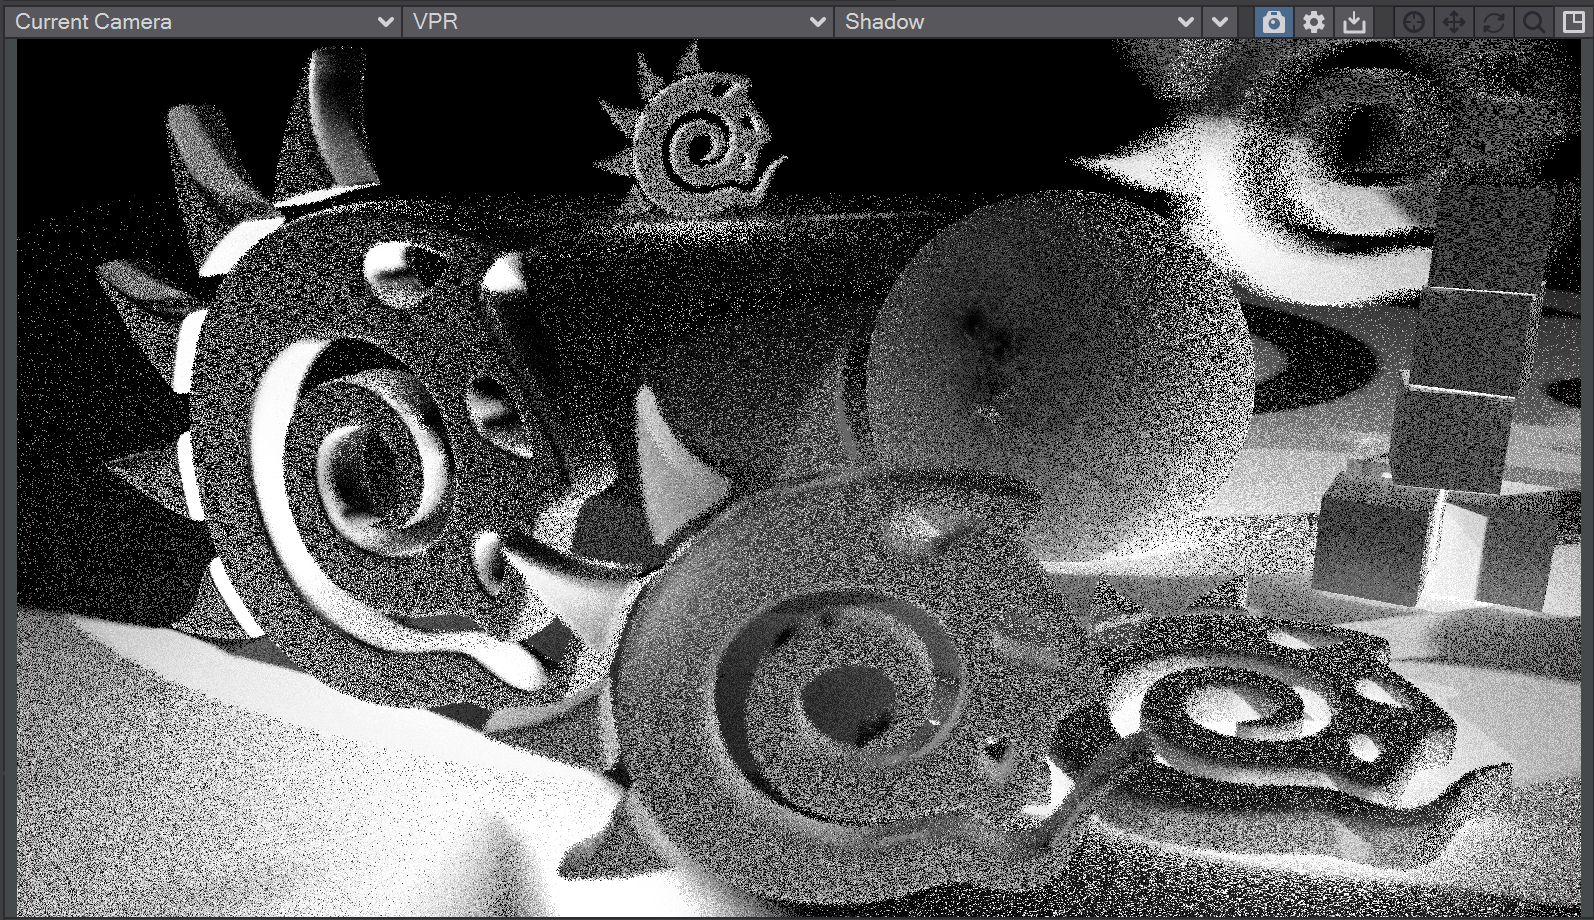
To exaggerate the effects of this workflow we have set our base values very low. Our scene has:
- Depth of field with the F-Stop set to an unrealistic 0.8
- Minimum and Maximum Samples at 1
- Reflection Samples at 1
- Refraction Samples at 1
- Subsurface Scattering Samples at 1
- Brute Force GI at 1 Ray
- Light samples at 1
These all combine to give a render that looks like

When trying to find the problem with this scene, we can check how the Alpha looks to see if it's purely an anti-aliasing problem.
Alpha Noise

The Alpha shows us that the yellow logo on the left is noisy, the green one at the back is noisier still, and the gray one to the right is the noisiest. The yellow and green logos are subject to depth of field and the gray logo is moving fast and the noise is caused by motion blur (and possibly some DoF too). To correct both of these problems all that is needed is more Camera Samples for anti-aliasing, but we should start by taking the Depth of Field out of the equation. If the Alpha is the only problem with your scene you can Go! If not, carry on down the list, but be aware that those Camera samples are multipliers for the other sample settings so be prepared to juggle otherwise you will end with longer than necessary render times. If there's no motion blur or depth of field in your scene, look at the other buffers before you increase Antialiasing samples. You can probably get a clean render without increasing them.
It may seem odd that the transparent logo in the foreground seems to be cutting a hole in the alpha through the ground. What is actually happening here is that the refractions are bouncing off the inside of the logo and heading up. We have no environment for this scene, so those refraction rays are hitting nothing and just returning black. You can have a shim or an environment so this doesn't happen in your scene.
Diffuse Indirect Noise

Indirect Diffuse noise is probably the most common challenge and we don't actually have that much, mainly because we don't have many purely diffuse objects in the scene. Nonetheless, you can actually see a bit in the curls of the red logo at front right and between the cubes just behind it. This noise is normally caused by too few Global Illumination samples. Increasing the number of Brute Force rays in the Global Illumination settings is the best thing to do. If your scene doesn't use radiosity, such noise can be cured with additional Camera samples. Was adjusting your Camera samples enough? Then go render. If not, try Specular Direct Noise.
Specular Direct Noise

Specular noise is caused by a lack of light samples. In the blue ball we can see obvious lacks in lights reflected, particularly the Area light, which is very noisy. Usually, increasing the Light samples a little is enough to cure these problems, but it does depend on the size of the light - larger lights will require more samples. It can be confusing to spot the difference between Specular Direct and Specular Indirect noise. Direct is reflection of the lights themselves in your surface, while indirect is a reflection of other objects. Good to go? If not, go to the next one.
Diffuse Direct Noise

Direct Diffuse noise is usually seen in the shadows of your objects. It can be cured with additional Light samples, but also see Shadow Noise. If this gives you a noise-free image, then you are ready to go. If not, and not Shadow Noise, carry on to Specular Indirect Noise.
Shadow Noise
Shadow Noise is always a result of too few Light samples. There is little point adding light samples to all your lights, in the image above the light behind the yellow logo on the left needs additional samples but the other lights in the scene can probably be left as they are to keep render times as low as possible. Noise gone? Go render. If not, next.
Specular Indirect Noise

Specular Indirect noise is caused by the reflection of objects in other objects and not the reflection of lights in objects, which is Specular Direct. You can check by setting the surface in which something is reflected to have a Roughness of 0. If the noise disappears you know there is a problem in Specular Indirect.

The Yellow logo appears clearly in the reflection when the ground surface Roughness is reduced to 0. The reflection is good, the noisiness is in the yellow logo itself.
To clear Specular Indirect noise. increase Reflection Samples in Render Properties > Render. Do you now have a noise-free render? Go. If you don't, check Refraction Noise.
Refraction Noise

Refraction noise is caused when transparent surfaces in your scene don't have enough refraction samples. It can be seen in the final render by noise and a lack of definition and more clearly looking directly at the Refraction AOV. It is cured by increasing the Refraction samples in Render Properties > Render. There is one more object in our scene causing problems, but if yours is good go render your scene. If you do have Subsurface scattering in your scene, check the next item.
Subsurface Scattering Noise

The last noise offender in our scene is caused by Subsurface Scattering. There's no complicated solution. If your SSS is noisy, you need to increase Render Properties > Render > Subsurface Scattering Samples.
Still Noisy?
If you've been through this workflow and your render is still noisy, it will probably be down to one of these:
- If there is something out of shot that is being reflected in your scene, check its sampling;
- If you are using the Standard material, it is not energy conserving and so can knock values out of whack. Consider replacing it with an energy-conserving material like Conductor, Delta or Dielectric or Principled BSDF, if possible;
- In this list, we have talked about geometric surfacing, but volumetrics in the scene can cause their own noise too. Increasing Volumetric Samples in lights affecting volumetrics will be the solution here.
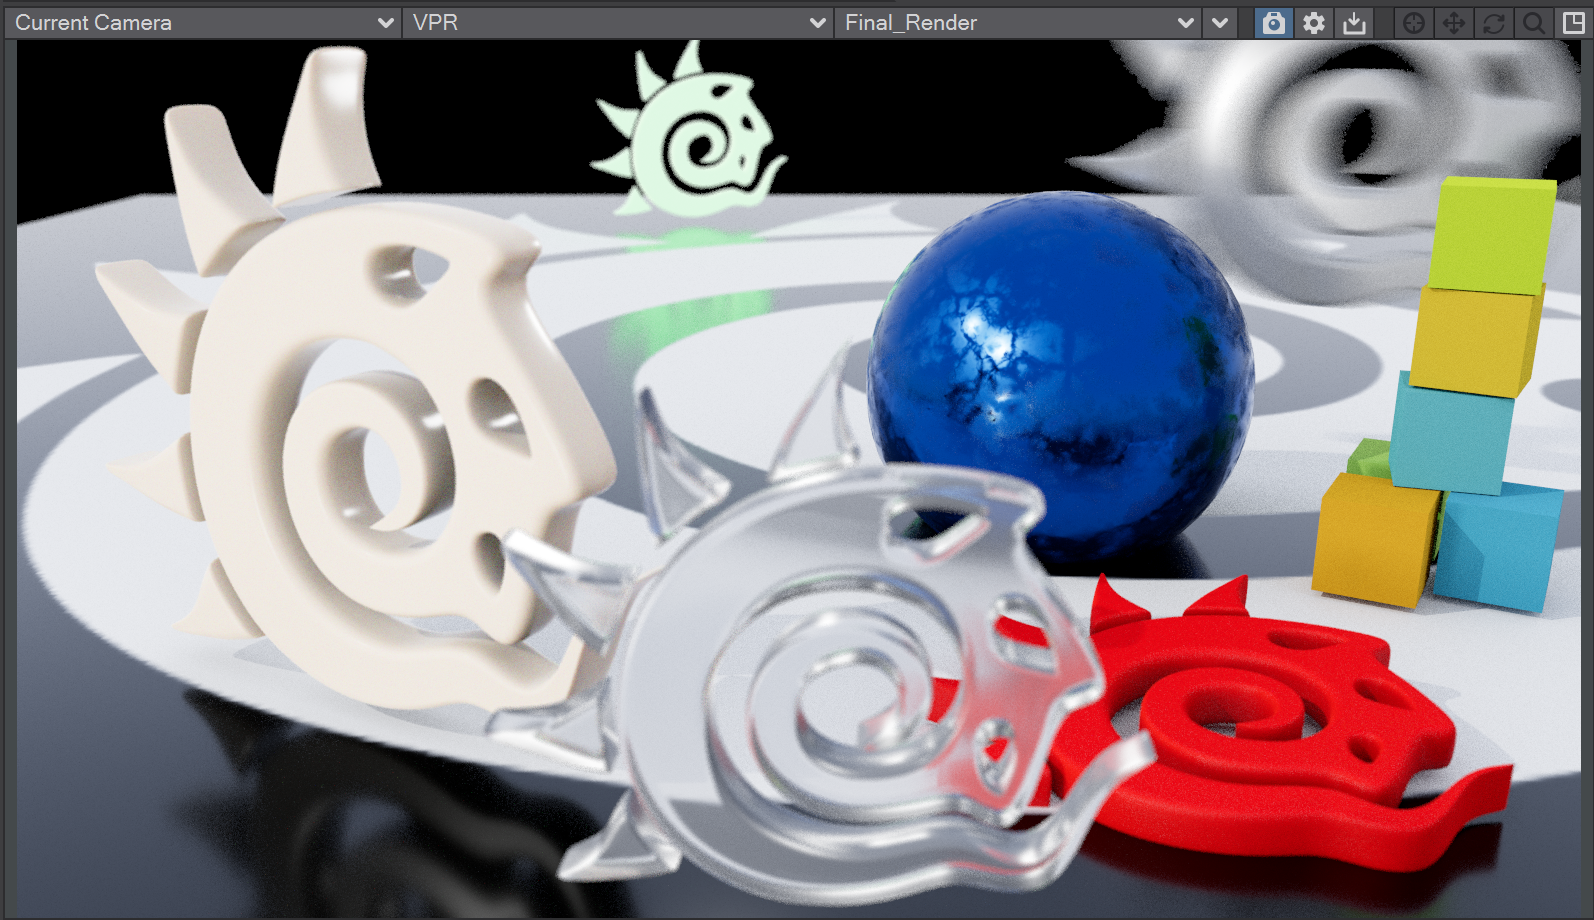
Go
Go for final render! Make sure you save your scene and objects before you hit F10 and if sending the scene for a network render use Package Scene to prepare your files.
|
Gives us a satisfactorily clean render |
As a shorthand, when looking to modify your sample settings check through this list:
- Alpha → AA
- Diffuse Indirect → GI Rays / AA
- Spec Direct → Light Samples
- Diffuse Direct → Light Samples
- Shadow → Light Samples
- Spec Indirect → Reflection Samples
- Refraction → Refraction Samples
- SSS → Subsurface samples
LightWave 2019 added two forms of noise reduction, for CPU and GPU. Both will reduce the noise in your renders but both rely on techniques, either manual or automatic, to blur noise without ruining the overall image. Using the steps listed above you will be able to reduce the noise in your renders with an understanding of what causes the noise in the first place. Postprocessing methods still have their place, especially for projects with a rapid turnaround, but getting familiar with the steps above will give you a better quality of render in a quantifiable way.