FiberFX - Geometry
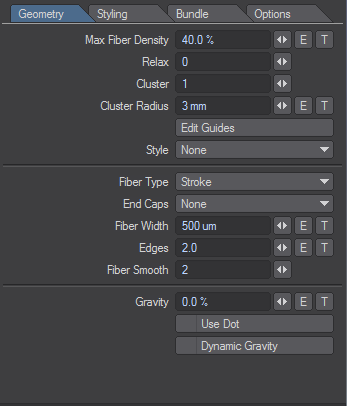
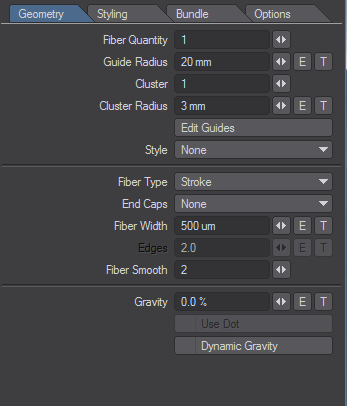
FiberFX has two styles of geometry tab. The one on the left will be seen when Fibers are grown on surfaces or objects, but if you use splines or poly chains you will see the style one the right
- Max Fiber Density - Dictates how many fibers your surface will have. Max Fiber Density can either be expressed with a number or with a texture. It can also be animated over time using an envelope.
- Relax - You can relax the fiber distribution across your object in a series of iterative steps that will gradually quantize placement making fibers more evenly spread. There are 40 levels of relaxation and each one marks an iteration, so setting it immediately to 40 will take some time to show results depending on the quantity of fibers to be processed. (Not available for Spline FiberFX)
- Cluster - This will place additional copies of the guide fiber around the initial fiber to increase dynamic responsiveness.
- Cluster Radius - The radius around the original guide fiber that is used for the placement of fiber copies.
- Edit Guides - This allows you to style your hair and save the style as a Vertex Map with the object it is applied to. It is discussed in detail here.
- Style - Apply a style created with Edit Guides.
Spline FFX specific:
- Fiber Quantity - How many fibers follow the spline or poly chain.
- Guide Radius - How far away from the spline fibers can spread. Important when the Fiber Quantity above is more than one.
How smooth your spline fibers will be will depend on how many control points your spline has.

The spline on the left has 647 points, the spline on the right has only 16
Fiber Type - This setting gives you a dropdown menu with two choices. If you polygonize the fibers to make a model they maintain that alignment in the model as well:
Stroke - Will create a camera-facing 2D shape.
With strokes being camera-facing 2D shapes, their shadows are necessarily an approximation created by taking the central line of the fiber and expanding it, without taking the fiber's form into account. Mostly, this will be fine but if you require accurate shadows, use Solid instead.
Stroke fibers brought in from LightWave 2015 will need to be scaled by 0.0005.
- Solid - Will create a solid tube. It can be applied to any fiber guides. You can generate and style the fibers directly within FiberFX using the Edit Guides option, or you can use models set up with the FiberFX tools in Modeler (Fiber Modeler and StrandMaker , both available on the Setup tab in Modeler). Solid mode render fibers with 3D volume at render time, in much the same way that Layout treats 2-point poly chains when you assign a negative Particle/Line Thickness for an object.
End Caps - Presents a dropdown list with a choice between:
- None - The ends of the Strokes or Solid fibers are squared off.
- Cap Base - The base of each fiber is rounded.
- Cap Tip - The tip of each fiber is rounded off. In Stroke mode, you might need to reduce the amount of tip transparency to see the effect, since the default 20% hides the rounding.
- Cap Both - Both ends are rounded.
Fiber Width - Sets the thickness of fibers. Thinner fibers are more transparent and build up density more slowly, whereas thick fibers are less transparent and build up density faster. Model scale has an effect on fiber width, as does the distance to camera. Fibers further away are smaller in screen space and are more transparent.
The default value is based on human hair which has been measured at 0.017mm to 0.181mm with blond hair being the thinnest and black hair the thickest. 500 um is the median value.
Depending on the size of your object you may need to increase or decrease this value for a realistic effect. By default Solid fibers have an equal thickness across their length. To vary the thickness, click the T button and select the Gradient Layer Type, then choose Fiber V as the Incoming Parameter and vary the thickness.
Edges - This is the geometric resolution of each fiber. Fibers are given two by default, but if you have long fibers you may need to increase edges in order to smooth the fiber and avoid awkward corners rather than bends. (Not available for Spline FiberFX)
Fiber Smooth - This is a subdivision technique for fibers at render time so that Edges can remain low and long fibers will still bend rather than corner. Since it happens at render time it has little impact on memory while working in Layout. By default Fiber Smooth is set at 2, which will subdivide each fiber four times. There are four levels of subdivision each of which doubles the previous level.
Setting Fiber Smoothing higher than needed can impact render times. Try incremental settings until you hit the smoothing level you need, rather than maxing it out.
Gravity - FiberFX offers a simplified gravity. The default is set to 0 %, but 140 % approximates earth gravity on human hair if you wish to use it.
Use Dot - This function uses the dot product of the gravity calculations to make the fibers act more like they are hugging the surface to which they are assigned.
Dynamic Gravity - If you have applied gravity to your fibers, checking Dynamic Gravity will ensure the position of the fibers will be animated to always point in an appropriate direction for the movement of the object the fibers are assigned to.