FiberFX - Options
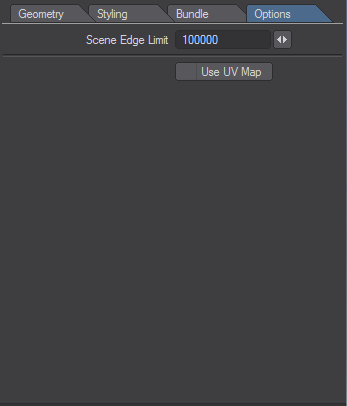
- Scene Edge Limit - Sets the maximum number of fiber edges drawn in OpenGL. The higher the number, the more fibers will be visible at the expense of slower OpenGL responsiveness.
- Use UV Map - If your mesh has a UV Map, you can use it, rather than texturing the hairs directly. As an example, you have a UV-mapped leopard model with an image for the fur. Using UV Map here will color your fibers according to that texture.
Edit Guides
FiberFX allows styling of fiber guides directly within the LightWave Layout OpenGL viewport using Edit Guides. The tools presented in this window are intuitive to use and allow more natural styling of fibers than using just the basic parameters found in the Geometry and Styling tabs of the main FiberFX window.
Fibers should be edited (using Edit Guides) in their undeformed state. Combing fibers must be done before any deformation is applied, and before they are parented, moved or rotated in space. Disabling Deformation, IK and Motion Controllers is a must.
To bring up the styling tools, click the Edit Guides button on the Geometry tab of the main FiberFX interface. Once clicked, the main FiberFX interface will be hidden, and you will be presented with a window asking you to name the style you are about to create. If you have already created a style and have it selected in the dropdown below the Edit Guides button, you will immediately enter Edit Guides where you can make changes. If you wish to create a new style, set your Style to None.
When using the Edit Guides window individual fibers become hidden, and the guides that control them are shown instead, these are what you will be styling. It’s worth noting at this point that when you begin styling your guides the Edges setting in the Geometry tab locks, so either make sure you have edges set to what you want before styling or save a ‘before styling’ version of the scene to preserve the ability to edit edges. You can also set your style to None, and your Edges setting will unlock again, allowing you to recreate the style from scratch.
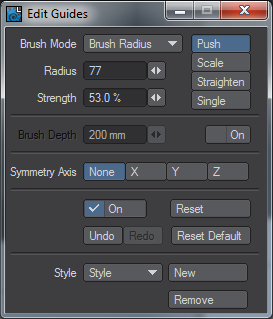
As soon as you click your left mouse button in an OpenGL viewport with this window open you will see two circles for your mouse pointer. The inner circle determines the strength of your brush, the outer the size. These values can be changed numerically in the Edit Guides window or using the right mouse button interactively in the viewport. RMB up/down controls brush radius, while RMB left/right controls brush strength. This applies whichever of the three Brush Modes you choose to use.
The three brush modes are as follows:
Radius - This is an airbrush-like manipulation of the guides on your object.
Global - This affects all guides equally, your brush radius has no effect here, but the strength does.
Surface Hug - This works similarly to Radius mode but attempts to keep to the surface of your object.
There are four brush types as follows:
Push - This ‘combs’ the guides in the direction you drag the mouse over them. The amount it drags them depends on the strength of your brush.
Scale - You cannot interactively change the radius and strength of your brush when in this type since clicking on the left mouse button grows the hair inside the radius of the brush, right-clicking shrinks the same hairs.
Straighten - This will unbend your fibers the longer you leave your mouse button held down until they are back in their initial direction of the normal of the polygon they are on.
Single - A special-use type, this allows you to manipulate a single guide, for instance, to create a kiss curl on the forehead.
Brush Depth - Because styling is most often done in a Perspective viewport sometimes you don’t want to affect fibers that are seemingly within the brushes radius but are actually on the other side of the shape you are styling. Using Brush Depth will enable you to control just how deep into the screen the brush goes.
Symmetry Axis - You can brush symmetrically on your object using these buttons, and a plane will appear bisecting your object perpendicular to the plane you choose. Also, a single circle shows the fibers you are affecting on the opposite side of the symmetry axis.
History - The Checkmark with On written on it is to enable or disable the keeping of a history of steps performed in the Edit Guides window and can be turned off to save memory. The history is only kept during the session using Edit Guides, not between sessions.
Revert - This reverts the style to what it was when you opened the Edit Guides window initially and functions regardless of the state of the History On/Off Checkmark.
Reset Default - This button takes the style back to its original, default state. Be warned that there is no undo for using this function.
Style settings
Style dropdown - Allows you to choose between the different styles applied to your fibers.
New - Creates a new style based on the one you were previously editing.
Remove - Deletes the currently selected style from your fibers.
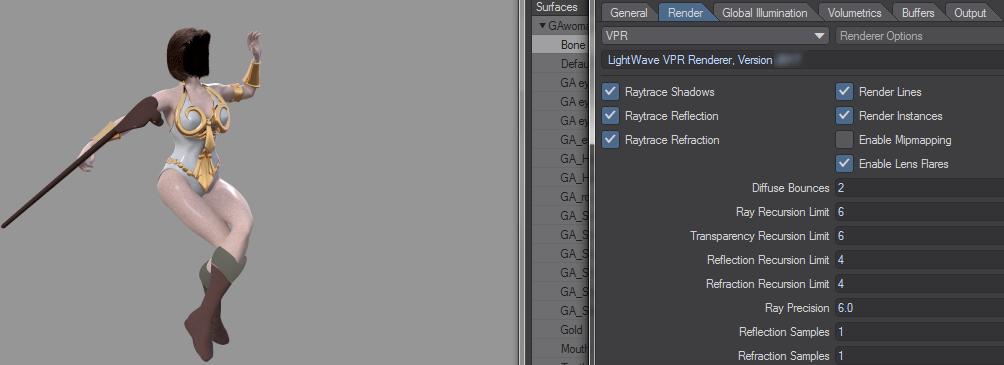
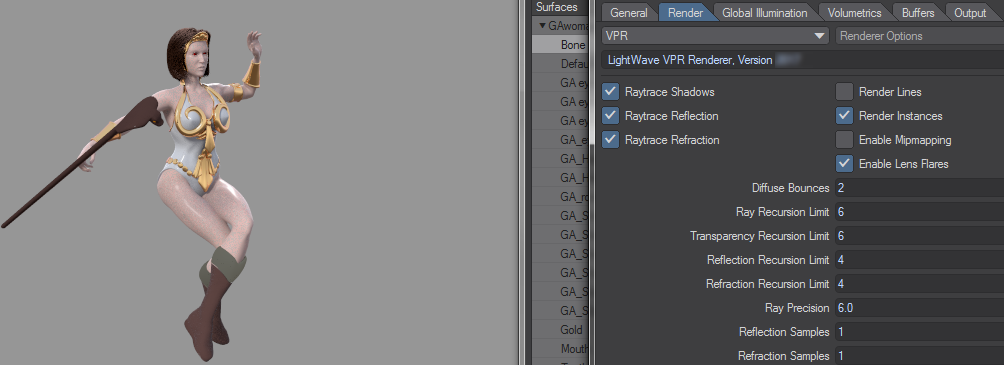
When using Guides for FiberFX, make sure you turn Render Lines off, otherwise, the two-point polygons used for guides will render through the fibers.