Interchange Bridge
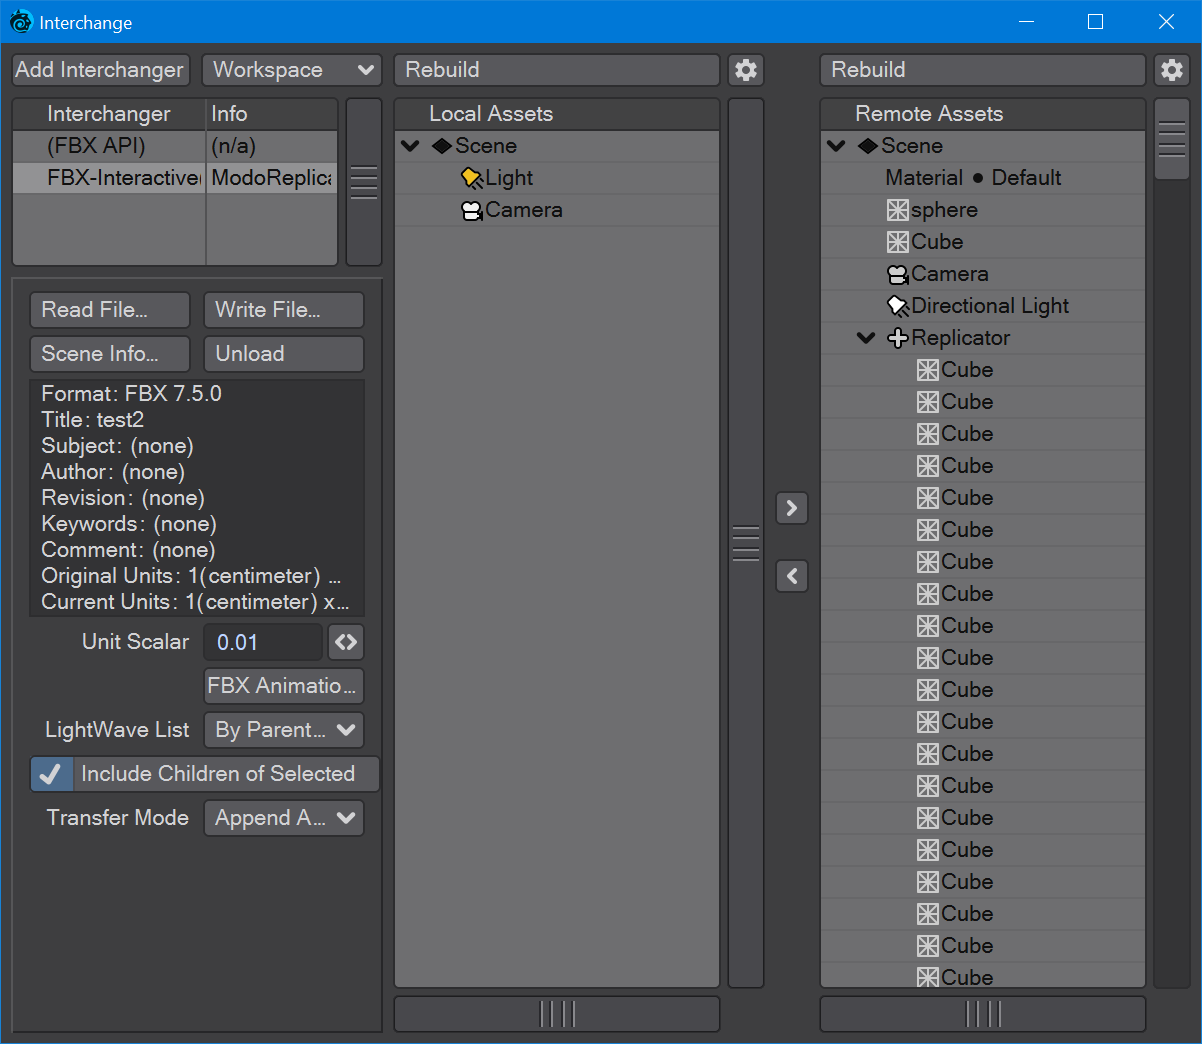
The new Interchange Operator window presents two lists. The left list, or local, shows the current LightWave scene content. The right side - remote - is the FBX file currently loaded.
It is best to use the existing FBX Export right now. The Interchange Bridge works well for importing, less so for exporting in this initial implementation.
Introduction
LightWave 2019 introduced the new Interchange Bridge for better importation and exportation of assets. An interchanger is the interface between files created in other applications and LightWave. For the moment, the only interchanger is FBX. There are three columns in the Interchange Bridge. On the left are general options and info, the middle section concerns items local to LightWave already in the current scene. The right section contains loaded FBX files brought in with the Read File button in the left column.
First Use
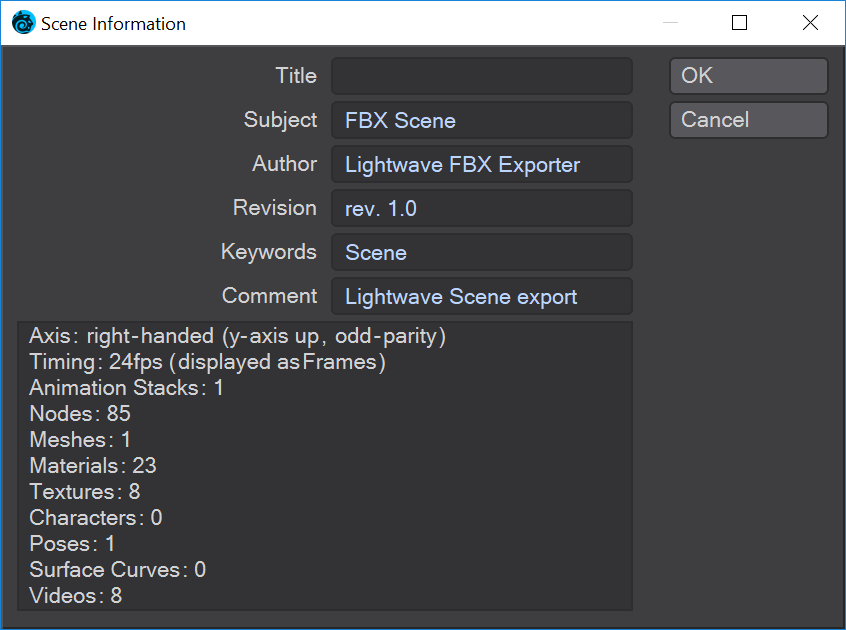
When you first open the Interchange Bridge panel, click on the Read File... button to add an FBX file to the right column headed Remote Assets. This will show the following window:
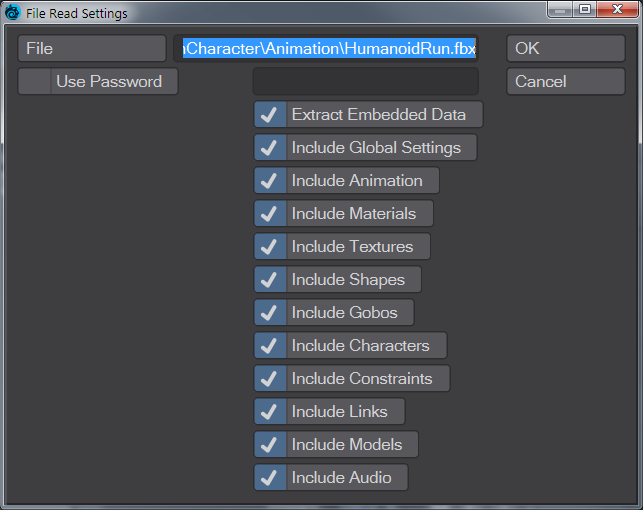
where you can choose the options for the FBX file you have chosen. Clicking on OK will add the FBX file to the right column headed Remote Assets. To add the whole thing to LightWave (either Layout or Modeler) drag the topmost entry - Scene - to the column headed Local Assets. Alternatively, click the left-pointing arrow between the Local and Remote columns. If you only want a specific part from the FBX file just drag the corresponding item. Whatever you have dragged should appear in the Layout or Modeler viewport(s) immediately (depending on the size of the asset).
Left Column
At the top of the leftmost column are:
- Add Interchanger - Adds an additional FBX interchanger to allow for multiple FBX files in the same bridge. Useful for when you want to mix and match FBX file contents. You can have several interchangers active
- Workspace - Tools to deal with the workspaces set by Interchangers. There are three options in the dropdown:
- Reset - After a warning will reset the Interchanger window to its initial view with no interchangers
- Save... - Saves workspace for later retrieval
- Load... - Loads saved workspaces
Down the left side of the window are:
- The Interchanger workspace:
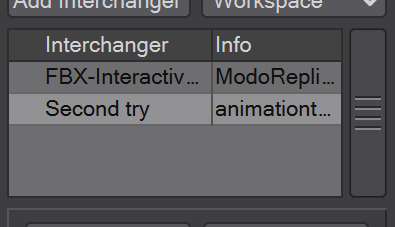
Interchangers can be right-clicked to rename or remove them
Read File... - This is where to choose an initial FBX file to import. Once determined, the following window appears, where you can select the options you want to include from the FBX file chosen:
Although there are many options listed here, LightWave does not currently understand or implement them all. However, if they are read from the FBX file to memory, they can be written back out. They are not represented by any assets in the GUI and can not be transferred back and forthIt is important to note the following
- FBX has a concept of item position separate from the animation of the item.
- FBX has a concept of poses, which store positions of item.
- FBX has a concept of skin cluster binding, which can be separate from poses and animation and non-animated position.
Layout only has one concept, the animation
Frames less than zero to support these FBX concepts that Layout does not support directly.
- Frame -1: the binding position (applicable when skin clusters are used)
- Frame -2: the not-animated position (can be same as Frame 0, but may differ)
- Frames < -2: poses (if any); each pose on a different frame.
- Write File... - This is for exporting your scene in the Interchanger format, here FBX. When you click this button, a settings window appears where you can finetune your FBX export.
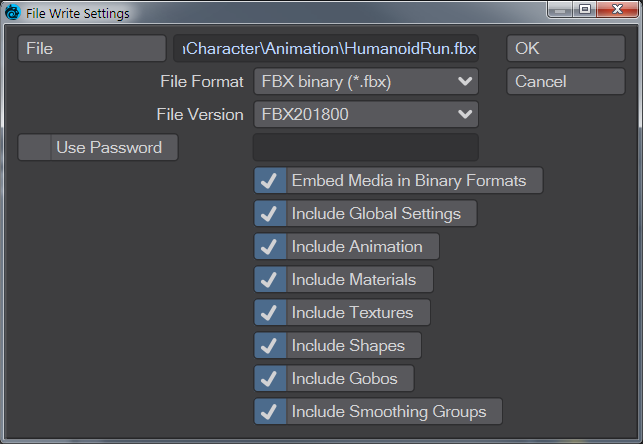
Although the number of options is smaller for writing out FBX files, the FBX API dictates the choices. Options read in will be written out - Scene Info... - Opens a window to input the LightWave (local) scene information in the FBX file for export
- Unload - Unloads the FBX file from the scene. It is still shown in the Interchanger lister, and the FBX files will still be on disk
- Scene Info - Technical details about the FBX file's content

- Active Take / Active Layer - FBX files can contain several "Takes," different animations, and each take can include several layers that can be mixed and layered, much like LightWave's Motion Mixer. Only one Take, with one layer, can be active at any one time in LightWave.
The Flatten Layers button here will collapse animation layers down to the selected take. Other layers are lost when the file is written out but can be reclaimed up to that point by reloading the FBX file with the Read File... button. Animation layers can be added to the stack as needed - LightWave List - Group the left lister in one of two ways:
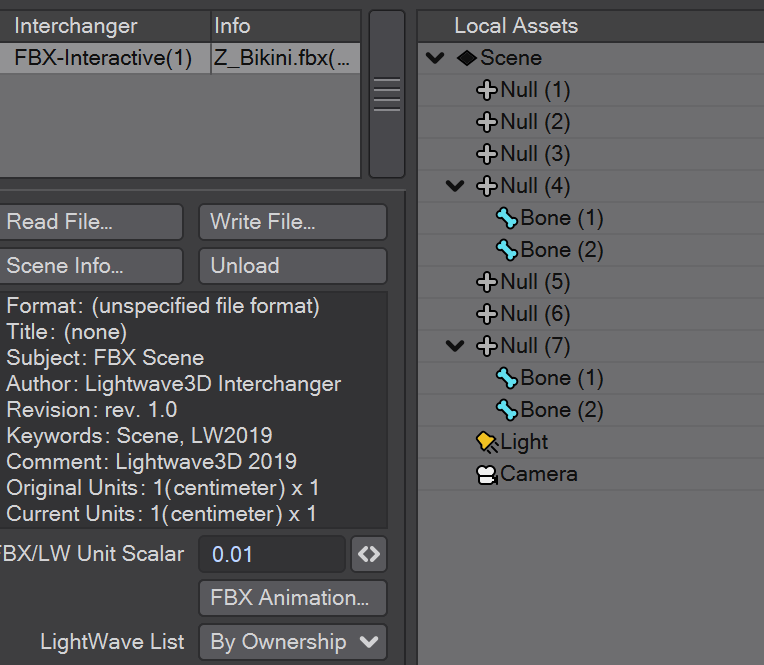
- By Parenting - The standard LightWave hierarchical view
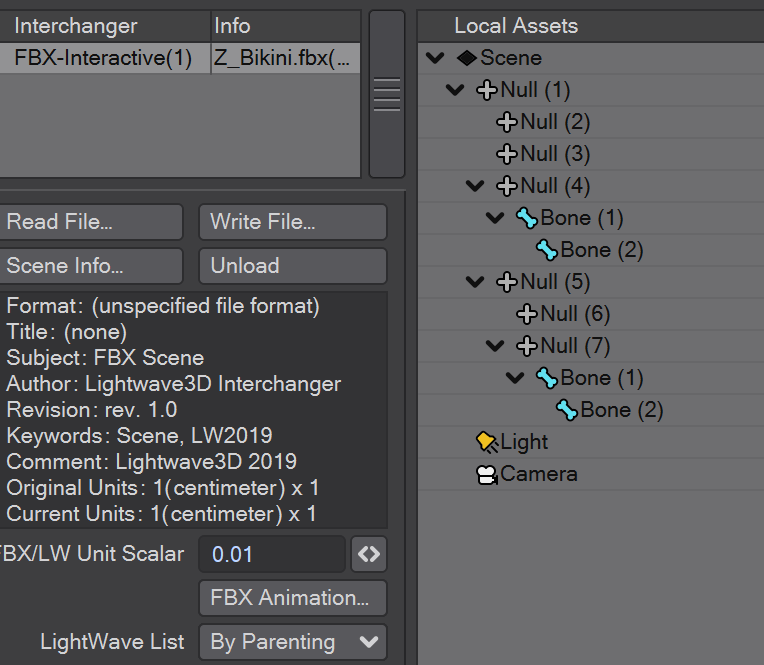
- By Ownership - In LightWave, the scene is always the owner of all scene items - Lights, Cameras, Objects. Objects are the owners of bones.
- By Parenting - The standard LightWave hierarchical view
- Include Children of Selected - This toggle (that defaults to on) means you don't need to explicit select all the elements of a scene to import or export, just the parents of hierarchies - the scene entry, for instance, would transfer the scene setup plus all the objects, lights and cameras
Local Column
Hit Rebuild to update changes
The middle column contains a view of your current LightWave scene. You can copy elements from your external file into this column piecemeal or load an FBX wholesale to add to a new scene.
Local Options
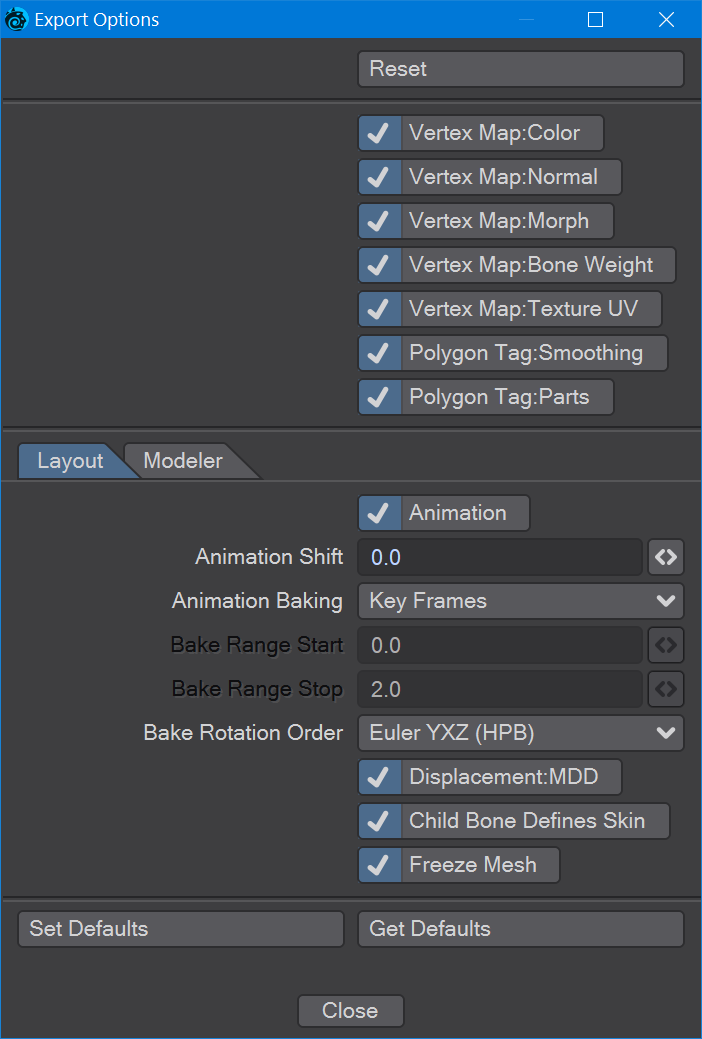
The Export Options panel contains settings for writing to FBX files
- Reset - Return settings to hardcoded factory defaults
At the bottom of the panel, you will see:
- Set Defaults - Click this button to record your current set of options as your default set
- Get Defaults - If you have made changes to your usual defaults, clicking this button will restore your chosen set
Defaults you set are saved in your configs on disk and kept across sessions.
The next section deals with import settings that are common across FBX interchange within Layout and Modeler:
- Vertex Map: Color - Enable exporting of LightWave color vertex maps to FBX vertex color layers
- Vertex Map: Normal - Enable exporting of LightWave normal vertex maps to FBX normal layers
- Vertex Map: Morph - Enable exporting of LightWave morph vertex maps to FBX blend shape deformers
- Vertex Map: Bone Weight - Enable exporting of LightWave weight vertex maps to FBX clusters
- Vertex Map: Texture UV - Enable exporting of LightWave texture UV vertex maps to FBX UV layers
- Polygon Tag: Smoothing - Enable exporting of LightWave smoothing group ('SMGP') polygon tags to FBX smoothing layers
- Polygon Tag: Parts - Enable exporting of LightWave part ('PART') polygon tag to FBX polygon group layers
Layout
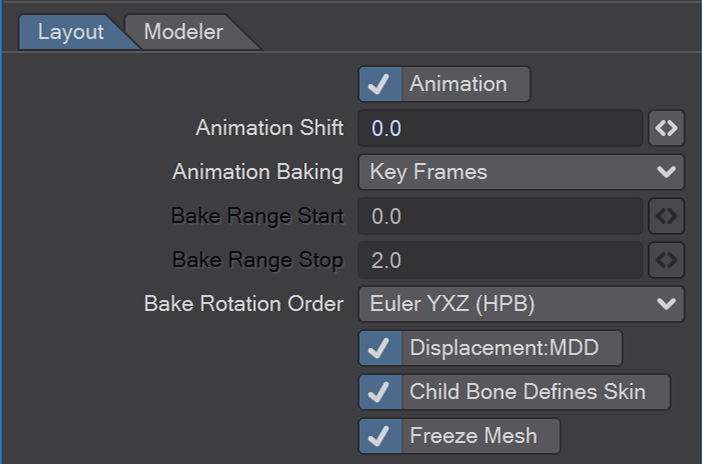
These options apply to Layout and not Modeler
- Animation - When enabled FBX animation is exported according to the settings in the "FBX Animation" options panel. Although FBX animation is layered, LightWave supports a single animation layer; so, one must choose which FBX layer is active before the export
- Animation Shift - This is an offset (in seconds) of the FBX animation time relative to the LightWave animation time
- Animation Baking - FBX animation evaluation can differ from how LightWave evaluates animation. Animation baking allows FBX to store approximate or accurate versions of the LightWave animation. The exported LightWave animation is stored in the currently active FBX animation layer. It is possible to store different animations for the same asset by choosing a different FBX animation layer each time:
- (none) - Don't bake at all. The envelope keys (key frames) in LightWave are mapped directly into FBX animation key frames. (see "Bake Rotation Order" below for how to interpret LightWave HPB envelopes)
- Start Frame - Only the start frame of the animation is baked. The start frame is the time of the first keyframe. This is often 0.0, but does not have to be
- Key Frames - Only the keyframes of the animation are baked, without any between frames. This is often sufficient for export to FBX
- All Frames - All frames in the Layout preview frame range are baked
- Frame Range - All frames in a custom frame range (from "Bake Range Start" to "Bake Range Stop" (in seconds)) are baked
- Bake Rotation Order - The LightWave motion rotation order is presumed to be HPB (YXZ), but the intent may be different; especially if the animation was imported from an FBX using a different rotation order. The choices here are FBX-supported rotation orders of how to interpret LightWave's Rotation HPB channels
- Displacement: MDD - Enable exporting of MDD displacement nodes as FBX vertex cache deformers
- Child Bone Defines Skin - The skin in FBX is similar to a bone weight map in LightWave. Rigs in LightWave come in many varieties; sometimes, the weight map is applied to the child bone because of how an FBX rig was imported. This feature allows the export to compensate for this
- Freeze Mesh - Use the mesh in its frozen state (deformations applied) before exporting as an FBX mesh
Modeler
There are no Modeler options
Transfer
Two Transfer arrows between the listers will transfer the selected items from one lister to the other. If nothing is selected, the entire contents of a lister will be copied over. Equally, with the Include Children of Selected toggle checked, clicking on the Scene name will transfer the entire lister contents over. Items can be transferred by double-clicking on them.
As of 2019.1, you can drag and drop between the local and remote columns.
Transfer only animations
Since 2019.1, the Interchange panel has two options for the Transfer Mode. You can either Append Assets or Replace Animation. Append Assets was the default functionality from before, but Replace Animation is new and can be used to transfer animation over items that are already animated. In this way, it can serve as an undo or an easy way to copy animations to multiple items.
Remote Column
Hit Rebuild to update changes
The remote column contains assets in the target format, for now, just FBX. You can add items from one or more local scenes to a single FBX file, which will be written to disk once the Write File... button is clicked. Multiple Interchangers can be added, and each has its own remote display chosen by clicking on the integrator in the Workspace area of the panel.
2019.1 added specifying that remote assets will be brought in with Standard or PBSF materials with the Use Standard Material option (on by default). The surfaces will now be created similarly to the Surface Editor's Convert > Layered to Principled option. Images linked to a surface will be recreated using the Layered nodes.
Import Options
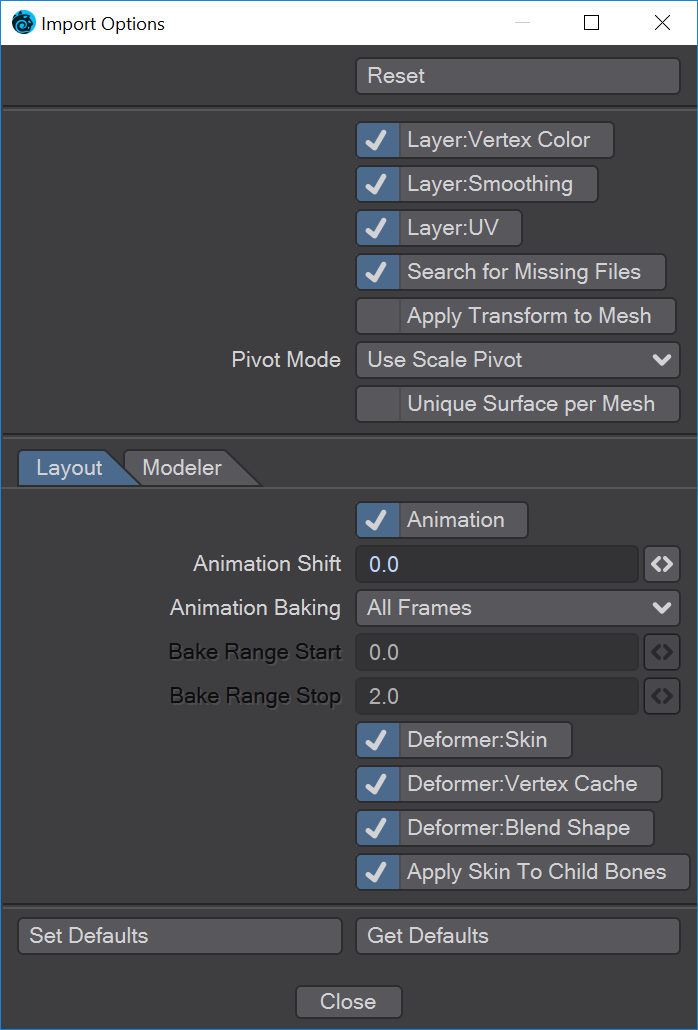
The Import Options panel contains settings for reading from FBX files. Again, user Defaults can be set, and this time the Modeler tab has further options relating to how objects will be treated when imported from FBX.
- Reset - Return settings to hardcoded factory defaults
At the bottom of the panel, you will see:
- Set Defaults - Click this button to record your current set of options as your default set
- Get Defaults - If you have made changes to your usual defaults, clicking this button will restore your chosen set
Defaults you set are saved in your configs on disk and kept across sessions.
The next section deals with import settings that are common across FBX interchange within Layout and Modeler:
- Layer: Vertex Color - Enable importing of FBX Layers that pertain to Vertex Color. These are mapped to LightWave color vertex maps
- Layer: Smoothing - Enable importing of FBX Layers that pertain to Smoothing. These are mapped to LightWave smoothing features
- Layer: UV - Enable importing of FBX Layers that pertain to UV coordinates. These are mapped to LightWave Texture UV vertex maps
- Search for Missing Files - When FBX refers to external images and other files, they are usually expected to exist in an "fbm" (FBX media) folder. This is not always the case in reality. When enabled, this feature will attempt to find files in nearby other locations and with potentially different file extensions. This can be turned off to find out if referenced files are not where they are expected
- Pivot Mode - FBX supports multiple pivots, one for rotation and one for scale, while LightWave only supports one. In Layout, the pivot is used for both scaling and rotation. In Modeler, the modeling pivot is actually different from Layout but gets assigned during object load. This popup chooses which FBX pivot to assign to LightWave during import. Some understanding of the FBX scene may be needed to make the proper choice. One option is to ignore the pivot altogether
- Unique Surface per Mesh - This ensures that each imported mesh does not share surfaces with existing meshes. This is more effective in Modeler than Layout when trying to segregate multiple imports that use the same surface name
- Use Standard Material - FBX materials are normally mapped to a LightWave surface using the Principled BSDF material. As such, any texturing requires the use of the node graph. The Standard material, however, supports textures outside of the node graph and may be more comfortable to some users
Layout
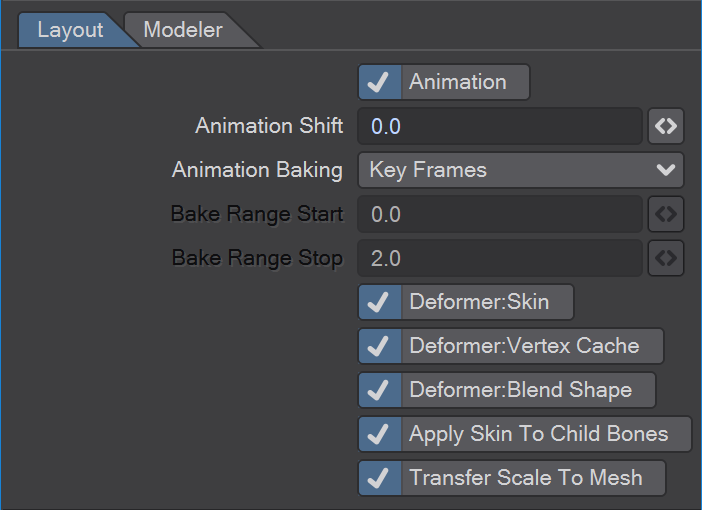
These options apply to Layout and not Modeler
- Animation - When enabled FBX animation is imported according to the settings in the "FBX Animation" options panel. Although FBX animation is layered, LightWave supports a single animation layer; so, one must choose which FBX layer is active before the import
- Animation Shift - This is an offset (in seconds) of LightWave animation time relative to the FBX animation time
- Animation Baking - FBX animation has a wide variety of evaluation possibilities that are not all supported natively in LightWave. Animation baking allows LightWave to store approximate or accurate versions of the FBX animation. Animation layers, rotation order, pivot effects, inverse kinematics are just some of the factors that may produce different results in LightWave versus the intent of the FBX file creator
- (none) - Don't bake at all. The animation keys (keyframes) in FBX are mapped directly into LightWave envelope keys. Rotation order customization is not supported
- Start Frame - Only the start frame of the animation is baked. This does not have to be at time 0.0
- Key Frames - Only the keyframes of the animation are baked, without any between frames. This is better for editing than "All Frames", since only the keyframes need editing; but, the results will not always be accurate to the FBX intent
- All Frames - The Layout preview frame range is baked for animation that will exist in Layout between that range
- Frame Range - A custom frame range (from "Bake Range Start" to "Bake Range Stop" (in seconds)) is baked for animation that will exist in Layout between that range
- Deformer: Skin - Enable importing of FBX skin deformers that are mapped to LightWave weight vertex maps
- Deformer: Vertex Cache - Enable importing of FBX vertex cache deformers that are mapped to LightWave MDD displacement nodes. Only positions are supported. The MDD node can understand Maya and Alembic files
- Deformer: Blend Shape - Enable importing of FBX blend shape deformers that are mapped to LightWave morph vertex maps in a way that Morph Mixer can understand
- Apply Skin To Child Bones - Bone Rigs specified in FBX can differ greatly based on which application generated the FBX content. LightWave does not support all industry-standard approaches to bone hierarchies. Some approaches use the bone tip as the location and some the bone base. In addition, the parent of the bone may be interpreted as the bone base or the higher level bone. LightWave has some bones options to help match the intent but the FBX skin (LightWave bone weight map) may still be mapped to the wrong LightWave bone. This option chooses to apply the weight map to the child bone, instead of the expected bone, just to get the evaluation to be correct. This can result in extra tip bones being generated to specify the proper weight maps. Good knowledge of the FBX rig is needed to make the best decision whether this option should be used
- Transfer Scale To Mesh - Enable transforming the mesh vertices by the scaling on import. This can help deal with differences in how scale is interpreted by FBX and LightWave, including the effect of negative scaling. By scaling the mesh prior to higher-level transforms, a final transform can often be more as expected. For simple, compatible scaling effects, though; this should not be necessary. Knowledge of the FBX scene construction may be needed to make the best judgment call here.
Modeler
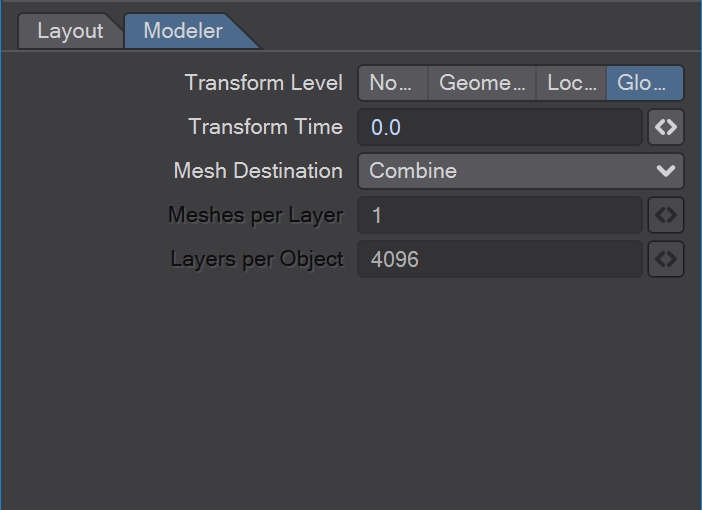
These options apply to Modeler and not Layout
- Transform Level - This determines what level of FBX evaluation is performed on the FBX mesh and then treated as the static Modeler mesh:
- None - Do not apply any transform evaluations. This is most like the modeled vertex coordinates
- Geometry - evaluate only the FBX geometry transforms
- Local - Evaluate geometry and other local transforms
- Global - Evaluate all transforms to obtain the global coordinates of each mesh vertex
- Transform Time - When evaluating transforms, this determines the animation time (in seconds) at which to evaluate
- Mesh Destination - A dropdown menu with four choices:
- Combine - All FBX meshes are combined into a single Modeler mesh layer
- Separate Layers - Each FBX mesh is imported to its own Modeler mesh layer
- Separate Objects - Each FBX mesh is imported to its own Modeler object (with a single layer)
- Custom - Each FBX mesh is assigned a layer and object based on the order it is processed and the settings for "Meshes per Layer" and "Layers per Object". This is useful when trying to combine hundreds or thousands of FBX mesh parts into a more manageable number of Modeler objects and layers