Motion Mixer
Motion Mixer was designed to bring the same concepts found in non-linear video editing to computer animation. You can store, re-use, and adjust motions for entire hierarchies. You can even mix motions together.
Motion Mixer’s “actors” define objects or groups of objects, while “motions” define their animations. The Timeline gives you the ability to move, trim and scale motions together. You can add “transitions” to control exactly how motions blend together. Creating incredibly complex animations from a library of relatively simple moves is fast and easy, bringing exciting possibilities to your LightWave animations. The best way to get comfortable with Motion Mixer is to play with a pre-made animation that will give you ideas for more.
Steps for using Motion Mixer
- Load the ProtonJack_MM01 scene. You will see a rigged brown dog.
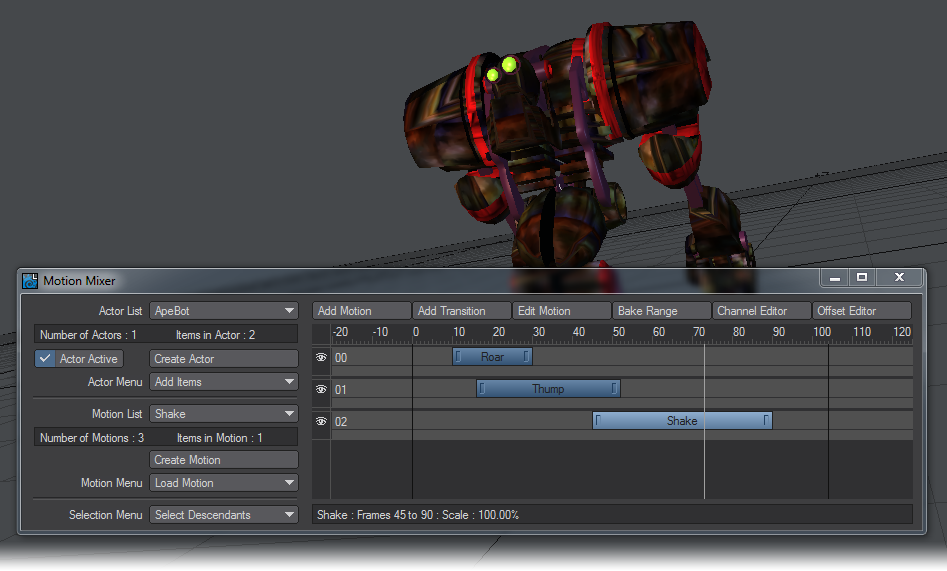
- Choose Motion Mixer from the Windows dropdown menu or press the keyboard shortcut F2. The Motion Mixer Panel is broken down into four areas, Actors and Motions on the left, and the Timeline and Toolbar buttons on the right. Beneath the toolbar is the familiar frame display.
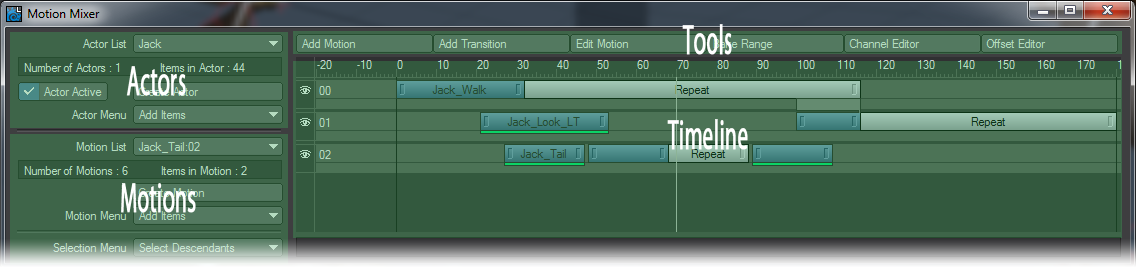
Beneath the frame display are the Motion Mixer tracks where motions and transitions are placed. There can be any number of tracks, each of which can hold any number of motions or transitions.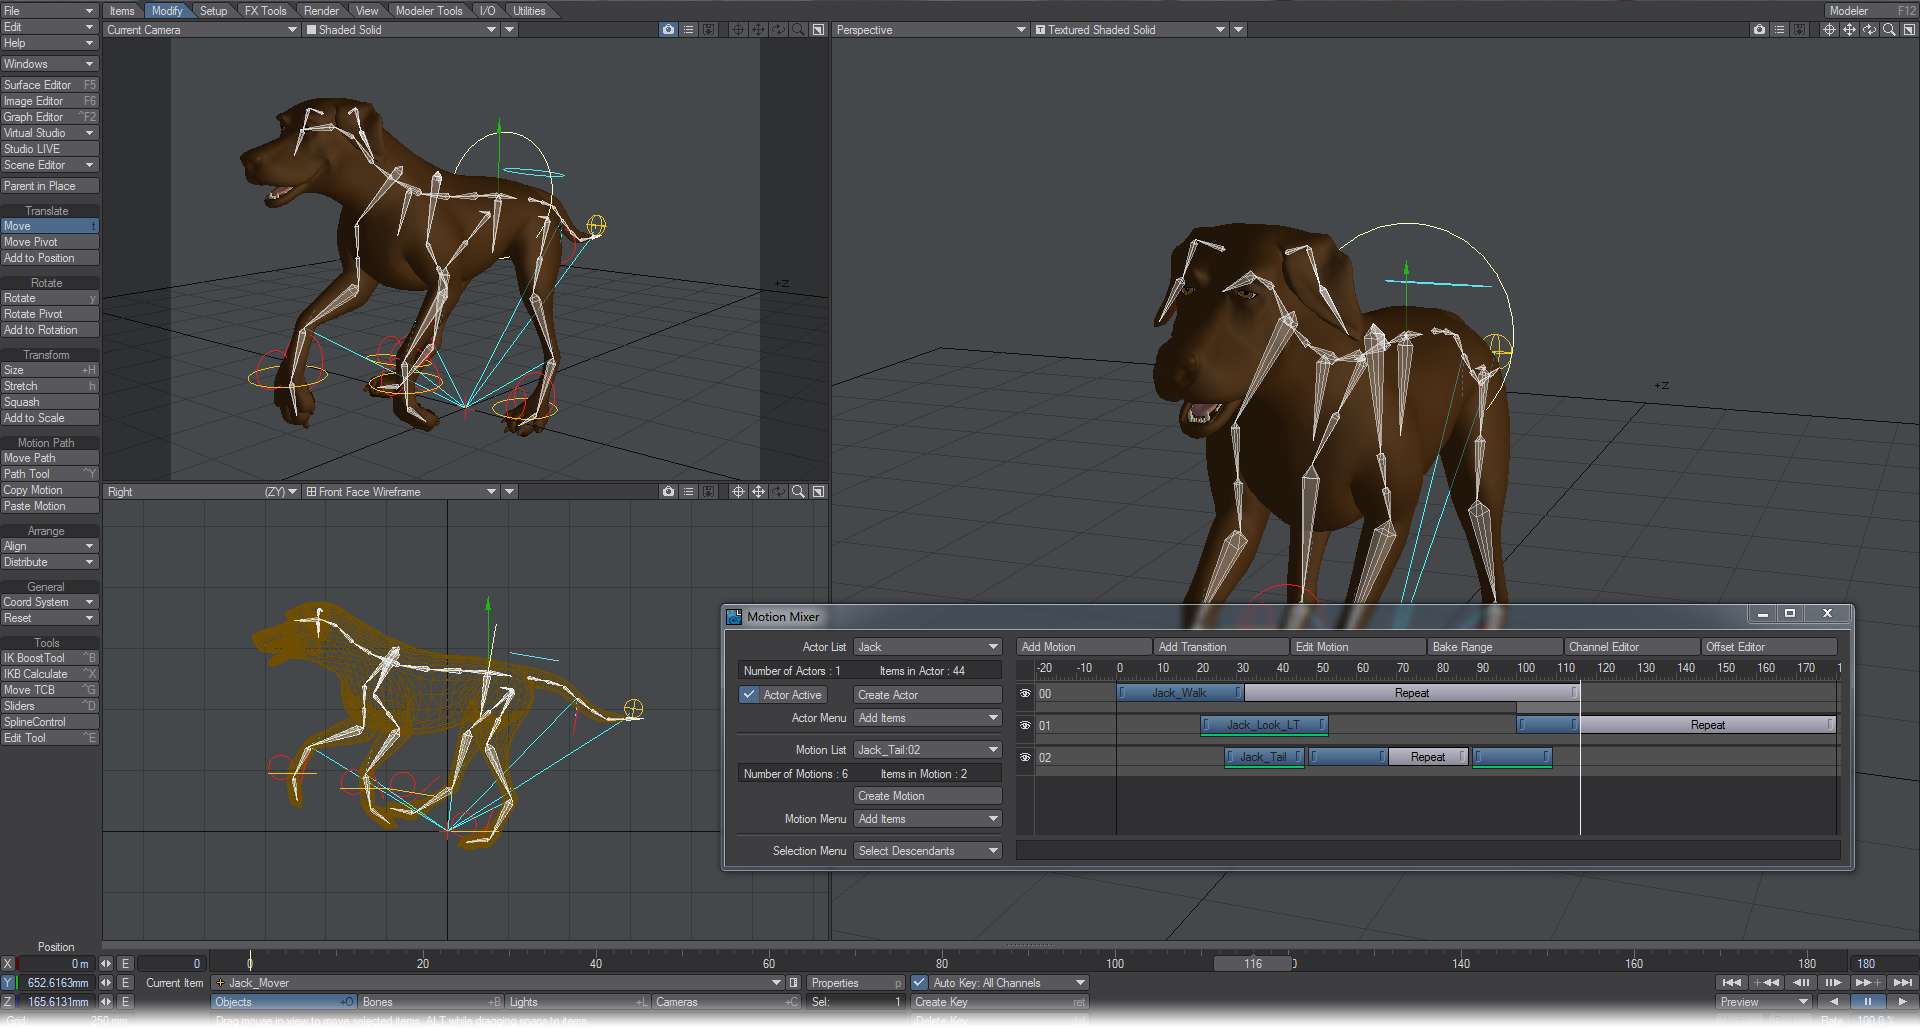
- Press Play in Layout and watch the animation of Jack walking, looking around and running. You’ll notice that the movements correspond to the blocks on the timelines. Turn on and off the eyes on each timeline to isolate the motions.
Example - Simple Motion Mixer
Create your own Motion Mixer scene
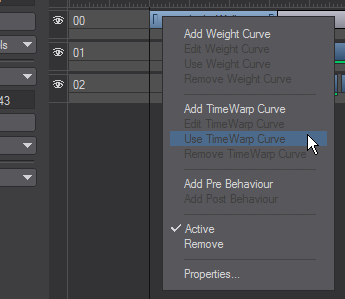
Right-clicking on a motion will open a menu with various options:
- Add Weight Curve - See Weight Curve
- Add TimeWarp Curve - See TimeWarp Curve
- Add Pre/Post-Behavior - See Pre and Post Behavior Options
- Active - When the checkmark is removed, the motion isn't played
- Remove - Removes motion
- Properties - See Motion Properties
Motion Properties
A motion’s properties can be edited by right-clicking a motion in the Timeline. The motion can be renamed by simply editing the Motion Name field. The Scale field allows the motion’s scale to be modified numerically. Use Local Start Frame and Local End Frame to trim the ends of a motion without changing the original data.
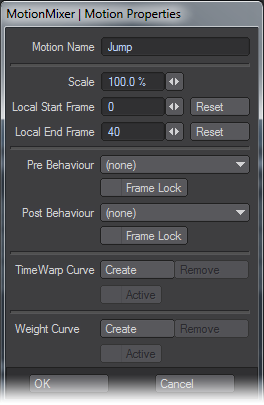
A motion uses “behaviours” in the same way that LightWave uses them in the Graph Editor. After you click OK, you will see any behaviours added to the appropriate ends of the motion on the Timeline. You can change the length of a behaviour by dragging its end handle.
Pre and Post Behaviour Options
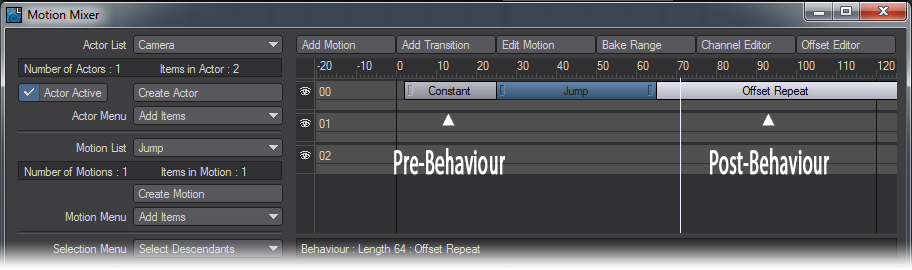
You can add behaviours without going into the Motion Properties window. Right-clicking on the motion will offer Pre and Post Behaviours and once those are in place, right-clicking on them will present a menu where you can choose between the different options:
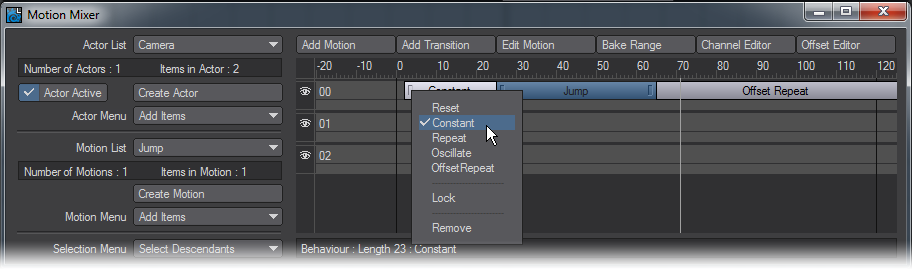
- Reset - the motion value is reset to zero.
- Constant - the values beyond the ends are equal to the first or last keyframe value.
- Repeat - the motion repeats from the first to last keyframe.
- Oscillate - the motion is mirrored over and over.
- Offset Repeat - the motion repeats, but it is offset by the difference between the first and last keyframe values.
- Lock - Normally, when you move a motion that has a behaviour, the behaviour will move along with the motion and retains its length. However, the Lock option “pins” the start or end frame of a behaviour to the Timeline. Dragging the motion will shorten or lengthen the behaviour. Eventually, it will push the behaviour once it has reached its minimum length.
- Remove - the behaviour will be deleted/removed from the timeline.
Weight Curve
Motions can be assigned a Weight Curve that allow you to specify the influence a Motion has over time. These curves have the added benefit of allowing you to weight to any keyframed animation underlying the Motion in Layout. The weighting system works on a value of 1.0 indicating full influence and a weight value of 0.0 indicating no influence on the final animation. The difference with MotionMixer’s weights is that as the weight approaches 0.0, and if there’s underlying animation in Layout, then more of that underlying animation will be mixed into the final value:
| Weight Value | Motion Influence | Layout Influence |
|---|---|---|
1.0 | 100% | 0% |
| 0.75 | 75% | 25% |
0.5 | 50% | 50% |
| 0.25 | 25% | 75% |
| 0.0 | 0% | 100% |
If a Motion has no Weight Curve attached then it’s treated as if it has a weight of 1.0. Weights can also be increased above 1.0. This is very useful for overlaying other Motions, the higher the weight value you apply the more influence that Motion will have over any others at that time (i.e., if you give a Motion a weight of 10.0, it will have ten times more influence over another Motion with a value of 1.0). When a Weight Curve has been applied, a small green bar is drawn under the Motion on the Timeline. Weight Curves can be added, disabled temporarily and opened in the Graph Editor either through the Motion Properties Panel or directly from the Timeline’s context menus (see below).
Curve Translation
Curves for Transitions, TimeWarps & Weights are moved and scaled to match their positions on the Timeline. This makes working with the curves far more intuitive; the frame indicator in the Graph Editor now shows the position on the curve at the current time.
Motion Instancing
Any number of instances of a Motion can be placed on a Track and each can have their own independent attributes (i.e., Item/Channel states, in/out points etc.)
To create an instance of a Motion, select the source Motion from the Motion Menu (this can also be a previously created instance) and click Add Motion.Freeing the “source” Motion also removes all instances.
TimeWarp Curves
These can be attached to any Motion (or instance) and allow you to vary the timing of the animation, you can speed up or slow down sections, go backwards or freeze time and continue. A small red bar is drawn under the Motion to signify that a TimeWarp curve is attached. These can also be temporarily disabled.
Controls to add/remove/disable TimeWarp curves are in the Motion Properties Panel and on the context menus.
Relative XZ Custom Offset Type
This is a hybrid of the normal Relative Offset and the Absolute Offset types. All channels are evaluated as relative offsets apart from the Y axis. This allows motions to be blended relatively but retain their Y heights (i.e., you don’t end up with a follow-on Motion under the floor or floating above the ground).
Character Custom Offset Type
As the name implies this offset type is specially designed for characters and makes it very simple to align Motions automatically. Say you have a Motion where a character turns a corner and ends up facing 90 degrees, you append a Motion of a walk in a straight line. MotionMixer can now rotate that Motion so that it continues in the direction that the last Motion ended on.
The Adjust Alignment control can be used to modify the calculated rotation value allowing you to fine tune the direction your character travels.
The Compensate for Start Angle checkbox allows you to compensate for a Motion that doesn’t travel along the positive Z axis. This is very handy for motion capture where motions are often not axis aligned (i.e., in situations where the performer runs diagonally to make the best use of the capture area, or probably more commonly, where people don’t create their forward motion along the positive Z axis).
To use the Character offset type set any items that control the characters movement (e.g., pelvis bone, IK Goals etc.) to CHAR in the Offset Editor (Custom Offset type).
Example - Blending Motions with Transitions
Create new motions by blending existing ones
Renaming or Replacing Items in Layout
Renaming or replacing an item in Layout that belongs to an Actor will update the Actor and any motions. However, the channel names (as seen in the Graph Editor) will not be updated until the scene has been saved and reloaded. This does not affect the operation of Motion Mixer, but you should save and reload as soon as it is convenient.
The Track Area
Clicking on the eye icon with your LMB can deactivate each track. When a track has been deactivated, all motions and transitions on the track are also disabled. This is useful for isolating a motion on another track, so that it can be worked on without the effects of any transitions or blending.
The display can be scrolled horizontally by holding down the Alt key while dragging your LMB on an empty area of the display. Scrolling the display vertically can be achieved by using your Up and Down cursor keys.
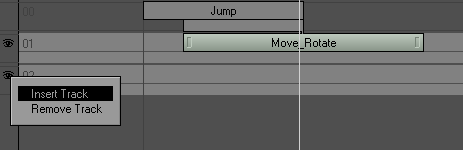
You can add or remove Tracks by using the RMB on an existing track. Insert Track adds a new track to the Timeline at the end of the current list of tracks. Remove Track removes the currently selected track along with any motions on it. You can select a track by clicking on it.
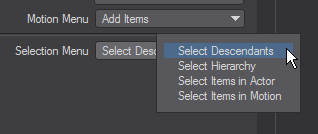
Selection Menu
The Selection Menu can be used as shortcuts to select items in Layout.
Actor Menu
The Actor Menu pop-up menu provides methods for working with actors and the items defined within them.
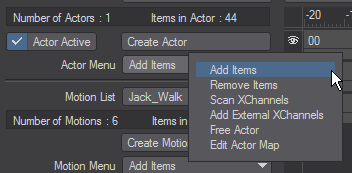
- Add Items - Adds the currently selected items in Layout to the current actor.
- Removes Items removes the items selected in Layout, from the current actor. Motion Mixer will no longer control these items. This does not clear the item from Layout, however. Clearing an item from your scene will also remove it from an Actor.
- Scan X Channels - Use to to add Endomorph channels, if Morph Mixer is added to an item after that item has been added to an actor. Motion Mixer allows you to mix all of the animation channels belonging to an item. The non-transformation channels (i.e., any channel other than Position, Rotation, and Scale) are called “X Channels.” Other examples of X Channels are: a light’s RGB color and Intensity channels, a camera’s Zoom Factor, an object’s Dissolve channel, and so on.
- Add External X Channels - Opens a panel from which can be chosen all scene X Channels.
- Free Actor - removes the current actor from memory. All items contained in the actor are removed and all motions are freed.
- Edit Actor Map - opens the Actor Map Panel.
Motion Menu
The Motion Menu provides methods for working with motions and the items defined within them.
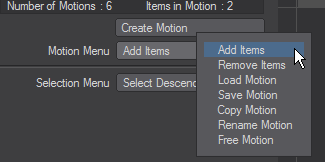
- Add Items - Adds the currently selected items in Layout to the current motion. Use this when you need items of different types in the same motion.
- Remove Items - Removes the currently selected items in Layout from the current motion. Any animation data for these items will not be restored.
- Load Motions - Loads a motion into the current actor. Motion files have an .hmot file extension and contain data for all the items in an animation. If the motion that’s being loaded contains animation data for items that are different from those in the current actor, the Motion Mapping Panel will be displayed.
- Save Motion - Saves the current motion to disk.
- Copy Motion - Creates a copy of the current motion. You will be prompted for a name, after which the motion will be added to the Motion List.
- Rename Motion - Allows you to change the name of the current motion. This can also be done in the Motion Properties Panel.
- Free Motion - Removes the current motion from memory, all channels are cleared and the motion is removed from the actor.
Actor Maps
The Actor Map informs Motion Mixer which channels in an item should be evaluated on playback and while “baking.” By default, all channels and all items are active.
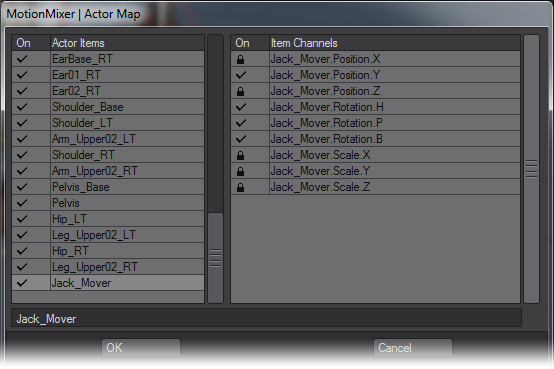
Usually, an animation will not use all channels in all items. Having fewer channels active will improve playback performance in complex scenes and reduce the amount of keyframe data generated by the baking process. For example, in a character bone hierarchy, scaling is unlikely to be used, so these three channels can be deactivated for each item. Moreover, often only one item has any positional animation (e.g., the pelvis), so all the other items can have their position channels deactivated. Finally, some bones, like an elbow joint, only rotate around one axis, so the other two rotation axes can be deactivated.
To toggle the state of an item or channel, click in the column marked On. A check mark in this column indicates that the item or channel is active. A Padlock icon indicates that this item or channel is locked (i.e., inactive). This is a global setting and overrides any states set in the Channel Editor.
Actor Maps are saved and loaded in the LightWave scene file.
Editing Motions
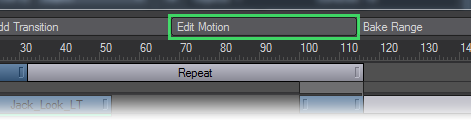
The Edit Motion button on the toolbar places the currently selected motion back into Layout for editing. All other tracks and motions are disabled while this mode is active. Once the motion is in Layout, you can edit the animation as you would normally. When you’ve finished making changes, toggle the Edit Motion button off. This will bring up the Edit Motion dialog.
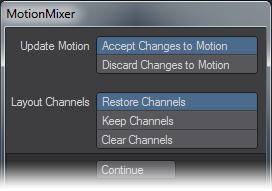
Accept Changes to Motion updates the motion with the changes you made. Discard Changes to Motion does not update the motion.
Restore Channels restores any animation that was present in Layout before editing the motion. Keep Channels leaves the motion in Layout. This is handy for creating new animations based off an existing motion. Clear Channels clears all the channels in Layout associated with the motion’s items. Motions are placed back at the frame/time from where they were created and are reset to their original (100%) scale.
Baking Motion
The Bake Range button on the toolbar allows a range of frames to be recorded by evaluating the animation at a specified interval. This enables any combination of motions, transitions, and behaviors to be collapsed into a single motion that can be loaded back into Motion Mixer or just used in Layout.

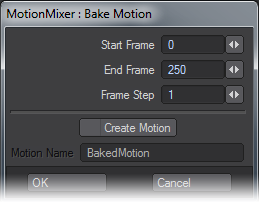
The Start Frame, End Frame and Frame Step fields specify the range of frames that will be baked and the frequency of the evaluation. Note that Motion Mixer will always create a key on the first and last frames of the range.
Often a Frame Step of 2 or 3 is accurate enough and much quicker to bake..
By enabling Create Motion, Motion Mixer will automatically create a new motion from the baked sequence and place it in the Motion List. The Motion Name field enables you to specify a name for this new motion. If this is disabled, the baked keyframes will be left in Layout, allowing you to perform further editing before creating a motion as described earlier.
The current Actor Map determines the items and channels that are baked. If an item or channel is locked, then no new keys will be made for it. This is an effective way of reducing the amount of new data created and optimizing the resulting motion.
Currently, you will need to bake the entire animation sequence, if you intend to render the scene with ScreamerNet. Once this is done, remove the Motion Mixer plugin from the scene and save the scene using a different name.
Baking does not currently support X Channels.
The Channel Editor
The Channel Editor gives you complete control over which motions, items and channels contribute to your animation. Open it by clicking Channel Editor on the toolbar.
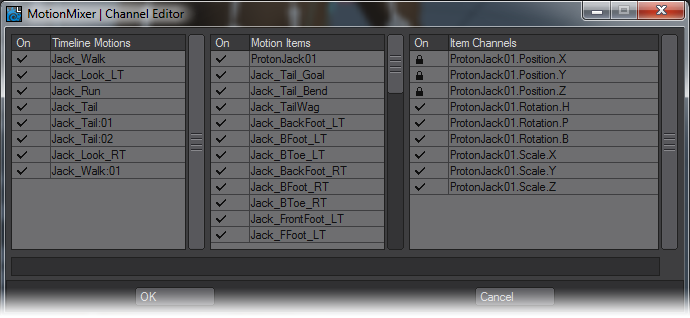
The panel contains three lists. The list on the left controls the states of the motions that are currently placed on the Timeline. Clicking in the left hand On column, toggles the state of each motion. In the center of the panel is the Items list. This shows all the items that are controlled by the motion selected in the Motion List. Any or all of these items can be enabled or disabled. The list on the right shows the state of the channels for the item currently selected in the Motion Items list. If a channel is marked with the [L] symbol, that channel has been locked by an Actor Map and cannot be altered here.
The Channel Editor can be used to combine two or more motions together. For example, say you have a character walk cycle and a waving animation and you’d like to combine them to create a walking waving animation. First, you’d position each motion on the Timeline so that they play at the same time.
Then, open the Channel Editor to edit the state of the items in each motion. In the walk cycle animation, you’d disable all the items for the upper body, leaving just the legs animating.
For the waving animation, you’d disable all the items relating to the character’s lower body, leaving just the upper body animating. Now, when you play back the animation, you’ll see the lower body animation from the walk cycle playing along with the upper body animation from the waving animation. The resulting animation can then be baked and saved for future use. Other animations could be layered on top of these, providing an easy way to add secondary motion to your work.
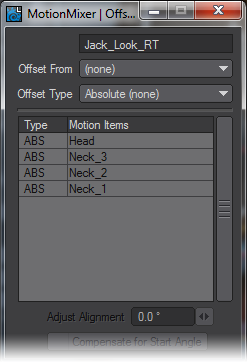
Offset Editor
By default, Motion Mixer uses an absolute offset when evaluating motions. This means that each motion is evaluated in isolation from any other motion on the Timeline. Alternatively, a motion may be offset from another motion. This is called a “relative offset.” If you want a motion to continue on from the point at which another motion has finished, you can use a relative offset.
To set an offset:
- Select the motion on the Timeline that you’d like to set the offset for and click on the Offset Editor button on the toolbar.
- Select the motion you want to create an offset from the Offset From pop-up menu and the type of offset from the Offset Type pop-up menu. Note that you cannot offset a motion from itself.
To remove an offset:
You can remove an offset from a motion either by setting Offset From to (none) or setting the Offset Type to Absolute.
More on X Channels
When you create an actor, or add items to an actor, Motion Mixer looks for any non-transform channels and assigns them automatically. If channels are added to an item after it has been added to an actor, Motion Mixer will detect the change and add them to the actor. The exception to this is Endomorphs. Endomorph channels will be added to an actor automatically only when Morph Mixer has been added before the item was added to the actor. If Morph Mixer is added after that item has been added to an Actor, you must use Scan X Channels in the Actor Menu, which was mentioned earlier.
Removing X Channels from an actor is achieved by either using the Remove Items entry in the Actor Menu, clearing the item from the scene, or manually removing the MM_ChannelDriver modifier on the Graph Editor.
Custom Offset - when you add this to a Motion, you can choose, on a per item basis, whether to use Absolute or Relative offsets. This is very useful for animations containing translation. Just set the translation item(s) to Relative and the rest to Absolute. Changing the offset type is done by clicking on the column next to the item name in the Offset Editor list box, this will toggle between ABS and REL.
Key Commands
- Shift+LMB Click: Add/remove Motions to/from the selection.
- Shift+LMB Drag: Moves selected Motions on the Timeline. Drag anywhere other than on a Motion.
- Ctrl+Drag: Moves the entire contents of active tracks. Disable a track if you don’t want to move its contents.
- Ctrl+RMB Drag: Moves the contents of active tracks that have their start frames after the frame at which the drag operation is started.
- Ctrl+MMB Drag: Same as Ctrl+RMB Drag, but affects only those Motions that have their end frames before the initial click frame.
- Timeline can be zoomed by Alt+Ctrl+LMB dragging.The Timeline will pan vertically during a normal Alt+LMB drag if the mouse is moved up or down more than the height of a track.
Additional Notes
- Displacement/HyperVoxel Texture Layer Position, Rotation and Scale envelopes etc. can be used. General XChannel support has been improved.
- MotionMixer creates a config file (in the same directory as the LightWave configs) to store settings between sessions. Colors for Motion & Behaviour bars and the Toolbar are specified here. Other colors will be affected by any changes made to the LightWave color scheme.
- Scenes containing the same Actor can be imported using Load from Scene, this creates a duplicate Actor.Motions on the Timeline that have been made inactive through the Channel Editor cannot be selected or moved.