Example - Blending Motions with Transitions
- We’ll start by loading ProtonJack again. Apart from the walking and running, we can make him look right and slow back to a walk using Motion Mixer. Make the end of the scene 250 frames so we have a bit more time for our extra stuff.

- Already we can see there’s a transition between Jack walking and running. It is represented by the gray bar between the two motions. Let’s slow Jack down again. Change the Motion List to read Jack_Walk and add it to timeline 02 at frame 175. If we hit Play now we can see that Jack resumes walking, but it’s not a smooth switch from running to walking.

- Select the short blue Jack_Run Motion on timeline 01, click Add Transition at the top and then click on the Jack_Walk:01 you added to timeline 02. You can move the Jack_Walk:01 forwards and backward in time to get the transition you want.

- Add a Post Behaviour to the Jack_Walk:01 motion and set it to Repeat. Make it last to the end of the scene and now your dog should start off walking, start running, then go back to walking in a loop. If there’s a slight hiccup just move the Jack_Walk:01 forwards or backwards a little on the timeline until the keys match up.
- Press Layout’s Play button and watch the movement of the dog. During the frames controlled by the transition, the dog’s gait is interpolated to line up with the start of the second motion. You might notice that the movement between the motions is quite abrupt. This is because it is a linear interpolation curve by default. For a smoother blend, read on.

Right-click on the transition bar and choose Edit Transition. This brings up the Graph Editor and the transition should be listed as an animation channel.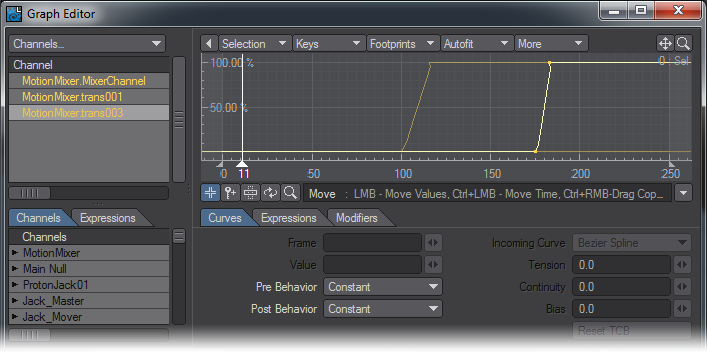
The vertical range of the curve represents the percentage of transition. For example, a value of 0% means 100% of the start motion and 0% of the end motion, 60% means 40% of the start and 60% of the end, and so on.
The horizontal axis, which is normally frames, represents how far through the transition you are - not the range of frames in the transition. For example, 0 means the start of the transition (i.e., 0%) and 100 means the end (i.e., 100%).
Ignore the time slider in the curve window, if you’re scrubbing the animation in Layout. It does not reflect the position within a transition.To smooth out the transition, you simply set the Tension to 1 for both Incoming Curves (they are both TCBSplines). You can do this quickly by selecting both keys and right-clicking one of them and selecting Ease In/Out from the pop-up menu.
Of course, since this is like any other curve, you can add more keys, use different Incoming Curve options, and so on. However, the first and last keys should always be left at 0 and 100. If you add new keys, only add them between 0 and 100 or you will likely get unpredictable results.