Extrude
(default keyboard shortcut Shift E)
Use the Extrude tool (Multiply > Extend > Extrude) to give depth to a two-dimensional shape. You can extrude any two-dimensional polygon or curve. The distance and angle from the initial dragging point sets the extrusion length and direction. As you continue to drag your mouse, you see the extrusion length and angle change accordingly.
The initial dragging point is not significant, only the distance and direction matter. In fact, when you release the mouse button, the axis will reposition itself starting at the object. You can further manipulate the axis by dragging its end in any viewport.
You can extrude polygons on multiple layers at once and the extrusions will be on the same layer as the original polygons.
When you are satisfied, simply click Multiply > Extend > Extrude again (or select another tool). To reset, click in a non-active part of the interface or click Undo.
The numeric panel for Extrude defines the relative XYZ coordinates for the end of the axis in the Extent fields. You can change the number of Sides created on the panel, which can be useful for multi-segmented items like snakes, or objects you wish to bend or twist.
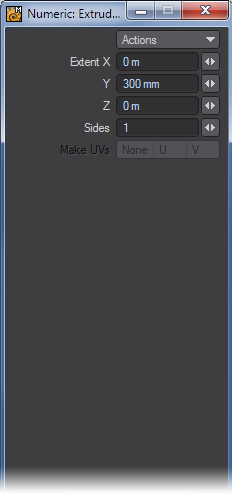
Make UVs Option
The Make UVs option at the bottom of the numeric panel assigns some default UVs based on the geometry of the object. Note that a UV Texture Map must be currently selected or this option will be ghosted.
The Extrude tool treats the original polygon(s) as a cap on the end of the extruded shape. Therefore, to create an enclosed object, you should extrude backwards (ie. behind the original polygon(s)) for all the polygons to be facing outwards. Extruding forward in the direction of the polygons normal will create inverted polygons and your extrusion will appear to be inside-out. To correct this, simply select the affected polygons and then select Detail > Polygons> Flip.