Band Saw Pro Tool
Band Saw Pro (Multiply > Subdivide > Band Saw Pro) will slice through a contiguous band of four-point polygons (or patches). While the images below use a simple sphere, Band Saw Pro is capable of navigating a more complex object.
To use the Band Saw Pro tool, be sure you are in Polygon selection mode, then just click on an edge to select two polygons in the “band” that you wish to divide and activate the Band Saw Pro tool (Multiply > Subdivide > Band Saw Pro). The tool will select the band of polygons going either direction from the first two selected, and will indicate the slice(s). The selection band and the slice(s) will continue all the way around until the operation returns to the point of origin or encounters a non-four-point polygon. The tool’s Default setting is for a single a single slice right in the center. The Numeric panel options can be used to create multiple slices, with a variety of controls, and these can be saved as custom presets.
Band Saw Pro defaults to the last preset used, even across sessions.
You can Bandsaw polygons on multiple layers at once and the cuts will be made on the same layer(s) as the original polygons.
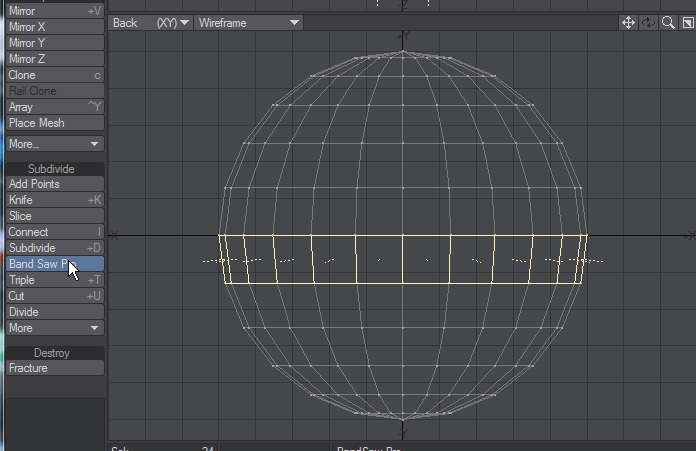
Selecting polygons for a horizontal band. When activated, Band Saw Pro selects rest of band and indicates the slice.

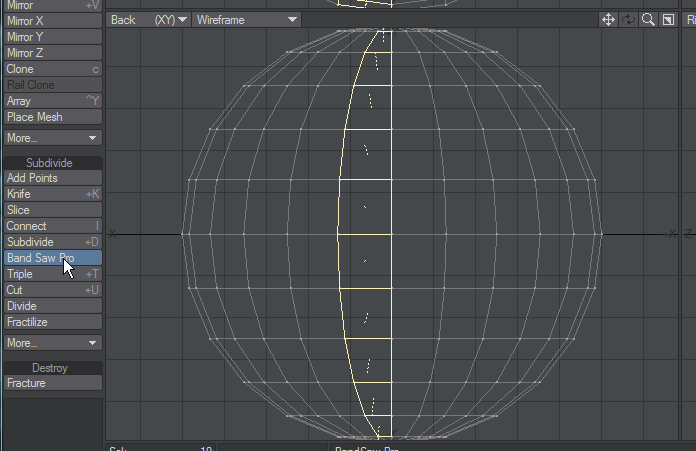
When Bandsawing vertically, note that Band Saw Pro’s operation stops when it encounters a non-four-point polygon.
You can select just one polygon, and use the Numeric panel if you need to adjust the selected band. When you select more than one polygon, the first selected polygon controls the operation.
Band Saw Pro Numeric Options
Band Saw Pro Numeric Panel and Pop-ups
The Actions pop-up lets you Reset the tool or Activate it to make the slice.
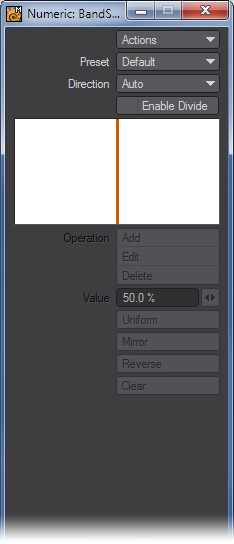
The Preset pop-up lets you apply the default settings for the tool, or one of up to 10 custom settings. A custom setting can be created by selecting one of the Custom options on the Preset button, entering the settings for Enable Divide, Value to place the relative position of one or more slices, the Operation pop-up to add or change the location of slices, and, where needed, by applying Uniform, Mirror, or Reverse to set or fine-tune the final version of the slice(s). Press the space bar to accept the entries and execute the slice, and the settings will also be saved as the options for the Custom setting that was selected.
The Direction option determines the direction of the band and the slice. With a quad, there are only two directions to proceed and these are described as Even or Odd. Auto is the default setting, wherein Bandsaw will pick the direction for you.
Enable Divide activates the slices that you have set up. However, you can also use Bandsaw to just select the band of polygons by not activating this option.
The Divide Window shows the slices that you have set up for the current operation. You can also make changes or additions in this window using the Operation pop-up, discussed next. When there are multiple slices shown in the window, the one shown is red is selected, and the ones show in blue are not selected.
- The Operation pop-up lets you make changes and additions to the slices.
- Add - allows you to create new slices by clicking with the LMB in the Divide Window .
- Edit - allows you select a slice using the LMB and move it using the Value slider.
- Delete - allows you to select a slice using the LMB and remove it.
- Value - lets you set the location of the selected slice by entering a value in the numeric field or by using the slider.
- Uniform - equalizes the spacing between slices.
- Mirror - will mirror the selected slice across the center.
- Reverse - inverts the order - handy if you placed the slice(s) on the wrong side.
- Clear - will remove all slices and set it back to default.