Print Camera
Print Camera
To aid those working in print, LightWave has a utility to help work out the camera frame size (in pixels) that would be an equivalent size in print. This replaces the previous Print Assistant utility and features more settings, as well as international standard paper presets. It is accessed through the Print Camera button on the Render tab in the default and Studio Production Style menus.
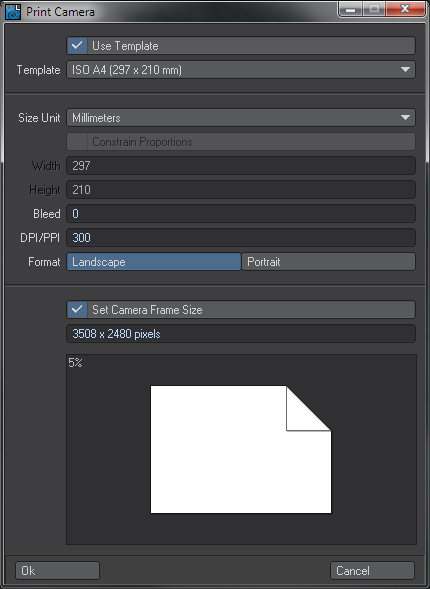
- Use Template - Leaving this ticked gives you the dropdown list just underneath with a long list of standard page sizes.
- Template - If Use Template is not checked, this dropdown list will be ghosted. If Use Template is checked you will be presented with 47 different standard sizes of paper.
- Size Unit - Whether you use any of the standard templates or create your own measurements, you can choose to display the page size in the units of your choice: Decimal Inches, Centimeters, Millimeters or PostScript Picas.
- Constrain Proportions - This option is ghosted if you are using Templates but if you are rendering to a custom sheet size, checking this option will keep the proportions the same between width and height values you set.
- Width and Height - These values are only available if Use Template is unchecked. The dimensions will be in the Size Unit you have chosen.
- Bleed - Adds the amount of bleed to the resulting camera frame size. The value is specified by the ‘Size Unit’ setting and is added to all sides.
- DPI/PPI - This is the target resolution when printed. Images on screen have no DPI since that is a print concept. PPI (or Pixels Per Inch) is perhaps more appropriate here, but the label DPI has been cited on the interface for those who are more familiar with that term.
- Format - You can quickly choose between Landscape and Portrait here.
- Set Camera Frame Size - Checking this option will set the selected camera’s frame size to the new size when you click OK to close the window. It will also set the camera Pixel Aspect Ratio to 1.0, as any other value would make little sense for print.
Information regarding the size your image will be in pixels is shown underneath the controls, along with a graphical representation that displays any bleed specified. The percentage value marked in the upper left-hand corner shows an approximate scale value compared to the real size of the page.
When you open your render in a package such as Photoshop, then look at the ‘Image Size’, it will probably say the image DPI is 72. This does not mean that the 300 DPI/PPI image size you set in the Print Camera settings is wrong. It simply means you need to set the image DPI that will be stored with the document in Photoshop. When you set your print size and DPI in the Print Camera utility, it calculates how many pixels need to be in your resulting image, so that when printed at the target DPI you specified, it will print with the correct quality.
To change the DPI of a document in Photoshop, go to the ‘Image Size’ window, uncheck ‘Resample Image’ and enter the DPI you want the document to be set to. Notice how the size of the image on screen did not change. There are still the same number of pixels in the document, all you are adjusting is how many of those pixels to use per inch when printed, which is why the ‘Document Size’ changes.