Render Properties - Output

This is where you decide just how you want to save your renders when you hit F10 to render your scene. You can save multiple image types - animations, still frames, alpha images - all at the same time at no extra cost in rendering time.
If you are network rendering, you will not be able to save an animation, only still frames.
To choose a save type, just click on the tick box associated with it. This will open a file requester where you can choose a base filename and location. The file extension will be added according to your setting in the Output Filename Format drop down menu.
If you wish to change the base filename, just click on the File Type button (Animation, Image, Alpha) again. This will open the File Requester again and you can change the base name.You can turn on and turn off any of the save types without losing their settings.
Saving Animation
Saving Individual Images
You have several choices for saving images, you can either save them at 32-bit to have an included alpha, for those formats that support it; in 24-bit with no alpha or with a separate alpha file (by selecting the Alpha buffer output) or if you are working with HDR images, you have the choice – some formats support built-in alphas, some don’t (LightWave’s native FLX and the SGI 64-bit do; Cineon, Radiance and TIFF LogLuv don’t).
If you are rendering using LWSN (including the new NRC), do not check "Use Preferences Output Path". Set the path explicitly.
Selecting a Filename Format
LightWave 2019 creates filenames based on the buffers used and numbering automatically.
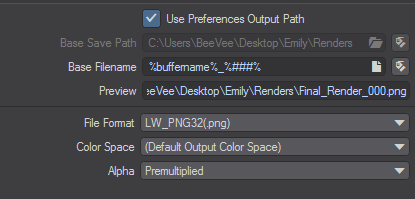
You don't need to name files at all. As you can see, the final filename is based on the Base Filename settings, in this case %buffername%_%###%.
The text, translated into English reads "name of the buffer type selected underscore three-digit number". Like this you can be sure that your buffers, and final images will be named appropriately. This Base filename can of course be customized. You could choose to name your files "Render_%######%" to have each file named Render with an underscore and a six-digit number. There are several possible automatic naming keywords, surrounded by % signs:
| Name | Buffer Tag | Notes |
|---|---|---|
| Scene Name | %scene% | Adds the name of the scene to the filename |
| Camera Name | %camera% | Adds the name of the camera to the filename |
| Eye | %eye% | Adds R or L to the filename (R renders first) |
Frame Width | %framewidth% | The rendered pixel width of the frame |
| Frame Height | %frameheight% | The rendered pixel height of the frame |
| Frame Number | %###% | As we could see from the second example above, the Frame Number keyword can be extended or contracted for as many frames as you have. |
| Frames per Second | %fps% | The scene's frames per second setting |
| Current Time | %time% | Adds the time in seconds (dependent on the scene's FPS) accurate to eight places |
| Buffer Name | %buffername% | The name of the buffer saved - a custom name can be set on the Buffers tab |
There are safety nets:
- A blank filename will default to: %buffername%_%###%
- If a frame number tag is missing from the whole path, then this gets appended at the end: _%###%
- If stereo is enabled and the whole path is missing an %eye% tag then the follow is inserted in front of the last frame tag: %eye%_
(empty filename) becomes "%buffername%_%###%"
"BlahBlah" becomes "BlahBlah_%###%"
and with stereo
"BlahPath-%#%\BlahFile_%#%" becomes "BlahPath-%#%\BlahFile_%eye%_%#%"
The tags allow the parts of the filename to be configured, but in their absence a reasonable default is used. The placement of the %eye% tag with the _ matches the behavior of 2015.
Monitoring Progress
Frame progress is complex to estimate from the start, so don’t be discouraged when you see a Frame Time Remaining that seems like your frame sequence is going to take months to complete. As LightWave understands more about what you are asking of it, the estimated render time will become more accurate. If you are rendering still frames using F9, then LightWave has to start from scratch every time it renders so you will always start with a high estimate that comes down over the course of rendering. If you are rendering a sequence with F10, LightWave can use the previous frames’ render time to better estimate how long the current frame will take (although obviously if you have something that causes a render time spike like motion blur or entering into a HyperVoxel field, that will throw off subsequent frames).
The Render Status Panel that appears when you render contains information about the settings used and can have an image of the render in progress at several different resolutions to give you some indication of what is going on.
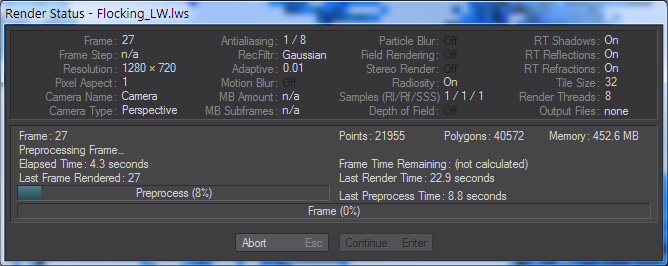
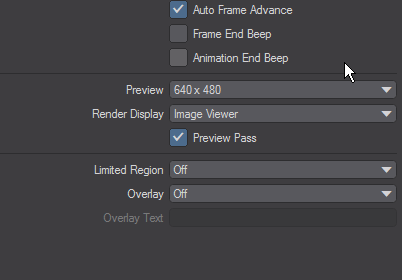
Rendering without a preview image will be a little faster than with one.


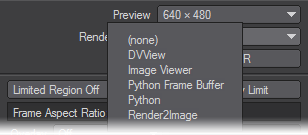
The scale of the render preview is set In the Render Properties panel (Ctrl F9) on the General tab:
At any time you can cancel a render by hitting the Abort button or the Esc key. It may take a while for LightWave to respond depending on the speed of your machine and the complexity of the scene being rendered.
Viewing the Finished Image
Before you start rendering, make sure you have the viewing option you want for the end of the render enabled. For rendering a sequence of images using F10, it’s certain that you will already have seen all your images and thus you can happily switch the Render Display to (none). Otherwise, you will want to see what you’ve done. Be warned that if you have no render display set, you won’t be able to change that once you start rendering. You will not be able to change viewing choices during the render or after it has been completed without requiring a new render.
Render Frame
(default keyboard shortcut F9)
To render the current frame, determined by the position of the frame slider, choose Render > Render Current Frame or press F9.
The Render Status window is a modal window. You may not be able to access options on other windows until it is closed.
Render Scene
(default keyboard shortcut F10)
Select Render > Render Scene to render the entire scene using the defined range of frames on the Render Globals Panel, or press F10. Make sure Auto Frame Advance is set as desired!
The Render Status window is a modal window. You may not be able to access options on other windows until it is closed.
Render Selected Object
(default keyboard shortcut F11)
You can render only the selected object(s) at the current frame by choosing Render > Render Selected Objects. Unselected objects can still cast shadows or be seen in reflections on the rendered objects.
The Render Status window is a modal window. You may not be able to access options on other windows until it is closed.
If you are using LightWave on a Mac using OSX 10.7 or higher, Apple’s Exposé might interfere with LightWave’s default rendering keyboard shortcuts.