Scene Editor
The Scene Editor (Scene Editor > Scene Editor) is the default choice for its speed of use, but there is also the new Scene / Dope Editor and NewTek suggests that you use the that over the standard. The Classic remains to help the transition for our customers who have a history with the Classic Scene Editor.
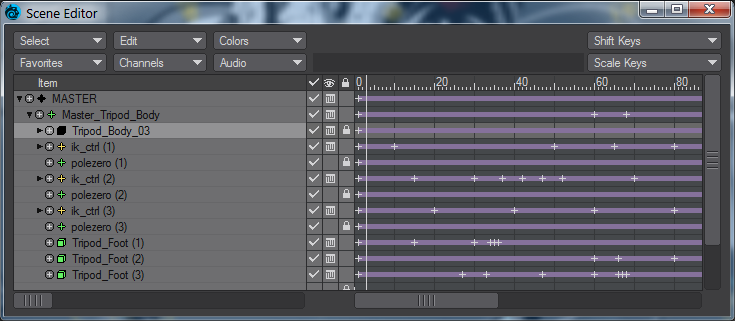
You can see a list of all of the items in your scene arranged hierarchically as well as all of the individual enveloped channels, perform global edits on keyframes, and change hierarchy. It also allows you to set the wireframe colors, change visibility modes, and even load a reference sound file.
New Panel Hierarchies
New panels (like the Surface Editor, Render Properties, Scene Editor, Scene/Dope Editor and others) have collapsible hierarchies. Holding down the Ctrl key when clicking the expander arrow will open or close all children, holding down Shift will affect all siblings and holding down the Alt key when clicking a closed hierarchy will open that group and shut others. Holding Alt when there are several hierarchies open will maintain the one clicked on and close the others. All of the modifiers can be combined, they are not mutually exclusive.
Basic Functions
The scene list is a standard LightWave list window. You can expand and collapse groups as well as subordinate items (e.g., child objects) by clicking the arrow icon that appears to the left of the item name.
The +/- sign icon will display or hide the individual channels for the item. Most of the time, these are the position, rotation, and scale channels; however, other enveloped channels can also be included, like light intensity.
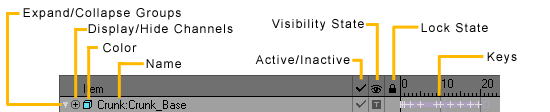
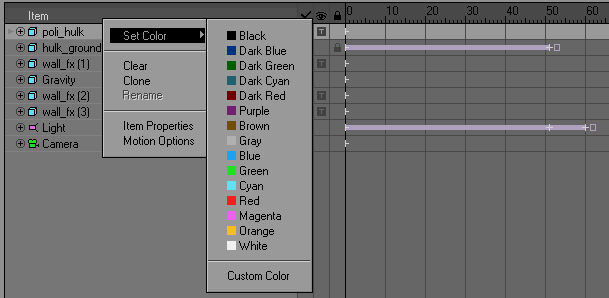
The item type icon indicates the type of item and the color used when the item appears in wireframe. You can change this by right-clicking on the item name and selecting a color from the pop-up menu. When working with complex scenes with overlapping objects, it can be beneficial to use different colors for certain items in the scene.
Double-clicking an item’s name will bring up the related Properties Panel.
If you drag the right edge of the panel, you can shrink the size of the Scene Editor and hide the keys display. Use in this mode as a scene item picker!

The checkmark column activates or deactivates items. Deactivating an object is like setting its Object Dissolve (Object Properties) to 100%, and deactivating a light is like setting its Light Intensity (Light Properties) to 0%. For a bone, this toggles its Bone Active state (Bone Properties). This option has no effect on cameras.
The “eye” column is the visibility column. For objects, clicking on this icon will display a pop-up menu where you can select how the object is displayed. This can range from making the object hidden all the way up to showing it as a textured shaded solid.

The Visibility setting can dramatically affect not only how an object is displayed, but also how fast the display is updated. Moving a 200,000-polygon 100-surface spacecraft around the screen using a textured display surely requires greater computing power than a wireframe six-sided bounding box. There are other reasons as well. Often, in a very complex scene, you may need to play with object visibility options in order to concentrate on certain aspects of the scene.
Most of the Visibility settings are self-explanatory. Front Face Wireframe will show only polygons that face the camera. The Textured Shaded Solid adds image-mapped surface textures.
You can override the Visibility setting to a certain extent by using the viewport’s Maximum Render Level pop-up menu located on the top left edge of a viewport.
The Color and Visibility options affect only the appearance of items in the Layout view. They do not affect the final rendered image.
For lights, cameras, and bones, you can make them visible or hidden by clicking in the visibility column.

Clicking in the “lock” column will toggle the locking function on for that item. Locked items cannot be selected in the viewports. The lock icon will also appear on the Current Item pop-up menu (on the main interface) next to the item’s name.

Pop-up Menu
When you right-click an item, it displays a pop-up menu. This menu can set the item’s wireframe color, clear the item, clone the item, rename the item, and open its Properties or Motion Panels.

Keyframes
The colored bars to the right indicate the length of the keyframed channel. The bar starts at its first keyframe and ends at the last one. (Note that the ends may be past the end of the visible display area.) The plus signs indicate keyframes.
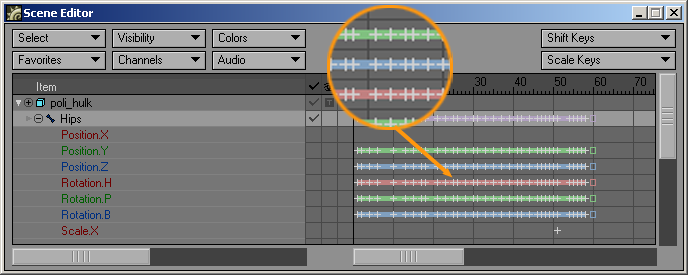
The line with the item’s name is the master channel and will show a composite of all of the keyframes in any of the underlying channels.
Adjusting Channels
You can move individual keyframes by dragging them with your mouse. The affected key is highlighted when you initially click on it. Dragging on the bar, off any key, will move the entire bar forward or backward in time.
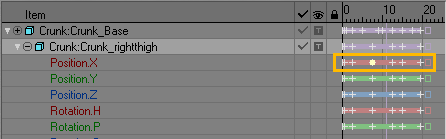
Key becomes highlighted as you drag one key
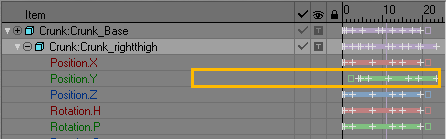
Move all keys for channel by dragging bar
You can also drag keys on the master channel, which will affect only the appropriate underlying channels.
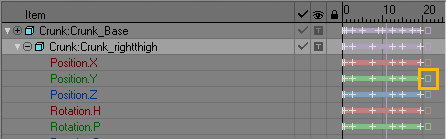
There are square handles at the beginning and end of every bar. You can drag these to scale all of the keys in the bar.
For more precise adjustments, use the Shift Keys and/or Scale Keys functions.
Adjusting Hierarchy
You can drag item names up and down to change the order and hierarchy (i.e., parent/child relationships). As you drag, a yellow insert line will appear. You insert the item by releasing your mouse button at the line’s position. The line will cycle between different lengths as you drag; the different lengths indicate different levels of hierarchy. The relative length indicates the level the line becomes when you release the mouse button.
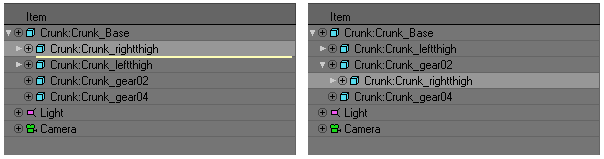
An item inserted between a parent and child will always become another child.
Effects of Selections
You can select a contiguous range of (same type) items by holding the Shift key down as you select. Hold the Ctrl key down to select/unselect non-contiguous items.

You can then drag the entire selected range of items to a new hierarchical position. Most of the editing functions can be limited to selected items only. These items will also be highlighted in the viewports.
Adding Audio
You can sync your animation to sound: from the Audio pop-up menu, load a reference audio file (WAV format) that you can hear when you play the scene. A simple waveform is shown behind the time slider on the main interface. You can scrub though the audio by dragging the timeline slider or preview the audio by selecting Play Audio. Use the Clear Audio option to clear the audio from the scene.
The Fixed Frequency option keeps the audio from changing pitch when you scrub the frame slider.
You can delay the start time of a loaded audio file by selecting Audio Start Time from the Audio pop-up menu. The value you enter into the dialog is the delay amount in seconds (e.g., if Frames Per Second, on the General Options Tab of the Preferences Panel, is set at 30, entering 1.0 starts your audio at frame 30).
Classic Scene Editor Buttons
Use the Favorites pop-up menu to create (or delete) selection sets for items that you want to access quickly. For example, if you always move the same five lights, you could multi-select them and make a favorite. Then, the next time you want to move them, you just select the favorites set you created and all five lights are selected automatically.
The Select pop-up menu lets you quickly select all items based on their type. To unselect a group of items, just click on any item. (One item is always selected.)
The Visibility pop-up menu will show/hide selected or all items.
The Colors pop-up menu will apply the selected color to all of the selected items. You can also set the default colors and apply them to the scene.
The Channels pop-up menu will expand/collapse selected or all items.
With Shift Keys you can Shift keyframes for all or just selected items forward or backward in time. The Low Frame and High Frame values set the range of frames to be affected. This function lets you fine-tune the animation without making individual changes for each item in the scene (a potentially tedious task). Enter a negative Shift Frames by value to shift backwards in time.
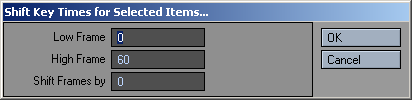
Some operations can affect frames outside the specified range. For example, shifting a range of frames in the middle of a motion path will cause keyframes after the range to shift so they are not overlapped by the newly shifted keyframes.
With Scale Keys you can extend or shorten either the duration of all or just selected items. The Low Frame and High Frame values set the range of frames to be affected. The result is that events occur either more slowly or more quickly, as they have been scaled to take place over a longer or shorter period of time. Scale Keys enables you to fine-tune the animation, allowing certain events or the entire animation to take place within a specified time frame so that you do not need to alter specific keyframes manually. The Scale Time by value represents the scaling factor with 1 being equal to 100 percent.
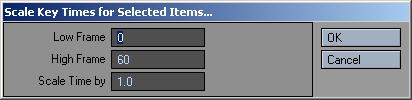
Time-related elements of the scene other than motions and envelopes will not change with the use of either Shift Keys or Scale Keys. Therefore, image sequence loop lengths and texture motion will not be affected.