NRC Controller
Introduction
Once installed on the machines in your network, the next thing to do is feed your Network Renderer with nodes and scenes. Nodes are the machines on your network running LightWave 2019 or that have the LightWave 2019 rendernode installation. If the rendernode hasn't been automatically started by the installer, or is not running for whatever reason, find the Network Render Controller Service 2019.x (64-bit) (NRC Tasker) in your Start menu.
The Service puts a green LightWave icon in your Task Tray. Right-clicking it offers two options:
- Start at Login - This will start the service once the user has logged in at boot-time. The entry will then have a check and selecting it a second time will remove the check and the service will only be started on demand.
- Quit - Stops the service. The machine on which it was running will no longer appear to the NRC
NRC Interface
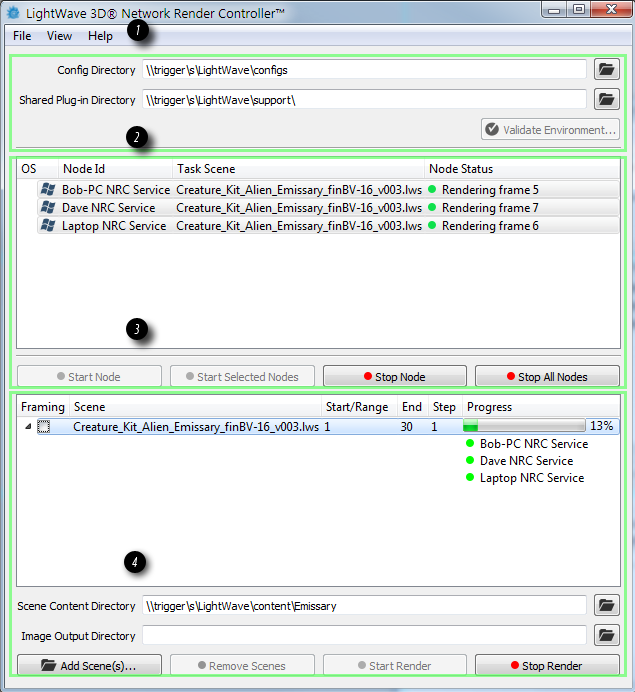
1 Menus, 2 Configs, 3 Nodes, 4 Scenes
Menus

The NRC has three menus, File, View and Help. The File menu contains just the Quit command (Ctrl-Q) and the NRC can also normally be quit by closing the window. The Help menu contains the links to the pages you are reading now.
The View menu contains two options:
Log
Shows the Log window.
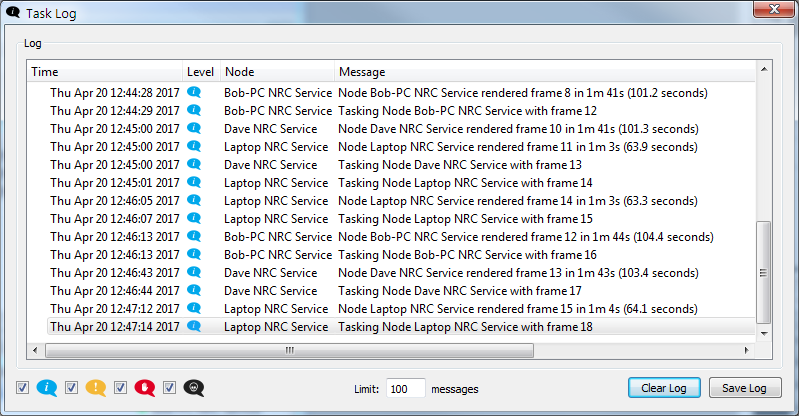
The icons at the bottom left indicate the severity of information messages presented. From the left they are:
- Informational - General activity messages like loading scenes, rendering frames and the like
- Warning - Messages containing "can't find"
- Error - Messages prefixed with "Error"
- Fatal - Exception messages (code runtime errors)
NRC Preferences
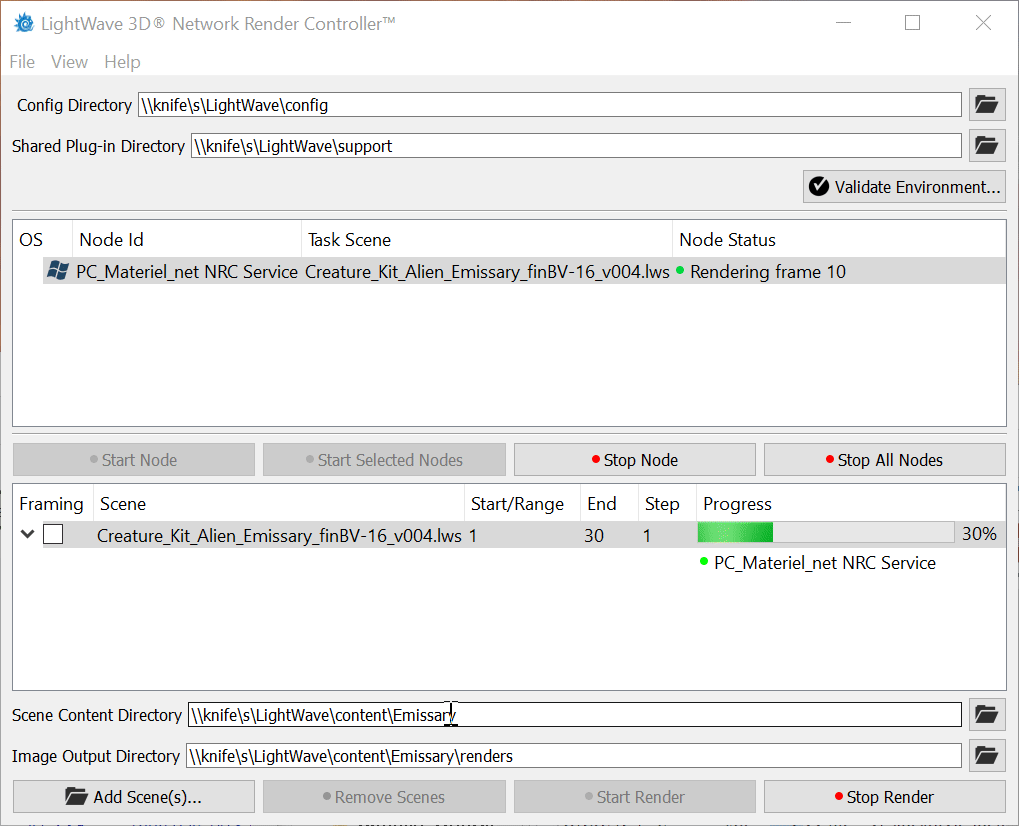
Config

Here is where you will set your initial paths - for content and for plugins. Care should be taken to use a path that all nodes in your network can access. The use of UNC-style path naming is strongly recommended as it is unambiguous, reliable and will work across Windows and OS X machines for NRC. Mapped network drives are also permissible for Windows-only farms provided the same drive name has been used across the network.
Shared Plugins Directory
The Shared Plugin Directory is where the plugins your render nodes will use live. If the field has a red tint, check your plugins using the Manage Plugins button. This needs careful attention when you are working in a rendering environment with both Windows machines and Macs. More detail is given on the Shared Plugins Directory page.
Validate Environment
Once your nodes have been set up and tasked with scenes to render, clicking the Validate Environment button should hopefully get you green across the board for your nodes, plugins, configs and content. Any time you get a red dot you should verify before starting the render.
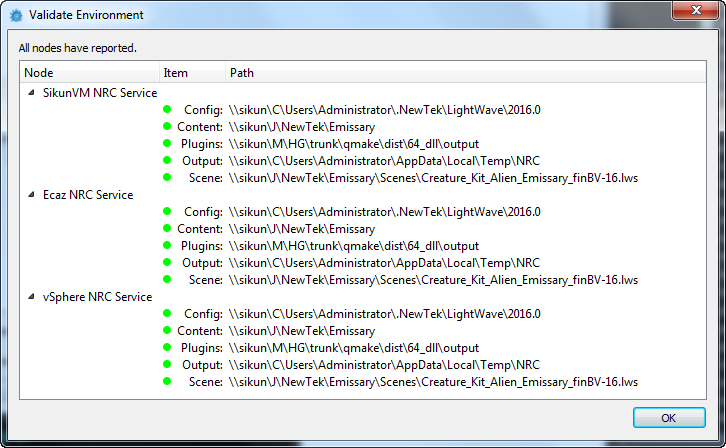
For the Validate Environment button to be available the following conditions must be met:
- A single scene must be selected
- A node or nodes must be selected
- The Config field must have a value
- The Plug-in path must have a value
- The selected scene must have a content path
- The selected scene must have an output path
Nodes
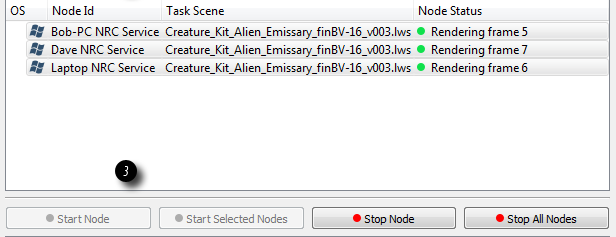
Contains the machines on your network that are running the LightWave NRC service. There are four columns here:
- OS - The OS of the node
- Node ID - The Identifier for the node as defined at install time
- Task Scene - The scene or scenes that nodes have been tasked with
- Screamernet Status - What the node is doing right now. Before it is tasked, the node will have a status of Ready
At the bottom of this section are four buttons:
- Start Node - Once a Node has been tasked, hitting this button will start the selected node or nodes on the allotted tasks
- Start All/Selected Nodes - Starts all Nodes, or those that have been selected
- Stop Node - Stops the selected nodes immediately
- Stop All Nodes - Stops all nodes immediately
Note that stopping nodes also clears their render queues
Scenes
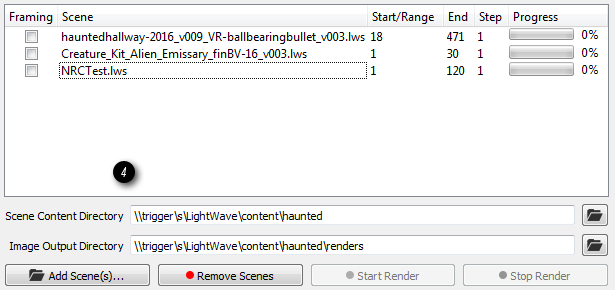
The scene queue. Scenes in here are setup for rendering and are tasked to selected nodes by dragging the scene onto them.
- Framing - When checked, the first and last frames of the scene will be rendered before any of the others
- Scene - Name of the scene file
- Start/Range - The start frame value, or range if an arbitrary range has been set
- End - The end frame. Empty if an arbitrary range has been set
- Step - The frequency of frames to render, 1 means every frame, 2 means every other frame and so on
- Progress - How far through the scene has been rendered
The Scene Content Directory should be filled in automatically for each scene but can be overridden. Likewise the Image Output Directory will normally be blank for using the scene's own path, but can equally be overridden. There are four buttons here:
- Add Scene(s)... - Scenes are added to the queue
- Remove Scene - Scenes are removed from the queue
- Start Render - Starts all nodes associated with the selected scene rendering
- Stop Render - Stops the selected scene rendering. If more scenes are queued, work will start on them instead
When a scene is in progress, right-clicking on it will give a context menu with a render preview
Framing and Ordering
When a scene is loaded into the NRC, there are several options for rendering it in addition to scene settings.

The first is a Framing checkbox. This will render the first and last frames of the sequence before any of the others to set the bounds of the rendered sequence. The second is the fact that the frame start and end point can be double-clicked and modified. Render sequences can be in reverse or arbitrary frames rendered.
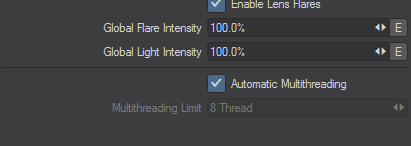
Throttling
Normally you want to take full advantage of the machines in your network to render your scene at full speed. However, if said machines also perform other functions, rather than taking them over completely, you can throttle LightWave's use. It will make renders slower - and the machines - but it won't use all their resources. When setting up the scene, visit the Render Tab in Render Properties and turn off Automatic Multithreading. Set the number of cores to whatever you think will be safe to allow continued use of the nodes for other purposes.