TimeWarp
TimeWarp (Camera Motion Options)
Timewarp manipulates time. Previously time has just been a steady clock ticking away at a certain number of frames per second. Now with Timewarp you can slow the clock down, speed it up, even wind it back, all during an animation.
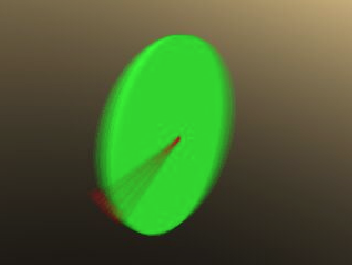
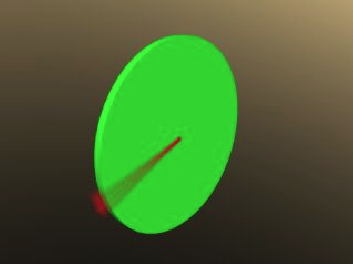
Timewarp can warp the time in a scene while keeping the camera unwarped. Effects like bullet-time can be created in this way. Timewarp can also manipulate motion blur in new ways for special effects. You can now fly through a motion blur.
Timewarp basics
The Timewarp plugin is implemented as a motion modifier plugin that needs to be attached to the camera. There is also a generic layout plugin that is used to preview timewarping in layout. It is highly recommended that fractional frames be enabled in layout when using Timewarp.
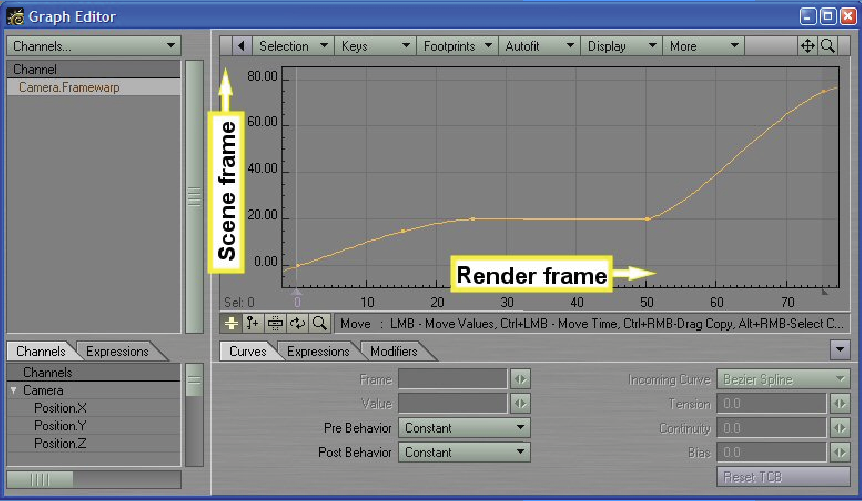
Render frame versus Scene frame
From within the Timewarp interface, a mapping from Render Frame to Scene Frame is set through the Frame warp expression or graph.
- Render Frame - The sequence number of a frame in a rendered animation.
- Scene Frame - The frame number given by the frame slider.
Understanding the distinction between render frame and scene frame is crucial for effectively using Timewarp. The scene frame number is what is shown by the frame slider in LightWave. The render frame number is given by the position within a rendered animation.
Normally the render frame number and scene frame number are always the same. The 14th frame in an animation matches the 14th frame in the LightWave scene. With Timewarp however, an arbitrary mapping from render frame number to scene frame number can be established. When rendering frames, Timewarp makes the scene frame number a function of the render frame number. By default the mapping is simply an identity function, where the render frame number is equal to the slider frame number.
As the scene frame number is now an arbitrary function of the render frame number, multiple render frame numbers may map to the same scene frame number. While the render frame number always increases, the scene frame number may increase, stay the same, decrease, or jump around.
Motion blur and camera warping
- Motion blur warping - Motion blur is done by LightWave by rendering the scene at slightly different times and then combining the results. The times are computed by adding small amounts to the current frame time, up to the value given by the blur length. Timewarp can warp the blur length as well. This can keep the motion blur as it looks like without Timewarp applied, or modify it to take into account the fact that the scene is Timewarped.
- Camera warping - When mapping render frame to scene frame, Timewarp can either keep the camera as it is in the scene frame, or set it to be the same as it is at the render frame time. In the former case, the effect is similar to changing the speed of a video playback. The latter case gives effects such as bullet-time and time freeze. It disconnects the camera’s timeline from the rest of the scene.
- Fixing the camera - When motion blur is enabled, the camera settings used for each pass are the settings at the motion blurred time. With Timewarp it is possible to optionally keep the camera at the unblurred time. The effect is that there is motion blur in the scene due to movement of objects, but no blur because of camera movement.
Plugin usage
The Timewarp plugin needs to be added to the camera as a motion modifier. There can be only one instance of the Timewarp plugin in a scene.
The first step in using Timewarp is to plan your scene carefully. Plan how objects in the scene should move as a function of scene frame time (i.e. without any timewarping). If you intend to warp the camera as well, set out the camera motion as a function of scene frame time, like the other objects in the scene.
The most difficult aspect of Timewarp is if the camera is not timewarped. The camera motion is then a function of render frame time, while the rest of the scene is in scene frame time. When working with the camera, the frame set with the layout frame slider should be considered to be the render frame. When working with any other items in the scene, the layout frame slider should be interpreted as indicating the scene frame number.
To help with working with Timewarp, there is a preview mode. This presents a preview slider, which acts like the layout frame slider. When the preview is enabled, the preview slider is used to set the render frame. In layout the scene frame for that render frame will be shown. In the preview mode, it is possible to set keyframes for the camera as a function of render frame number instead of scene frame number.
Timewarp interface
The timewarp interface is used to set the timewarp function and the various camera and motion blur warping options. The timewarp preview mode can also be launched from this interface.
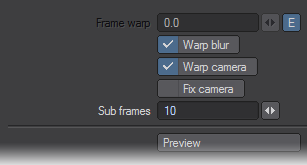
Frame warp
The frame warp defines the mapping from render frame to scene frame. This uses frame numbers, rather than time. The frame numbers do not need to be integers, but can be fractional.
Although you can just set a constant here, it is more typical to use the envelope to set a graph or expression. A constant would mean that the given scene frame will be used for all render frames. When set to a graph, the horizontal axis indicates the render frame number, while the vertical axis is the scene frame number.
Warp blur
Sets whether or not to warp the motion blur. This will only have effect if motion blur has been enabled for the scene.
Warp camera
Enables and disables applying the timewarping to the camera.
When adding a key manually using Create Key with Cam Rekey turned on, the frame number given will be ignored for the camera, and the current Render frame slider value in the Timewarp Preview used instead.
Fix camera
When set, fixes the camera in place when doing motion blur. This option is not available for some combinations of options.
| Warp blur | Warp camera | Fix camera available |
|---|---|---|
 | | Yes |
|  | Yes |
| | No (camera always fixed) |
| | Yes |
If the scene does not have motion blur enabled, this option will have no effect.
Sub frames
When doing a timewarp, the computed scene frame number is very likely to be a fractional frame number. However, LightWave can only render the scene at whole frame numbers. If the fractional scene frame number were to be rounded to the nearest integer, the resulting timewarp animation will appear to stutter, especially when time is slowed down. The Timewarp plugin can overcome this by manipulating the frames per second setting for the scene.
The Sub frames setting tells Timewarp the desired sub-frame resolution. The default of 10 means that the time of the rendered frame will be accurate to within 1/10th of a frame. A value of 30 would mean an accuracy of 1/30th of a frame.
What Sub frames does is multiply the frame per second setting with the given value. For example, say the FPS is 30, and the fractional scene frame number that needs to be rendered is 1.53. Without the use of the Sub frame setting, this would be rounded to scene frame 2, an error of almost half a frame or 0.5 / 30 = 1/60th of a second. With Sub frames set to 10, the FPS is modified to 30 * 10 = 300, the fractional frame number becomes 1.53 * 10 = 15.3, which is rounded for rendering to 15. That results in an error of only 0.3 frames or 0.3 / 300 = 1/1000th of a second.
Put in another way, without Sub frames, the scene frame number would have to change by 1/30th of a second before a different frame is rendered. If the timewarp slows down time by a factor of 5, this would mean you’ll only get 30 / 5 = 6 unique frames per second in the final animation. With Sub frames set to 10 you have up to 300 / 5 = 60 unique frames per second available.
This disadvantage of setting Sub frames very large is that the number of frames in the scene becomes very large, which may have implications with memory usage. Also keep in mind that Sub frames will multiply the scene frame number. This will affect the results of any setting which is dependent on scene frame number rather than scene frame time. For example, animated images which are animated as a function of frame number.
Preview
The Preview button activates the Timewarp Preview interface, which is explained in the next section. Note that the preview interface can also be opened by activating the TimewarpPreview generic plugin.

Timewarp Preview
The Timewarp Preview can be used to preview the effect of the timewarp in layout. It presents a simple slider and animation controls. The slider sets the render frame. When changed, the frame shown in layout is the scene frame that would be rendered for the given render frame number. When the Timewarp Preview is active, it is possible to set camera keyframes as a function of render frame number instead of scene frame number. This is very useful when the Warp camera option is switched off.
If the camera type is anything other than Classic or Perspective, anytime-varying camera type parameters may not be correct if the camera is left unwarped. It may end up using the warped time for those parameters.
Timewarp preview interface
The Timewarp Preview interface can be activated in two ways. The first is to use the Preview button on the Timewarp interface. The second is to start the TimewarpPreview generic plugin.
- 6.1.1. First frame, Last frame - The first and last render frame specify the range over which the preview is done. These are initially equal to the rendering options first and last frame.
- 6.1.2. Render frame - The slider is used to set the render frame. The view in the layout and the layout frame slider will be adjusted to show the matching scene frame.
- 6.1.3. Play > - Toggling the Play button on starts playing the timewarped animation. The animation is looped from First frame to Last frame. Toggle the Play button off to stop the animation.
During the playing of the animation, interactions with Layout other than with the Timewarp Preview panel is blocked. - 6.1.4. +<< >>+ - When Warp camera is off, the +<< and >>+ buttons change the render frame to the previous and next camera keyframes respectively in render frame time.
- 6.1.5. Cam Rekey - In the case where the camera is not warped (Warp camera is turned off), the camera properties change as a function of render frame number instead of scene frame number. The layout frame slider controls the scene frame number. Normally, when a keyframe is created for the camera it will be set at the current scene frame. With Cam Rekey turned on, keyframes for the camera will be created at the render frame number indicated by the Timewarp Preview slider.
In combination with the +<< and >>+ buttons this allows you to easily edit the camera in render frame time and the rest of the scene in scene frame time.
The Cam Rekey toggle is only available if the Warp camera option is off. Cam Rekey will only be applied when the toggle is turned on and (to avoid confusion) the Timewarp Preview interface is open.