Image Editor
LightWave’s Image Editor is far more than a simple location to load up images or sequences of images to apply to your models. Of course, you can use it for that, but you can also edit the attributes for those images directly in the Image Editor without altering the original file, and you can set image sequence start and end frames within it.

Opening Image Editor
Although you can hit F6 to call up the Image Editor any time you like, sometimes it’s nice to call it up with an image you are currently using, so that you can tweak for your particular needs. Any time that a window needs an image - particularly the Texture Editor - you will find an Edit Image button beneath the thumbnail of the image you’ve chosen.

Image Editor Sorting and Filtering

The Image Editor has the ability to filter images from a list. This operation is live in the sense that as you type the filtering is carried out immediately. You can also choose to sort your image list in a variety of ways to best suit your needs (Alphabetical, Date, Type, Size, Bit Depth, etc.).
You can Collapse and Expand the Image Editor so that it takes up less screen real estate when you don’t need it by clicking on the arrow that we’ve highlighted.
Using the Image Editor
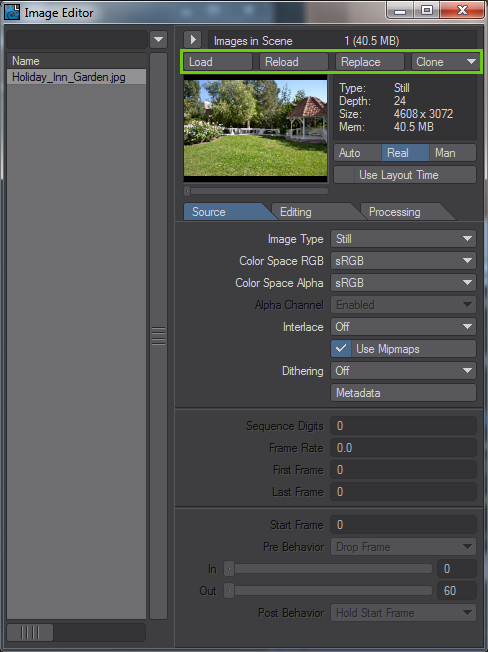
To load a new image or animation, or image sequence, press the Load button. To replace an image you’ve loaded, perhaps in error, press the Replace button. The Clone button is a drop down, because it has two different abilities. The first - Instance - copies the image, but allows you to work on with different settings in the Editing and Processing Tabs, almost as though it were a new image. Any changes you make to the Instance will not be reflected in the original image, however changes you make to the Original image will be reflected in all instances. If you are using an animation or an image sequence, any instances will have the same in and out points.The second - Duplicate - can only be used on image sequences and simply copies the images. Each is treated as a completely separate sequence and changes made to the original sequence will not affect a duplicated sequence.
To delete an image, image sequence or animation, simply select it in the list on the left-hand side of the window and hit the Del key on the keyboard. You can also do it by clicking the right mouse button over the image in the list that you wish to remove.

The image preview window acts as a reference for you to see the effects you are having on your pictures when using the editing or processing functions. All edits are carried out on this 24-bit preview so that they can be done as close to real-time as possible, rather than working on the full image, scaling it down to the preview size and redisplaying it. Double clicking on the preview image will open the Image Viewer containing the image or frame with all processing and editing done. A large image and a great number of operations to perform on it may cause a delay in opening the Image Viewer.
The three buttons under the Information Panel give you options on how frequently you wish the preview image to update when a change is made. Auto updates the image when any change is finished and the mouse button released. Real updates the preview image in real-time, while you are making changes and Man means that any image changes are only performed manually, by clicking the left mouse button on the preview image.
The Use Layout Time button and the slider underneath the preview image are intimately linked. If you are using an image sequence or an animation you can use this slider to scrub through it. Alternatively, click the Use Layout Time button and you can use Layout’s own timeline to scrub through your animation.
Source Tab
The Image Type pop-up menu displays the type for the currently selected image. Generally, this setting is auto-detected when you load the file. However, you can specify a single image in a sequence of images by leaving its Image Type to Still and when you load a frame in a sequence that you want to use, don’t forget to change the Image Type from Still to Sequence. Animation is used if you load an animation into the Image Editor and Reference is a clone of an image, as discussed above.


Image Type
The Image Type dropdown offers five choices:
- Still - The default option used for all still images
- Sequence - This option will be chosen automatically if you load a sequentially-numbered image from a folder with a sequence of such images. Layout will switch between images in a sequence based on the scene time
- Animation - If an animation filetype is used, this choice will be taken
- UDIM - A way of referring to images for UV mapping. See UDIM Workflow for more info
- Reference - An image that is cloned as an Instance will be assigned this choice
- Memory - An image that only exists in memory without a file (this entry is not always visible). Visor creates images like these and the LightWave command IE_CreateImage does the same.
To be able to load a single image and tell LightWave that it is a sequence, you need to have a series of numbered files with the same filename. For instance, this is a valid sequence:
Ayslinn0001.flx, Ayslinn0002.flx, Ayslinn0003.flx and so on.
A sequence can be missing some individual frames, like so:
Ayslinn0001.flx, Ayslinn0002.flx, Ayslinn0007.flx, Ayslinn0008.flx
This sequence has frames 0003-0006 missing. When this is the case, LightWave will use the last frame it can to fill the gap. In other words, the sequence will be like so:
Ayslinn0001.flx, Ayslinn0002.flx, Ayslinn0002.flx, Ayslinn0002.flx, Ayslinn0002.flx, Ayslinn0002.flx, Ayslinn0007.flx, Ayslinn0008.flx
Color Space
You can normally leave these at Default for the images to take on their assign color space settings, but if you wish to specify directly choices are available on a per-image basis including the ability to load a color space table.
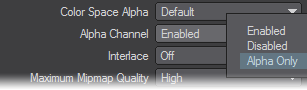
Alpha Channel
If you are using images with embedded Alpha Channels, like some TIFFs, TGAs and Photoshop format images, you may wish to disable the Alpha Channel, otherwise, you may get unwanted effects since LightWave’s OpenGL doesn’t take embedded Alpha Channels into account. If you only wish to use the Alpha element of a picture, for a Transparency Map for instance, use the Alpha Only setting.
Interlace
If you are using video grabs as still images, or a sequence, you may wish to use a field interlace. You have two choices, Even First or Odd First and which one you choose depends on your source material, but you will certainly know when you render if you’ve chosen the wrong one. If you are using images from almost any other source, you can leave Interlace to Off.

Mipmapping
Mipmapping is an automated way of create image maps at varying resolutions optimized to suit the size of an object in a rendered image. In LightWave you can globally enable or disable mipmapping in Render Properties. Turning it on means that textures, especially ones with a lot of detail, will be better resized to suit the render. Turning it off usually means sharper texture images, but with an increased risk of “sizzling” during animation unless additional samples are used in Camera Properties.
Dithering
Applies a dither to images. Normally this is not necessary.
Metadata
Opens a window giving the metadata for the image, animation or sequence. If available, this will include EXIF data.
Sequence Settings
When you load a sequence of images, LightWave automatically tries to ascertain the way the sequence is numbered by comparing files.
- Sequence Digits - You can override the number of digits used for a sequence if LightWave is getting confused.
- Frame Rate - Frame Rate controls the incrementing of an image sequence with respect to the scene’s Frame Per Second setting on Layout’s General Options Tab of the Preferences Panel. So, if you set this to, say, 15 and your scene Frame Per Second is 30, the image sequence will increment every two frames.
- First Frame and Last Frame - display which files (or frames for an animation file) are treated as an image sequence in LightWave. This is computed when you load an animation file or switch the Image Type pop-up menu to Sequence (after loading a single image from the sequence), but can be set manually. However, it’s best not to use these fields to trim your animation to fit your needs. Instead use the In and Out points discussed next.
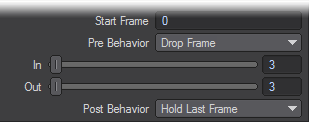
- Start Frame - determines on which frame in Layout your sequence will start. Use the In and Out sliders to determine how much of your animation you want to play back in Layout. The Pre Behavior and Post Behavior drop down menus determine what Layout should do when an animation is not as long as the frame count in your scene.
Editing Tab
You can independently adjust (and envelope) various image parameters for the selected image on the Editing Tab if you want the images altered before LightWave uses them.

These image operations do not affect the actual file on your hard drive, only the image used inside LightWave itself. If you wish to save your changes to an image, double click on the preview to open the Image Viewer and save the transformed image there in the format of your choice.
- Invert - Inverts colors in the image
- Default - Resets values to default
- HDR Filtering - Allows Gaussian or Bilinear filtering of HDR images
Processing Tab
Access this tab to add image-processing filters. You may use any of the non-post-processing filters in the filter list. Ones that can only be used in the rendering process will inform you of the fact. Image filters added here will not update the preview window interactively unless the Animate Filters option is activated.
