Standard
Standard

Standard is the basic material node applied to all surfaces before they are specialized. It takes its settings directly from the entries in the Surface Editor. Envelopes and textures applied in the Surface Editor are reflected in the node editor, but are not created as separate nodes.
Other materials have energy conservation, which means that they automatically balance their Diffuse, Specular and Transparency components. It is up to the user to do the same with Standard, as they wish. To balance, try to ensure that the three groups separated at the top of the panel - Diffuse, Specular and Transparency - don't add up to more than 100 % together (in fact a little less together. 100 % would equate to a perfect surface)
Color (Color)
Color is probably the most obvious surface parameter. It doesn’t take much experience to know that if we want something to look like a banana, we need to make it yellow, right? However, although Color might be the most obvious setting it is not the only one that is important to a satisfying finished surface. At the very least, make sure that your Specular and Bump channels have some values.
Luminosity (Scalar)
Luminosity refers to how much a surface appears to glow of its own light. However, unless you use Radiosity, Luminosity does not have any actual light emitting properties - you need to add an actual light for that. A value of 0% is most common for this setting, unless a special need arises such as the surface of a modeled light bulb.
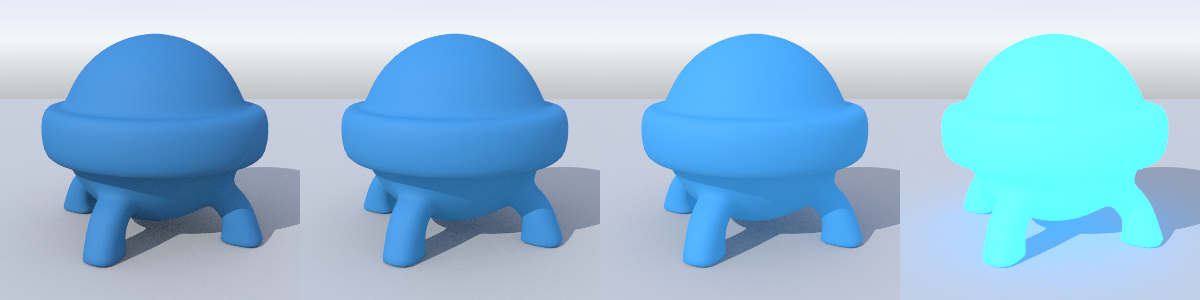
Luminosity from left to right: at 0%, 50%, 100%, 500%
Diffuse (Scalar)
Diffuse is the amount of light scattered by a surface. A high level scatters a lot of light, and therefore, the surface appears bright. A low level absorbs most of the light, and therefore, the surface appears dark and dull. Metal, reflective and dirt surfaces are good candidates for a low Diffuse level. Common values are 40% to 80%. Surfaces must have some diffusion for shadows cast on them to be visible.
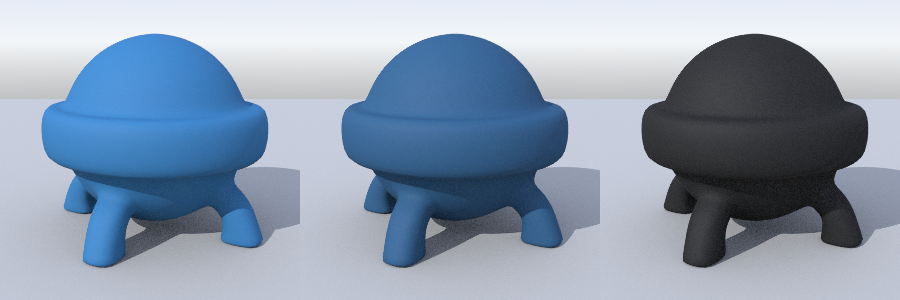
Diffuse from left to right: at the default 80%, 50%, 0%
Specularity and Glossiness have changed a lot. Where once they strictly meant the reflection of scene lights and how sharp they were and nothing else, specularity is now reflection of everything (if you have used the Dielectric or Conductor nodes you will be familiar with their settings) and Glossiness will be the inverse equivalent of Roughness. This means that old objects created in pre-2018 versions of LightWave that have a high specular component (to create lighting hotspots on the surface) will now be very reflective. Likewise, if they also have Reflection, they will need to be adjusted before they can be used. The math behind Lights is also more physically-based and realistic in 2018 and newer and thus much stronger, so this needs to be taken into account when importing old assets.
Specular (Scalar)
Specularity is reflection. Where in previous versions of LightWave you'd think nothing of having Specularity settings of 100 %, now you'd only want that if you want perfect reflections. To give an object a shine and slight reflectivity, stick to 0-20 % values. By default, Specularity is set to 5 % because everything has a little reflectivity.


Specularity from left to right: at default 5 %; Specularity at 50%, Diffuse at 50%; Specularity at 90 %, Diffuse at 0 %
Glossiness (Scalar)
When some level of Specularity exists, Glossiness determines how rough the surface is. A low Glossiness is equal to a high roughness and vice versa. Using the last image from the Specularity examples, you can see the difference:


Glossiness left: 40 %, right: 100 %
Reflection (Scalar)
The Reflection channel is now less needed since Specular will reflect the environment as well as lights. To replicate the Reflection Blurring from previous versions of LightWave, make sure Glossy Reflections is turned on in the Shading Model for your material and then manage your Glossiness setting. If you have Glossy Reflections turned off you should set your Reflection to the same level it was at in 2015.
Transparency (Scalar)
Transparency lets you make a surface see-through; it is the opposite of Opacity. Whenever light passes through a transparent object, the light will bend. An example of this can be seen when you look through a glass of water or down through a clear pool of water. The amount of this light bending is controlled by the Refraction Index.
Image by Christophe Desse
Refraction Index (Scalar)


Refractive Indices left to right: Vacuum (1.0), Water (1.33), Crown Glass (1.52), Diamond (2.42)
The index of refraction determines how much light is bent when entering the material. It is responsible for straws appearing bent when placed in a glass of water at the most quotidian level, and usually applies to liquids. There are transparent solids, like ice, glass and diamond that have increasingly higher refraction indices.
There are features such as Total Internal Reflection and Dispersion, but you would be advised to use a material like Dielectric to better duplicate these since that is its dedicated use.
Refraction Blur (Scalar)


Refraction Blur Off, 10 %, 50 %
Refraction blur will cast more rays in different directions at the point a ray enters a surface. This breaks up the refraction effect to create additional detail in forms seen through the refraction. Low numbers can be used for this just to add a degree of interest to the interior of the glass. Note how the surface light hotspots in the example images are not blurred, but interior refractions are.
Translucency (Scalar)
Translucency allows back lighting. The effect can be seen when someone stands behind a curtain and you see their silhouette through the material. Other examples include seeing bones in your hand with a flashlight in your palm, or bugs crawling on the underside of leaves.
![]()
The plane has no Transparency, but Translucency is at 100 % and there is a strong light behind the rock
Translucency is similar to Transparency in that all lighting properties, like color and luminosity, will show through. The obvious difference is that translucency doesn’t add a see-through effect. If you want to make a silhouette visible, something must cast a shadow on the back side. Note that you do not need rear-facing polygons for the back side, nor must you use a double-sided surface to catch the shadow.
Color Highlight (Scalar)


Color Highlight left: 0 %, right 100 %
Causes a surface’s own color to show through a specular highlight. Normally, a specular highlight shows in the color of the light striking the object. For example, a white light illuminating a red ball leaves a white specular highlight on the surface of the ball. But with Color Highlights, the highlight appears red. A color highlight blends the object’s surface color with the color of the light source, which causes a more metallic appearance.
Color Filter (Scalar)
Available when a surface has some degree of transparency. It allows the surface color of an object to tint all of the objects seen through it. A good example is a green wine bottle. Light shining through the bottle tints all objects seen behind it with green.
Diffuse Sharpness (Scalar)
Causes a more severe shadow cutoff zone on objects rather than the gradual falloff of light. It enhances the appearance of contrast between the lit and unlit sides of the object. Diffuse Sharpness is usually used for very large-scale objects, like planets.
Bump
The T button is is to attach a Texture map and a Bump Map. You can use the input instead for a more nodal setup.
Bump Height (Scalar)
How far the bump extends. Bumps can go inwards as well as outwards but remember a bump map is a shading trick, it won't change the silhouette of the object. For that a Normal map is needed.
Normal (Vector)
Only available in the Node Editor and as an input. It allows the deformation of the surface's normals.