NRC Tutorial
Introduction
There are two parts to using NRC as a simple render controller for network rendering of LightWave scenes. First we will cover the use with homogeneous networks - that's to say networks of machines all running the same platform - then a smaller section on how to create renderfarms with a mix of Windows and OSX machines.
Getting Started
Network rendering has to be really locked down. If you are accustomed to having scenes with content brought in from all over the place - your desktop, a friend's USB key, your computer's Images folder - stop it. Right now. For successful network rendering (indeed, it's best for all rendering, particularly if you are not the only one working on a scene), you need to adhere to LightWave's holy trinity of Scenes, Objects and Images directories. Not only that, but you want to bake anything that is based on random factors that might be different on the different machines in your farm.
Install
NRC will work with your standard LightWave install, but wants to have its configs separate (so that plugins will work over the network). Create a folder called NRC in a network-accessible area of your machine. To make things simple create two subfolders - config and content. Copy the entire support folder from your normal installation of LightWave into the NRC directory.
config
Copy your LightWave configuration files into this config subdirectory. On Windows machines, by default the LightWave config files are located in C:\Users\<username>\.NewTek\LightWave\2020.x - copy the contents of this folder into the configs directory you have made. For OSX machines, the process is identical, but the folder is here: User/<username>/Library/Application Support/NewTek/LightWave/2020.x. By default, access to this folder is restricted, but you can either use Go > Go to folder... or go to your Documents folder where there is a Symbolic Link to the correct folder.
Copy all the files in this folder to the config folder you have made
content
This is where you should store scenes that are going to be rendered. All scenes that will be rendered over the network need to be:
- Contained within a LightWave content directory.
- Should have a rendered image save path explicitly defined (It is best to define a save path inside the content directory).
- Should have all random elements baked. This includes simulations, radiosity and images.
support
The third thing to organize for a render farm is your plugins folder. LightWave relies on its range of built-in plugins to do many things, from animation to saving images. These days, it is not just plugins either, but also supplementary parts of LightWave that live in the support directory above plugins. It is vital that all of these are available for the network render to work. This is perhaps the hardest thing to manage, but it shouldn't be. If you haven't already done so, copy your LightWave's support directory to our network-accessible location. You should now have three folders in our NRC directory - config, content and support.
NRC Setup
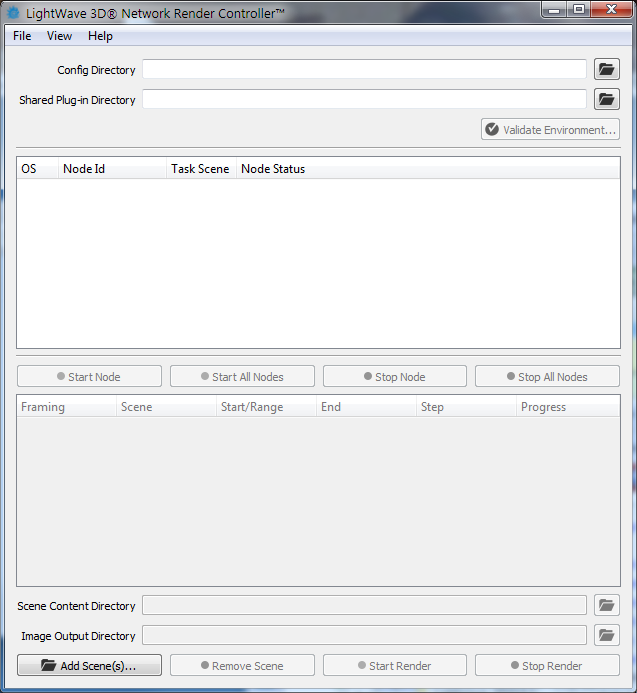
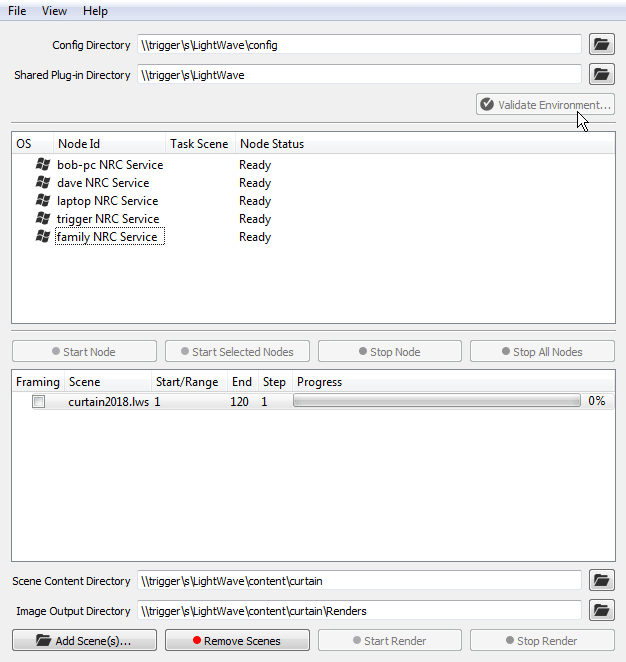
The NRC Controller can be launched from the LightWave directory and will look like the above to start. Start filling it in by finding your config directory through the network. Next add the directory that contains your copied support folder (if you've been copying this tutorial, that would be your LightWave directory).
If you haven't started a render node yet, do so now on the same machine you are running the controller on. Lastly, we need a scene. Hopefully you have one ready to test. If not, start simple - choose a scene that takes seconds to render a frame, not minutes.
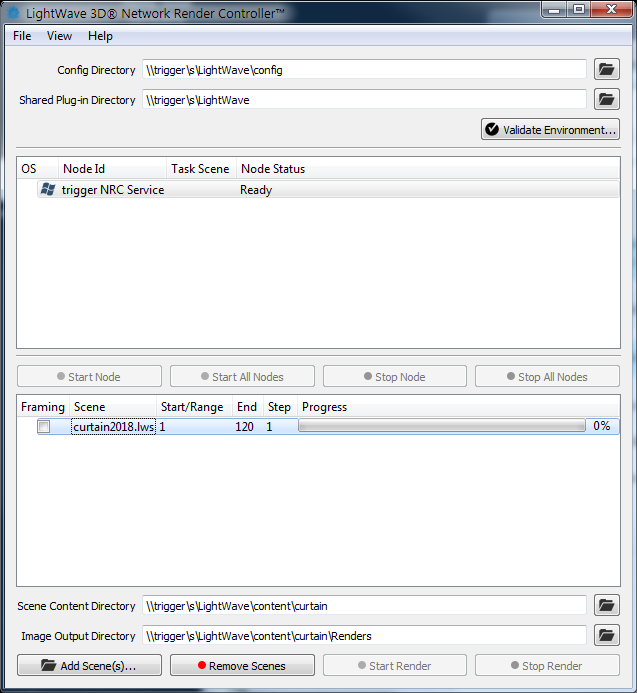
If your Controller window looks like this, and you have selected the node; the scene and have an Image Output Directory set, you will see that the Validate Environment button gets highlighted. You can check that all is well with your setup by clicking this button, which will open a window showing either red or green dots by the entries. You are aiming for this:
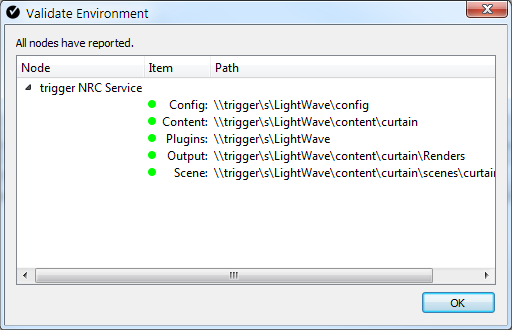
If you have it, you should be good to go. Drag the scene from the bottom window onto the nodes to assign them the task. Do a test for a couple of frames, looking in the folder you set for renders to see the images arrive. Once you have a couple, stop the render and it's time to bring some other machines to bear.
For this example, I dragged six machines to bear on this curtain2018 scene. It's very satisfying to see all the machines start to work rendering frames.
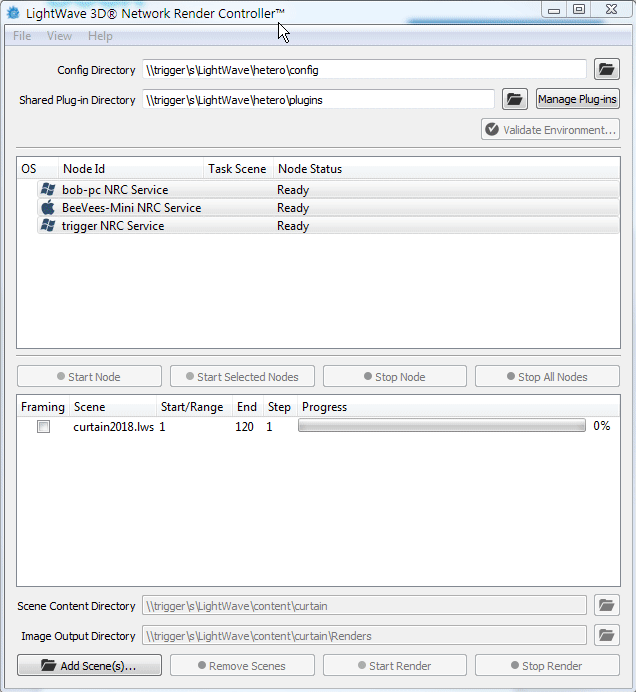
Heterogeneous setups
When dealing with a mix of OSX and Windows machines, there is one wrinkle. Plugins and configs need to work for both platforms, but there can only be one controller. When you are setting up a dual platform render farm (whatever platform your controller is on), the support directory we talked about making earlier needs to be contained within folders for OSX and Windows. Make a folder called Plugins that contains an osx directory and a windows directory. In these copy the support directories for each platform. The config folder can have the Windows and OSX config files (the extension cache, Layout and Masters configs for both platforms are essential) in the same directory since there is no conflict with the names.
Troubleshooting the Setup
If you are having problems getting NRC to work, there are several easy points to bear in mind.
- Are the paths in your scene network paths? Check that output paths are network accessible and that everything in the scene has been loaded from within a content directory.
- Does the simplest scene work? Try creating a scene that consists of a null and saves its render output to the .FLX format in the content directory. FLX is LightWave's native image format and requires no plugin. If it works, check 1.
- Are you having trouble validating (in a heterogeneous render farm)? Make sure your LightWave version is the same for both platforms.
- Plugins come up as red when you validate? Go into Manage Plugins and use the Replace dropdown button to edit your path until you can follow it to find the scene plugins. Manipulating the Path Prefix field at the top of the window with Replace all Paths until the path is correct, then hitting the Apply button will create a modified extensions configuration file that will work across the network.