IK Booster Manual
^
Introduction
This free reference guide was created by Ryan Roye. It contains information on what IKBooster's tools do and basic instructions on how to use them.
IKBooster Command List
Here is a complete list of IKBooster's menu commands. Click one or do a search to jump to its description (rmb = right mouse button).
|
|
|
|
|---|---|---|---|
|
IKB Menu → |
Hotkey List
Some hotkeys are exclusive to IKBooster mode and as of this writing most cannot be changed. Also, some hotkeys replace Lightwave's default functionality (IE: global channel toggling).
CTRL-B:Activate IKBoosterCTRL (while moving things):Disables "fixed" items while ctrl key heldCTRL (while selecting things):IKBooster multiselect. This works for fixing items, baking, and some dynamics functions. This does NOT work on anything else as of this writing.Shift+LMBSelect the topmost IKBooster parent object (if not locked)Alt+LMB-drag on DopeTrackPlaces a BakeSpot range | Shift-DDeletes keyframes without a dialogue, and relative to the keyframe mode setting. Note that motion modifiers, even if disabled, will prevent this command from operating on items that contain them. F1-F3:IKBooster Global Axis toggling. This replaces Lightwave's UI channel button functionality as well as the hotkeys associated with them. The channel buttons like shown below, when clicked in IKBooster mode, will get greyed out to indicate that all manipulations done in the 3d viewport will exclude those channels. XYZ in this case stands for XYZ and HPB.
|

Adding IKBooster to Your Object
To apply IKBooster to an object...
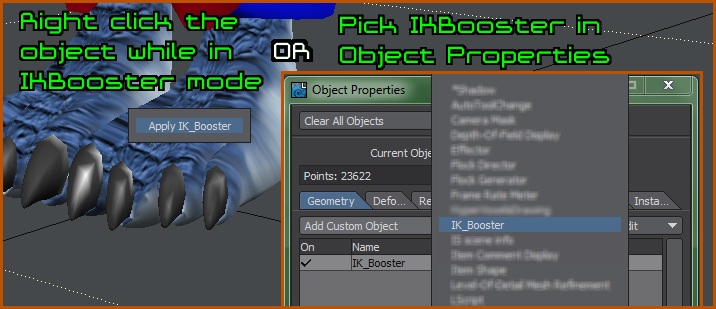
- After applying IKBooster, its functions will be accessible to the object and all of its child items. Only one instance of IKBooster is needed to control a hierarchy with it.
- NEVER add multiple instances of IKBooster to a hierarchy. It will break things. This includes making an IKBooster object the child of another object with IKBooster applied. Remove IKBooster from the object before re-parenting it.
Adding IKBooster to Lights and Cameras
- Make the light or camera a child object of a null that has IKBooster applied.
Interface Overview and General Tips
IKBooster's interface and controls are specifically designed to make animation efficient by reducing the number of clicks, dialogues, and anything else that would add time to the process of animating. This also makes IKBooster somewhat difficult to learn through usage alone.
UI Overview
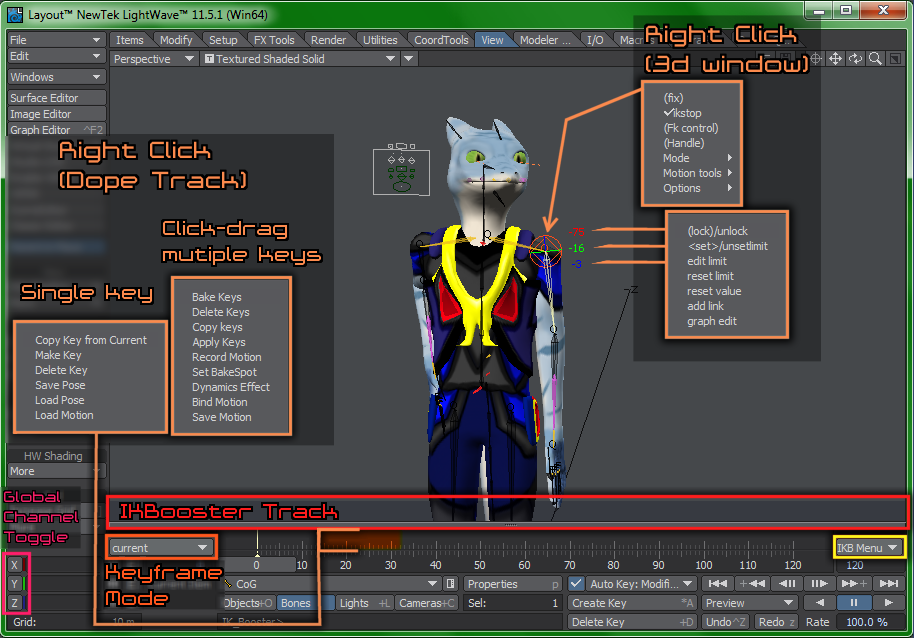
Moving Things Around
- IKBooster's primary benefit is that it lets you click-drag any item in the 3d window to move things and it greatly simplifies the process of rigging and animation. This movement is almost always relative to the user's 3d window view regardless of move/rotate mode. This eliminates the problem of changing control schemes as the user moves the viewport around, or when manipulating an object that is a child of a parent object that has been moved, rotated or scaled.
General Notes and Tips:
- IMPORTANT: Make absolutely certain you uncheck "FSPE" (Full Scene Parameter Evaluation) when using IKBooster with things like full character rigs, as it will severely hinder performance while manipulating things. FSPE can be found in the Preferences window (general tab).
- IMPORTANT: For character rigs, avoid scaling the character object signifcantly up or down in layout or else it can adversely affect click-dragging controls on that character. If you need big differences in scale (IE: say you want a character who is half or less of the height of a template rig you're using), re-size the model in modeler and utilize skelegons to adjust the whole rig armature if scaling in layout yields problems.
- Some commands such as Set Goal, Add Link, and Motion Copy, derive their targets from whatever was previously selected.
- If the dope track is open, enabling channel mode can significantly boost Layout playback when displaying many keyframes. Especially helpful for motion capture editing.
- Load from scene works best when the background and other misc elements are loaded to the IKBooster character, not the other way around. Once the background is loaded into a scene that already has an IKBooster rig present, all other load from scene operations should work seamlessly.
- It is recommended that character animation be performed when the frames per second is set to 20 or lower especially when using IKBooster. This reduces computational burden and increases productivity. When done, crank up the FPS and add additional motion detail as needed.
- IKBooster tracks the keyframe selections in the dope track and can use them to perform operations on them. Sometimes these "selected" keyframes become invisible, so a rule of thumb is to left-click an empty space on the dope track before doing a right click operation to avoid unexpected UI behavior.
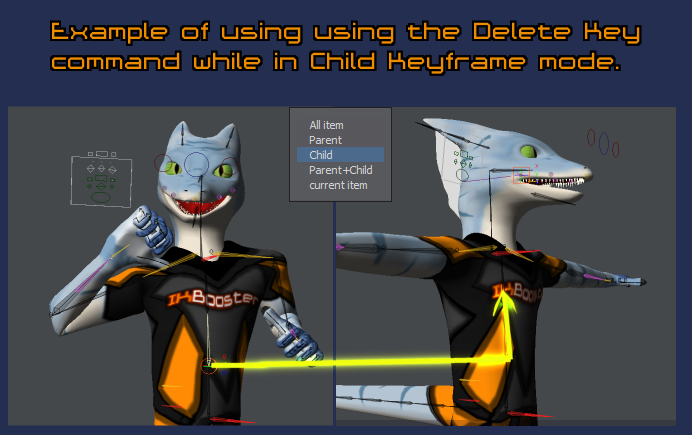
Keyframe Mode Setting
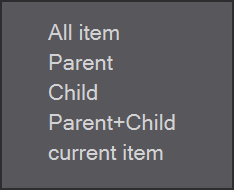
The Keyframe Mode Setting is the SINGLE MOST IMPORTANT thing to understand when using IKBooster. Many commands operate relative to what is set in this little dropdown menu. The options listed refer to which way IKBooster will crawl up or down the bone chain when performing various actions such as Copy Key from Current or Delete Keys. Notice in the above image how the delete command got applied to ALL child items relative to the selected one.
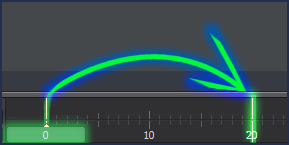
The BoosterTrack
This inconspicuous grey bar, the BoosterTrack allows you to click-drag on it to shift keyframes around relative to the keyframe mode setting. Clicking anywhere (without dragging) leaves a marker like shown in the image which allows the user to isolate their shifting to either the LEFT or RIGHT of the marker's displayed keyframe. It is uber useful for re-positioning animations so that they occur exactly when you want them to (IE: You could create an animation of landing gears deploying, then just use the boostertrack to shift the keyframes where they need to go). Known Issues/Limitations:
|
|

IKB Menu
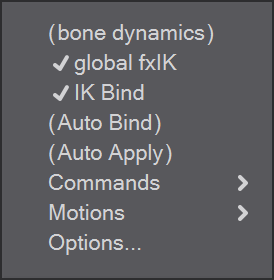
NOTE: The first five options shown in the IKB Menu are PER OBJECT toggle settings that apply to the currently selected hierarchy.
Bone Dynamics
This enables or disables bone dynamics for the currently selected object hierarchy.
Global fxIK
Enables or disables all fixed items across the entire character. In almost all cases, use the CTRL-LMB functionality instead of this toggle option.
IK Bind
Do not confuse this with the "Bind" function, as this does something different. IK Bind prevents fixed points from moving beyond where they were fixed when the user manipulates a bone chain. Consider this an occasional use option; it is recommended that it be left DISABLED for most situations as IKBind can make controls feel "stiff".
Auto Bind
Whenever the 3D window is clicked, or manipulations are done in the viewport, having this option will automatically re-bind and re-position things that are controlled via BakeSpots. IMPORTANT: If autobind does not update in real time, press D for display options and make sure "Dynamic Update" is set to "Interactive", not off or delayed.
Auto Apply
This performs the Apply Keys command (using "Soft Apply") on the selected item across the current timeline range whenever the 3d window is clicked. The keyframe range that this affects can be changed by adjusting the timeline range, or by selecting keys in the dope track.
Commands →
Reset Rotation
Resets the rotation relative to the keyframe mode setting. Useful for easily getting a character back to a default T-Pose.
re-BakeSpot-all
Bakes the keyframes of all bakespots across all items in the currently selected hierarchy. Because bakespot baking does not factor in the orientation of the bone at the start of a bakespot after the first-placed one, using this option is not recommended in cases where a chain of fixed points need to be baked.
re-BindMotion-all
Performs the Bind operation all Bakespots present in the character's entire hierarchy.
Get/Set/Clear RIG as Comments
These commands are highly unstable and will often crash Lightwave especially in versions after 9.6. Just avoid using them. For those curious, these commands were supposed to be a way to copy and paste IKBooster settings of an entire IKB hierarchy.
Motions →
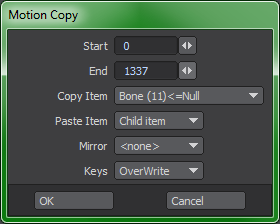
Motion Copy
This functionality is similar to graph editor's "Leave Footprint", only it works across the entire character and is much easier to take advantage of. It copies all of the motion data contained within the IKBooster object across the entire timeline. In this case, the keyframe mode setting is ignored.
Motion Rollback
Similar to the graph editor's "Backtrack Footprint", only it applies to the entire character. It replaces all of the animation contained within the object and all of its children back to that which is stored when the motion copy was performed. Performing this command multiple times allows you to toggle back and fourth between the stored and replaced motions. If you wish to discard the old motion, simply run motion copy a second time.
Motion Save/Load
Click here to scroll down for details; this command is the same as those identically named in other menus.
Options...
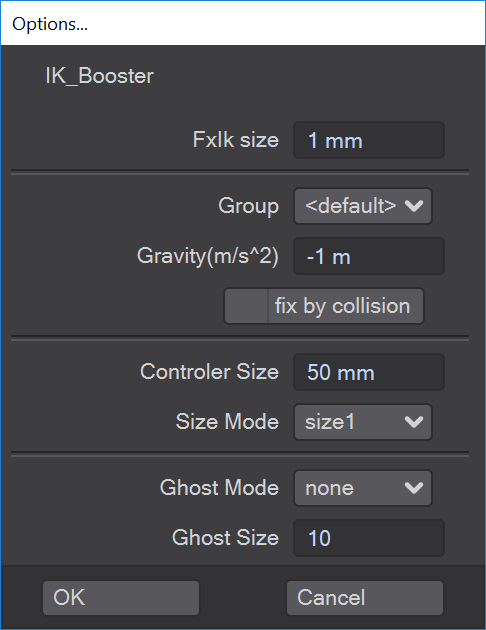
FxIk size
Determines how far the bone chain needs to move until Lightwave calculates IKBooster's part-time IK relative to fixed items. Setting this to a higher value will improve performance. You should increase the value as high as you can tolerate to optimize performance while editing. It is very important to understand that this setting also affects baking operations.
Group
This is a global dynamics setting that applies to all IKBooster objects in the entire scene. Group (also found in other Lightwave dynamics tools) is used to differentiate between objects to isolate dynamics calculations between specific objects.
Gravity
This number is factored in when doing IKBooster bone dynamics calculations. Note that you can also use a "gravity" dynamics object instead of this for greater flexibility, or to isolate the effect.
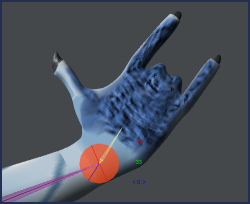
Controller Size
Adjusts the size of IKBooster's display that shows you the clickable areas of your rig. It is recommended that this be set to zero as the density of the display can often hinder visibility.
Size Mode
Identical to Controller Edit's size mode. Changes the size of the display that shows the currently selected item.
Ghost Mode/Size
Provides an "onion-skinning" display guide which can be shown on either the currently selected, or all bone in the hierarchy. Ghost size referrs to the number of frames it will look ahead of and behind the playhead's current position. Ghost mode does not operate well when motion modifiers or IK is applied.
Menu: Right Clicked Item 
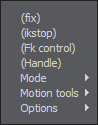
Fix (rotation modes only)
The fix command will hold the rotation-mode item in place as the character is moved. If a consecutive chain of fixed items are present, manipulating the top-most point will also hold the item's orientation. It is important to note that FxIK size in the IKB menu options will affect how fixing works. This video demonstrates usage of this feature. NOTES: IKBooster is a PART-TIME animation system, therefore fixing items will not prevent things from wiggling around *INBETWEEN* keyframes. The bake command will plant fixed items solidly in place. As noted above, holding the CTRL key while moving things will temporarily disable the fix property on the whole character. |
|
IKStop
When IKStop is applied, this prevents the user's direct movements and manipulations done to any child bones below it from influencing anything past it. Most often, IKStop is used on the upper legs, upper arms, knuckles, and other "top-point" areas to isolate areas of control. NOTES: When moving things around, items above the IKStop point will still receive keyframes if you are in All, Parent, or Child+Parent keyframe modes. |
|
FK Control
| This rotation option can greatly simplify the process of rotating a single item in ways that would be challenging to do with standard Lightwave handles, as it operates relative to the viewport orientation. FK Control and Quaternion mode have high synergy. Example uses for FK control include orienting gimbal bones on motion capture rigs (motion capture rigs often have "diagonal" rest rotations), animating simple boneless objects, getting specific rotations from gimbal-locked bones, and so on. |
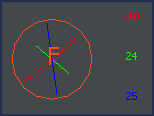
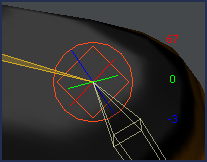
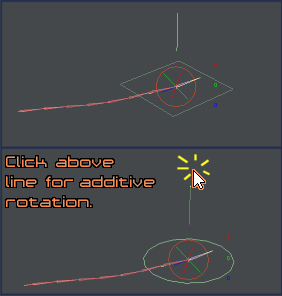
Handle
Assigning Handle to an item makes it operate on only 2 channels when click-dragged, with the 3rd channel being controlled by the "line". The line may be right-clicked to define the handle channel. Click-dragging above the line causes the handle symbol to change from a square to a circle, and allows for additive rotations across all bones in the chain (Handle is affected by IKStop, fixed points, etc). Known Issues: Handle additive rotations will not operate in a usable fashion on bone chains that have had rest rotation applied to them. |
|
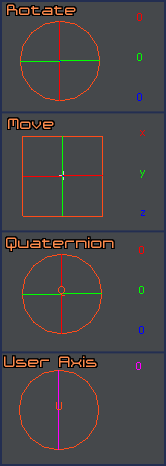
Mode →
| The modes listed here operate RELATIVE to the user's viewport... | |
RotateThe default mode that IKBooster child items will be set to; allows click-drag rotations of any number of items and applies IKBooster's part-time IK functionality while doing so. If no IKstop is applied, this mode can also be used to MOVE an object in addition to its child items. MoveMoves items. This is advantageous over Lightwave's normal move mode in that the object hierarchy, viewport orientation, and other things that would normally affect controls adversely are not an issue with IKB move mode. Up is always up, down is always down... it just works! Move mode is often used on IK goals to greatly increase productivity and ease the animation process. QuaternionIdentical to rotate with the addition of "quaternion" functionality. To put it simply, it rotates things linearly and is best used on items where rotational problems like gimbal lock are expected. In IKBooster character rigging, this is most often used on the arms and legs to give stability and flexibility to controls. NOTE ON LAYOUT SCALING: When using Quaternion bones in character rigs, know that if the rig is scaled significantly more or less than the model's original size in Layout that it will adversely affect quaternion controls. If you need drastic changes in a character template's size, scale them in modeler and adjust the rig rather than scaling them in Layout. User AxisSimilar to FK control, only this lets you take a "snapshot" of your viewport orientation and restrict the rotation to that angle. Right click an object that has this mode applied, and "Set User Axis" will appear in the Options category of the object-RMB menu. The "Get View Axis" button within the user axis dialogue, when clicked, is what takes the snapshot and changes the control accordingly. NOTE: This is essentially a motion modifier that uses the HEADING channel to operate, and will require baking to change or do anything else to the object. |
|
Motion Tools →
IMPORTANT NOTE ABOUT MIRRORING:Mirroring functions for Pose/Motion copying work relative to the topmost item in the IKB hierarchy, not relative to the chain of items. IE: Torso twisting that is isolated to the character's bones will affect the results you get. Pose Copy from ...Operates on ROTATIONS only. This takes the previously selected item and copies a single keyframe to the other side of the object. Motion Copy from ...Identical to Pose copy, only this does multiple keyframes. NOTE: "Lock&Limit" seen in the "Keys" dropdown menu of the pose/motion copy dialogues will factor in limited and channel-limited items when performing the copy. Do not confuse the meaning of the word "lock"; it refers to CHANNELS in this case, not whether the item itself is locked. This is useful if your character uses deformer bones and you don't want operations being applied to them. Both "Overwrite" and "Lock&Limit" will overwrite keyframes. Pose Save, Pose Load, Motion Save, Motion LoadClick here to scroll down for details; this command is the same as those identically named in other menus. |
 |
Options →
Set Goal ... (only appears on fixed rotation items)When a goal is set, whenever any part of an IKBooster bone hierarchy is moved, any "goal-enabled" items will "snap" into position of their goal target, except for when the goal itself is moved. Think of this as an easily appliable and removable "pose-to-pose" style of IK designed to help the animator make characters or things interact witheachother. "Reset Goal" takes the place of "set goal", which removes the goal property. Set IKTarget ...This lets you control the rotation a single item by click-dragging on another. This does not constrain either object in any way,and can be used to cluster frequent-use controls together for easier access. This option only affects rotation-mode items, and Quaternion is recommended for use with IKTarget. IKTarget cannot be assigned across two IKBooster hierarchiesSetting Copy from...Copies the movement mode, limits, controller position, etc from the previously selected item to the currently selected. Dynamics EditAllows for quick editing of the dynamics properties for IKBooster objects and their child items. All editing happens relative to the keyframe mode, right click for the menu after enabling Dynamics Edit. Note that IKBooster's dynamics use the exact same properties and settings found in Lightwave's other dynamics systems (IE: Clothfx). Controller EditThis editing mode allows you to re-position where items need to be clicked in order to manipulate them (it does NOT change their functionality). Click-dragging anything while in this mode will move the controllers accordingly. Use this when item overlapping is an issue, or when things are too tightly clustered to easily pick out one or the other. Float Mode "sticks" the controller to a static position in the viewport, which can be useful for things like torso controls that would otherwise be hidden when doing upper body shots, or when you don't want to concern yourself with click accuracy or rotations. Size Mode refers to a global setting that affects IKBooster's display (it is not item-specific, and is identical to the size mode option found in the IKB Menu). |
Menu: Right Clicked Channel 
(lock)/unlockLocks or unlocks the channel. Locked items are denoted by parentheses. Set/unset limitEnables/disables limits for the item. While rotation limiting is the same as going into motion options, this is not true for MOVE mode items as IKBooster handles XYZ limiting separarately from the rest of Lightwave. Unconfirmed whether this is a bug or a functionality limitation. Edit limitAllows you to specify the minimum/maximum values for the item. Most often, limiting done through IKBooster is reserved for when boosterlink is involved. | Reset limitSets the limit's minimum and maximum to the item's current position or orientation. Reset valueZeroes out the channel. Add LinkAdds a "link" to the previously selected item. See "Boosterlink" below for more details. Graph EditOpens up graph editor and automatically highlights the channel. |
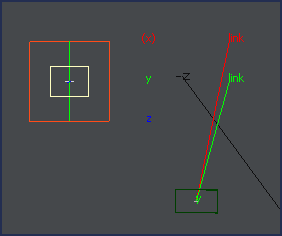
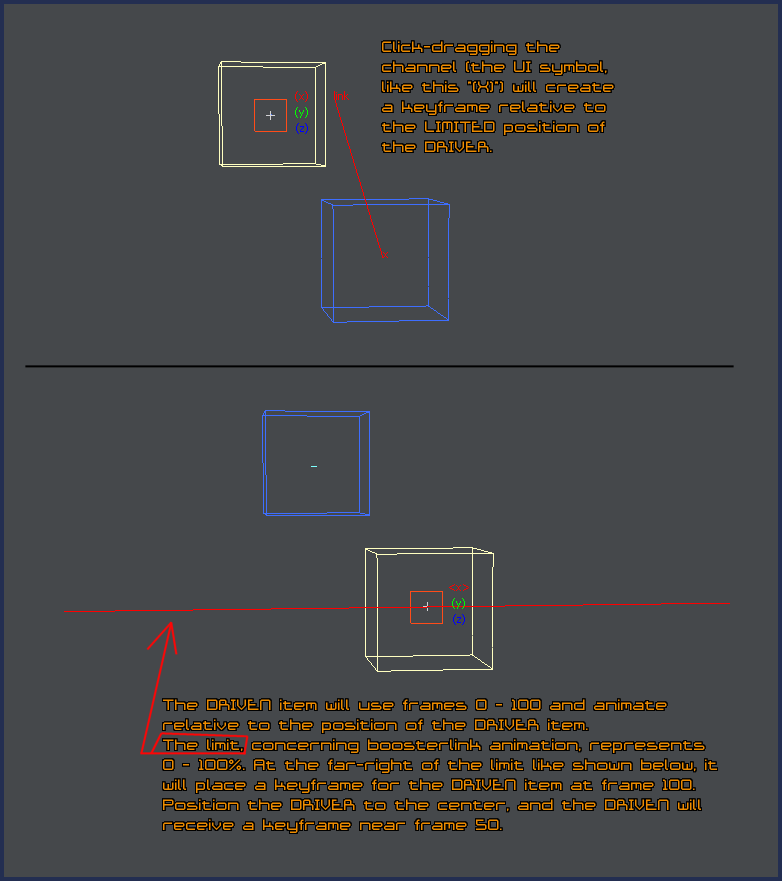
Boosterlink
Think of boosterlink as being similar to follower and cyclist, with its core advantage being that assigning channels is a much faster process as it doesn't involve dropdown menus or even a window dialogue. Boosterlink can be described as having two functionalities. Follower-ModeSelect the DRIVING item, then select the DRIVEN, right click a channel (like displayed in the image to the right) and this will cause the driven object to "follow" the driver. There are no settings for boosterlink items applied in this fashion. Animation CyclingBoosterlink also contains functionalities very similar to the "Cyclist" motion modifier, allowing you to define a controller for an object's keyframed animation. See the image below for details. The advantage of this method is that boosterlink items can be animated without moving around the timeline in addition to easier setup. The disadvantage is that keyframes 0 - 100 get tied up and therefore makes boosterlink controls less re-usable. Use the animation cycling feature for when you do not intend to remove a boosterlink constraint. "Link" Right Click MenuRight clicking the word "link" will display some options related to boosterlink: Removeremoves the link Change ShiftOffsets the animation by a specified number of frames in comparison to the driving item. Change ChAllows you to change the driving channel. You will need to switch between rotate/move mode temporarily to assign a boosterlink between move and rotate channels. Copy/PasteYou can copy the boosterlink settings of one link to another which can save the need for extra clicks. Edit GraphOpens graph editor and highlights the linked channel. |
|
Menu: Timeline (single key) 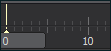
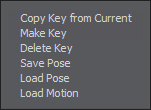
NOTE: Almost all timeline-based menus are performed based on the keyframe mode setting! Copy Key From Current
Insanely useful. Copies ALL of the keyframes (XYZ/HPB/Scale) located at the playhead and pastes them where you right-clicked relative to your keyframe mode setting.Make KeySame as Copy Key From Current except that it only copies the channels in which the items are set to (IE: Move mode items will only get XYZ, and rotate will only get HPB). Use this instead of copy key when preparing motions to be saved.Delete KeyDeletes relative to the keyframe mode setting. The hotkey for this is Shift-D (replaces LW's normal delete dialogue).Save/Load Pose/Motion (appears in various menus)When saving poses or motions, know that IKBooster will save *all* keyframes (XYZ/HPB/Scale) present relative to the keyframe mode setting. In almost all cases, the topmost object in the hierarchy should be selected when saving. Also, the same object or item that was selected while saving, must be the same object selected when loading. If saving animations associated with a specific limb of a character, it is recommended to have good file naming conventions. With non-destructive rig editing practices, IKBooster motions (which are .TXT files), may be used on any character that shares a rig template. Also, IKBind ranges will get saved into the motion file and will automatically "apply" the bind when loaded. Known issues with motion saving: Motion save will insert blank keyframe space for any frames past frame zero, making it problematic to save any motion that does not start at frame 0. If the motion is intended to be re-used, always use the boostertrack to move the motion so that it starts at 0. Also, when specifying the desired keyframe range, there is an error that causes the resulting saved motion to be short by 1 keyframe. IE: If you save frames 0-20, it will only actually save frames 0-19... unless this is fixed in a later version of Lightwave, always add 1 keyframe to the range you want to save. If using a bind-null setup for relative motion loading, note that the order in which the bind null hierarchy appears in the CLASSIC SCENE EDITOR must be consistent across all characters the saved motion is compatible with. Move it up or down in the list should its order somehow change (usually when deleting/adding new meshes/nulls to the character). For more info on relative motion loading, see the Comprehensive Guide to IKBooster at the bottom of this page. If you need to add OBJECTS to your character's hierarchy, add a bone first and make the object a child of that bone. This is neccecary because of the way IKBooster stores and reads motion files. If you want your motions to always work on all characters, adhere to this rule. TIP: Want to use a pose on multiple different characters that use a same rig template? Use save motion instead of save pose (saving only 1 keyframe). Save pose does not work across multiple characters because there is no way to make it not save certain keyframes; save motion does not have this limitation. |
Menu: Timeline (multiple keys) 
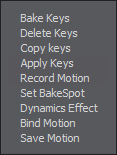
Bake KeysMeant to be used in conjunction with the "Fix" property. This will hold fixed items in place by baking their keyframes (preventing interpolation wiggling). Remember this works with IKBooster multi-select. See the fix video for details on how Bake and Fix are used together. IMPORTANT: The "FxIk size" in IKB Options affects baking! A higher value will result in wobbling but will bake instantly, a low value, such as 1mm, will have no wobbling, but can be slow when performing the operation on many keyframes. Delete KeysClears multiple keys relative to the keyframe mode setting. Quite useful. Know that motion modifiers or constraints will prevent this command from operating on items that contain them. Copy KeysCopies keys relative to the keyframe mode setting. Pre and Post Mix frames found within the dialogue of this command allows you to fade the animation in or out for a specified number of keyframes. Apply KeysThis takes the user's last action and gradually applies them over a specified range of keyframes. This is most often used for adjusting/altering heavily keyframed animations or simply to make editing motions easier and more efficient. See also "Auto Apply". NOTE:
Record MotionThis takes a specified range of keyframes and, when the selected object is moved via a click-drag operation, keyframes will fill and advance in the timeline relative to the Record Interval setting. Recording stops when the user lets go of the button or reaches the end of the keyframe range. Record Interval within the dialogue of this command determines how far you need to move an object in order for a keyframe to be generated. This command is best reserved for 2-dimensional operations due to its limitations. Set BakeSpot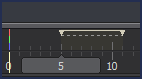 BakeSpots are used in conjunction with the Bind and Bake commands and specify a keyframe range in which they should take effect when used, or when AutoBind is enabled. Right clicking below a bakespot will bring up additional options. As a general note, in most cases it is recommended that baking be performed with IKBooster multi-select instead of bakespots. It should be noted that the keyframe range of BakeSpots will not be adjusted with changes to frames per second (including bakespot ranges contained within saved motions), so it is best practice to save motions at a frames per second value you intend to use most often. Bakespots can be utilized with varying FPS values, but it requires switching to the same FPS that the bakespot was saved in, performing the bind operation, then switching back to the new FPS. Dynamics EffectThink of this option as a quick and dirty way to quickly get a "wobble" movement out of things like antennae or other semi-rigid chains of bones, or to add detail to currently existing animation (it factors in current keyframes when performing the calculation). Usually when performing this action you will have the lowest end of the bone chain selected... it can take some experimentation to get a good feel for what settings are required for the results needed. For added stability, set all bones that are to be used with this command to Quaternion. This will also factor in any dynamics edit mode changes that have been performed. IKB Multi-select will work on multiple items granted that all of selected items reside in the same IKBooster hierarchy. While this doesn't factor in gravity, collision objects will affect the IKBooster-selected items during the dynamics effect calculation (only the selection, not the whole bone chain). Bind MotionThis is IKBooster's most powerful feature; most commonly used with BakeSpots but this command allows binding without placing one. It transfers the absolute position of the selected item to the topmost object in the hierarchy which is useful for getting complex "relative" movements. It is difficult to describe all the scenarios where this can be used... it can make your characters climb stairs, roll boxes around with 100% accuracy, automatically factor in distance relative to a character's leg length, allow you to abandon entirely the need for retargeting and other nifty things. Save MotionSame as that which is found in other right click menus. |