Depth of Field (DOF)
LightWave allows you to have a whole series of objects in a scene at differing distances from the camera and to render them all in perfect focus! The human visual system can’t even do that, and that’s the problem. For your images to look as realistic as possible, they need to use a feature of reality called Depth of Field. Fortunately, you can emulate this functionality inside LightWave.
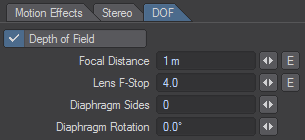
Settings are found on the DOF tab at the bottom of Camera Properties and become active once the Depth of Field button is checked.

Depth of Field refers to the area of acceptable sharpness in front of and behind the actual area in focus. When you enable Depth of Field you need to change two settings. The first setting, Focal Distance, refers to the distance from the camera to the object that you would like to be in focus.The second option is Lens F-Stop. Camera focus typically encompasses a range, from near to far, that we call “in focus”. Objects nearer than this, or farther than this, appear out of focus. The Lens F-Stop value determines the range of focus around the Focal Distance (the near and far distances from the camera in which objects still appear in focus).
If you are familiar with real world cameras, you know that the f-stop sets the diameter of the lens aperture. An f-stop of f/4 (which corresponds to a LightWave Lens F-Stop of 4) indicates an aperture diameter that is a quarter of the lens focal length (LightWave’s Lens Focal Length). Higher f-stop numbers refer to a smaller aperture, because the number is the denominator of a fraction. The aperture (f-stop) control on a real camera affects both the brightness and sharpness of an image. In the LightWave world, the Lens F-Stop works in the context of Depth of Field where it affects only sharpness.
The larger the Lens F-Stop value, the larger the depth of field, that is, the greater the distance between the near and far distances where objects appear in focus. Conversely, the smaller the Lens F-Stop, the smaller the range of focused area.In general, remember that the Depth of Field becomes progressively greater as the Lens F-Stop setting increases, the Focal Distance value increases and/or the Zoom Factor (and therefore the Lens Focal Length) setting becomes smaller.
When starting to experiment with Depth of Field, try using a short Focal Distance setting (shorter than the distance to the object you wish to be in focus) so that the depth of field is more pronounced. You can also look at the scene in an orthogonal viewport and be able to see a ring around the camera indicating the focal distance of your lens - the distance at which things are in perfect focus. Don’t worry that the display will get confused if you are also showing fog circles in the viewport; the lines indicating the fog are visibly different to that of the focal distance.
The settings on this tab are as follows:
- Focal Distance - This value is the distance at which the rays your camera “sees” are brought into focus. Without Depth of Field being engaged, everything in a scene is in focus all the time.
- Lens F-Stop - This is the aperture setting that determines the strength of the Depth of Field effect. To create something exaggerated, use an F-Stop of less than 1.
- Diaphragm Sides - The lens aperture is polygonal and this is here you can side how many sides the aperture has. A setting of less than 3 results in round lens reflections.
- Diaphragm Rotation - How far off vertical the aperture is rotated.
The two diaphragm settings are for creating a so-called Bokeh Effect, where lens reflections appear in the final image.

A simple explosion of cubes with extreme depth of field. Diaphragm Sides has been set to 3 and Rotation to 23° to better show the Bokeh effect.
You can get an accurate measure of the distance between the camera and your selected object using the Ruler or Range Finder custom objects.
You can also set a null to be parented to the camera and linked to the focal distance envelope of the camera so that you can control the focal distance by moving the null. This way you can get an interactive distance tool to control the focal range. Here’s how you do it:
- Add a null to your scene and parent it to your camera in the Motion Options window ( M ). In Layout, turn off the X and Y axes so that the null can only be moved along its Z-axis. Name this null “CameraFD”;
- Go to the Object Properties window ( P ) and assign the Range Finder custom object to the null. You can turn on the link to camera if you wish;
Go to the Camera Properties window. Make sure that the Focal Distance is set to 0 m;Hit the Envelope button next to this field so that you can link the distance between the null and the camera to the focal distance used.
Click on the Modifiers Tab in this window and use the Channel Follower Modifier. Double click on this in the list under the Add Modifier drop down menu to set up the Channel Follower Modifier;From the list of channels, choose the CameraFD.Position.Z channel, make sure that the time lag is set to 0, scale to 100% and start frame and end frame to 0 and –1 respectively.
You can now key the position of the null and the camera’s focal range will be set to the distance between the null and the camera meaning that you can pinpoint a single object in a busy scene to be focused upon. The smaller the value for the Lens F-Stop, the smaller the range of focus.
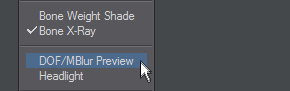
Depth of Field/Motion Blur Viewport Mode
You can preview motion blur or depth of field in OpenGL using the preview option located in the third Viewport dropdown menu.
The number of preview passes is controlled in the Preferences Panel. You must use the Camera View to use the Motion Blur preview.
Number of motion blur passes - 3, 9 (the default) and 18.
The Display tab of the Preferences window is open and highlighted is the quantity of DOF/MBlur passes. You can have up to 35 presented in OpenGL.