Stereoscopic Rendering

Stereoscopic rendering gives you the familiar two-image set seen from slightly different perspectives that can be combined in a variety of ways to produce a 3D image. Further explanation of stereoscopy is outside the remit of this manual, but there are plenty of resources on the web for people interested in this field. When rendering using the Stereoscopic Rendering function you will get two images for each frame of your animation suffixed with either an L or R for Left and Right eye images respectively.
When Stereoscopic camera always renders the Left Camera first then the Right Camera. So when using F9 it will render the left camera image, then it will then render the right camera image. When you have a RGB file format and path chosen it will save the sequence of Left and Right images into that folder.
Also, when you check on Apply Anaglyph Filter it will render the Left Camera Image and then composite that with the Right Camera image to create an Anaglyph Red / Blue image saved as the Right Camera Image. If rendering with the Anaglyph filter for best results you should use an image format without an alpha because the resulting final Anaglyph image is composed of both right and left camera so the alpha would cause the image to not display properly. If you need an alpha then you should render just straight Right and Left stereoscopic images (uncheck the Apply Anaglyph Filter) so that two separate images (Right and Left) will be generated with their proper alpha channels for compositing.
Use Apply Anaglyph Filter if you wish to make a 3D image viewed through red/blue glasses.
- Eye Separation - This field is set by default to 70 mm, the average distance between the centers of the pupils in a human adult. You can change this value to exaggerate the 3D effect.
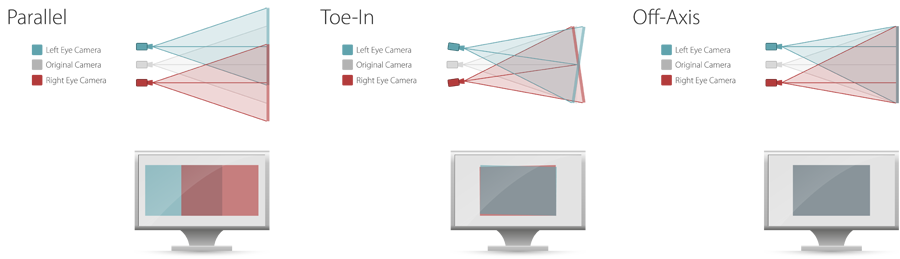
- Use Convergence Point - The Convergence Point is the point a specified distance away from the center of the camera that each eye focuses on. If it is checked off, the eyes will point directly forward.
The original method of camera convergence is what is called Toe-in , which causes each camera eye to be rotated towards the convergence point. A setting of 0.0% for the Convergence Toe-in setting is equal to 100% for Off-Axis .
LightWave supports all three of the major stereoscopic camera rig types used in live action and animation rendering and when Use Convergence Point is on, you can drag the Convergence point to where you want it in the viewport, or change the numeric values.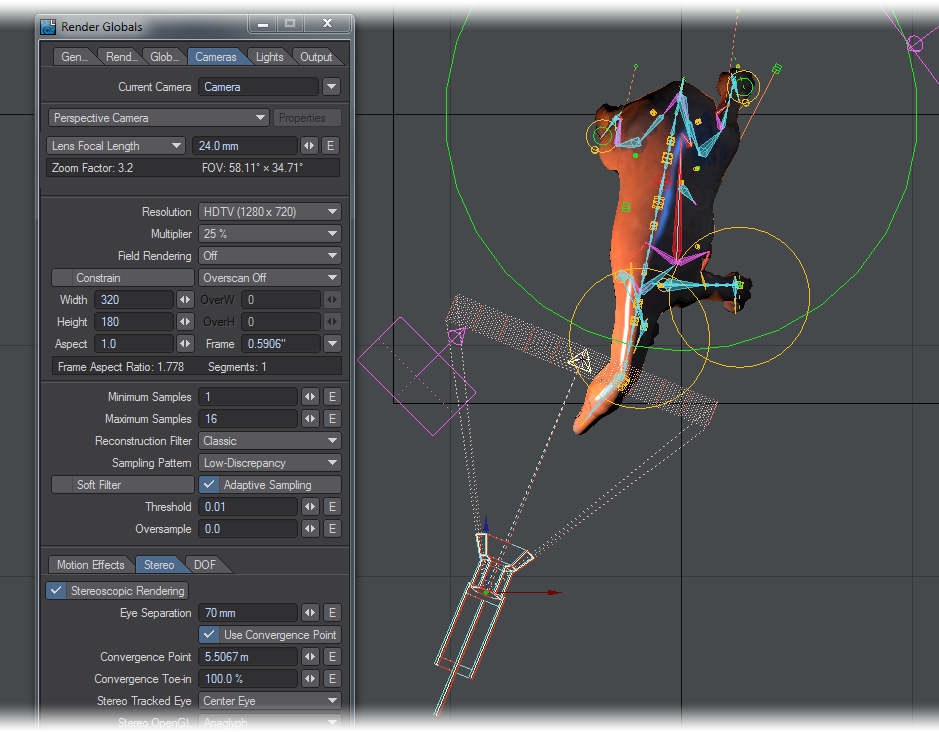
- Stereo Tracked Eye - You can choose to center the tracking for the camera’s motions or bias it to the left or right eye.
- When Use Convergence Point is enabled, the distance to the convergence point is always taken to be from the center eye.
- Stereo OpenGL - Has three different modes. Off switches off the OpenGL display of stereoscopy for a less visually cluttered workflow, Anaglyph displays the OpenGL so that the 3D can be seen using anaglyph (red/Blue) glasses, and 3D Glasses that requires a 3D monitor, 3D-capable graphics card and accompanying 3D glasses.