Modeler Edit Menu
Basic Point, Edge, and Polygon Maintenance
Cut, Copy, Paste, Paste in Place, Delete
The basic steps to copy and paste points, edges, and polygons are essentially the same. First, you select the points, edges, or polygons. Then you either click the Copy button (Ctrl C) to copy the selection into the memory buffer, retaining the original, or click the Cut (Ctrl X) button to delete the selection. You can also use the Del key to run the Delete command; it is similar to Cut, but does not copy the data to memory for future pasting.
Once something is in the memory buffer, you can click the Paste in Place tool (Edit > Paste in Place) (Ctrl V) to paste the contents back into the layer. The memory buffer is not reset after pasting. Thus, you can paste the contents multiple times. The buffer contents change only when they are replaced by a subsequent cut or copy. For interactive pasting, use the Paste tool (Edit >Paste).
Undoing Operations
LightWave Modeler offers an undo function that lets you take back the last change you made while working on an object. The Undo button (Ctrl Z) is located in the Edit drop down menu. The number of undos is determined by the Undo Levels setting found in the General Options Panel. The maximum value is 128, but you can also be limited by your computer system RAM. However, minimally-configured systems should be able to go back several steps if necessary. Even power-users should find 10 undo levels sufficient.
Redo
It’s possible to go too far unintentionally and undo too many steps. To correct this error, click the Redo (Z) button located in the Edit drop down menu. As long as you have made no editing changes, you can redo all the way back to your last Modeling operation.The combination of Undo and Redo is a powerful tool, allowing you to step backward and forward through the evolution of a model. This is especially useful when you use some of the more advanced Modeling tools, and you may need to make a series of subtle changes to a model as you design it by undoing and redoing as needed until you achieve the desired shape.
Configure Keys
Configure Menus
Syncmesh Tools
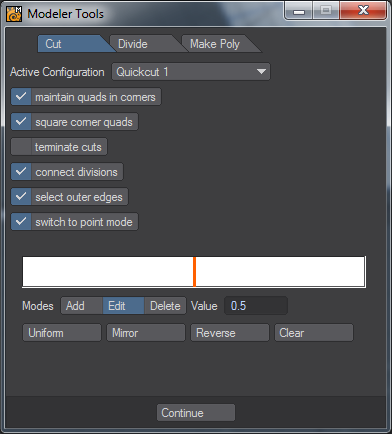
Edit Modeler Tools
This Options Panel gives you the ability to set new default settings on Cut, Divide, and Make Poly. Also, this is where you will need to set the settings for the three Quick Cut tools. By default the Quick Cut tools all have the same setting and you will need to define them in this panel.
Custom Preferences
You can use Edit > Import Preferences File and Edit > Export Preferences File to load and save, respectively, Preference settings. Use this feature to access special-purpose Preference settings you might set up. You can also use Edit > Revert to Startup Preferences to go back to the settings that existed when you first started Modeler.
General Options - See General Options Section below.Display Options - See Display Options Section, starting on the next page.Backdrop Options - Part of the Display Options.Recent Content Directories - The Content Directory is a central file path for loading objects, images, and scenes. Note that this setting is shared by all LightWave applications. This drop down menu will store recently used Content Directories to help gain access to past projects.
Modeler General Options
Modeler Display Options
Font Specification
You can specify the font to use for Modeler and Layout by launching with a commandline option. This was already available in LightWave v9 but only for Layout. Buttons will remain the same size for LightWave interfaces so this option should be used judiciously.
The possibilities are as follows:
-f <fontname>@<pointsize>
--font-app=<fontname>@<pointsize>
--font-edit =<fontname>@<pointsize>
Don’t forget to enclose font names with spaces in them in quotes as follows:

This will give this look to Modeler:
Note that the Color channel text is missing and Luminosity , Diffuse and others are truncated.
If you want to create shortcut icons to launch Layout/Modeler follow the same methods as for redirecting configs and plugins.