Example - Kooky Cube Eyeballs
Introduction
I'm going to use LightWave 2020's new addition to Instancing, the ability to offset normals. This functionality can bring all sorts of things to the fore but we'll use it this time just to create a pair of strange eyeballs.
Setup
We'll start by adding the TestObjects file in the content/instancing section, or you can model a cube and a ball for yourself. With the Ball object, go into the Instancing tab and add an Instance Generator. The generator should be set to Surface and Coordinates should be Local. Add 500 instances to see how it will work. Set the Scale to Uniform and the amount to something that is big enough to see each box, but small enough that you can have a large number. On the Rotation tab, set the Alignment to Normals and the Rotation Axis to Local.
Nodes
Now, we need to visit the last tab, Nodes. Check Use Nodes and we can dive into the Node Editor. Let's add some nodes, then sort them out. Add the following:
- Item Info
- Vector > Subtract
- Normalize
- Incidence
- Functions > Boxstep
- Wrap
- Gradient
- Scalar > Multiply
- Set that Item Info node you added to be for the camera by double-clicking on it. You should take the World Position from it into A on the Subtract node. Take the Base Position output on the Input node into B on the Subtract node. This is creating a vector of the intersection of the camera and the instances. Next, we want to turn that information from being a set of coordinates that could be anywhere to bring them within a 0-1 range. Pipe the result from Subtract into the Normalize node.
- Now, we will take those normalized coordinates into the Incidence node using the Normal input, as you might expect. From the Input node, take the new Base Y Axis output into the Vector input on the Incidence node. That gives us the incidence of the camera's view of our instancer. There are a couple of additional settings inside the Incidence node we need to take care of with a double-click on the node. The first is the Invert Alpha toggle. You should be able to see by toggling this switch that it will either show instances towards the camera or in the same direction as the camera. The second is the area covered where you have the choice of 90 or 180 °. Since we're going for a pupil look, let's choose 90 °. It still seems too big but we'll take care of that next.
- Next, we want to have our instances disappear when they are not within our camera's field of view. We'll do this with a BoxStep function. Double-click the BoxStep node, and set Clamp High to 0.5. Also, set Begin to 0.47, and End to 0.52 - this will create a blend between the instance being there or not. We said in the previous step that even 90 ° is too big so let's make our pupil smaller, then we'll hook everything up.
- Take the Gradient node. We only need to set an Alpha for this so at the 0 % Marker, set the Alpha to 0 %. Add a new key at about 0.9. Set the Smoothing for both keys to Step so you should have checkerboards for most of the gradient and a block of black at the bottom. If we take the result from our Incidence node (set at 90 °) into the Input on the Gradient that will cut our pupil down to size. Take the Alpha out of the Gradient into the Input on the Wrap node we added, and the BoxStep Result output into the Function Input on the Wrap node. Now, take the Result from the Wrap node into A on the Multiply node, and the output into the Scale of the Instance Generator destination node. At this point, your instances should be quite big on the sphere so double-click on the Multiply node and set the B input to something like 0.3 or so.
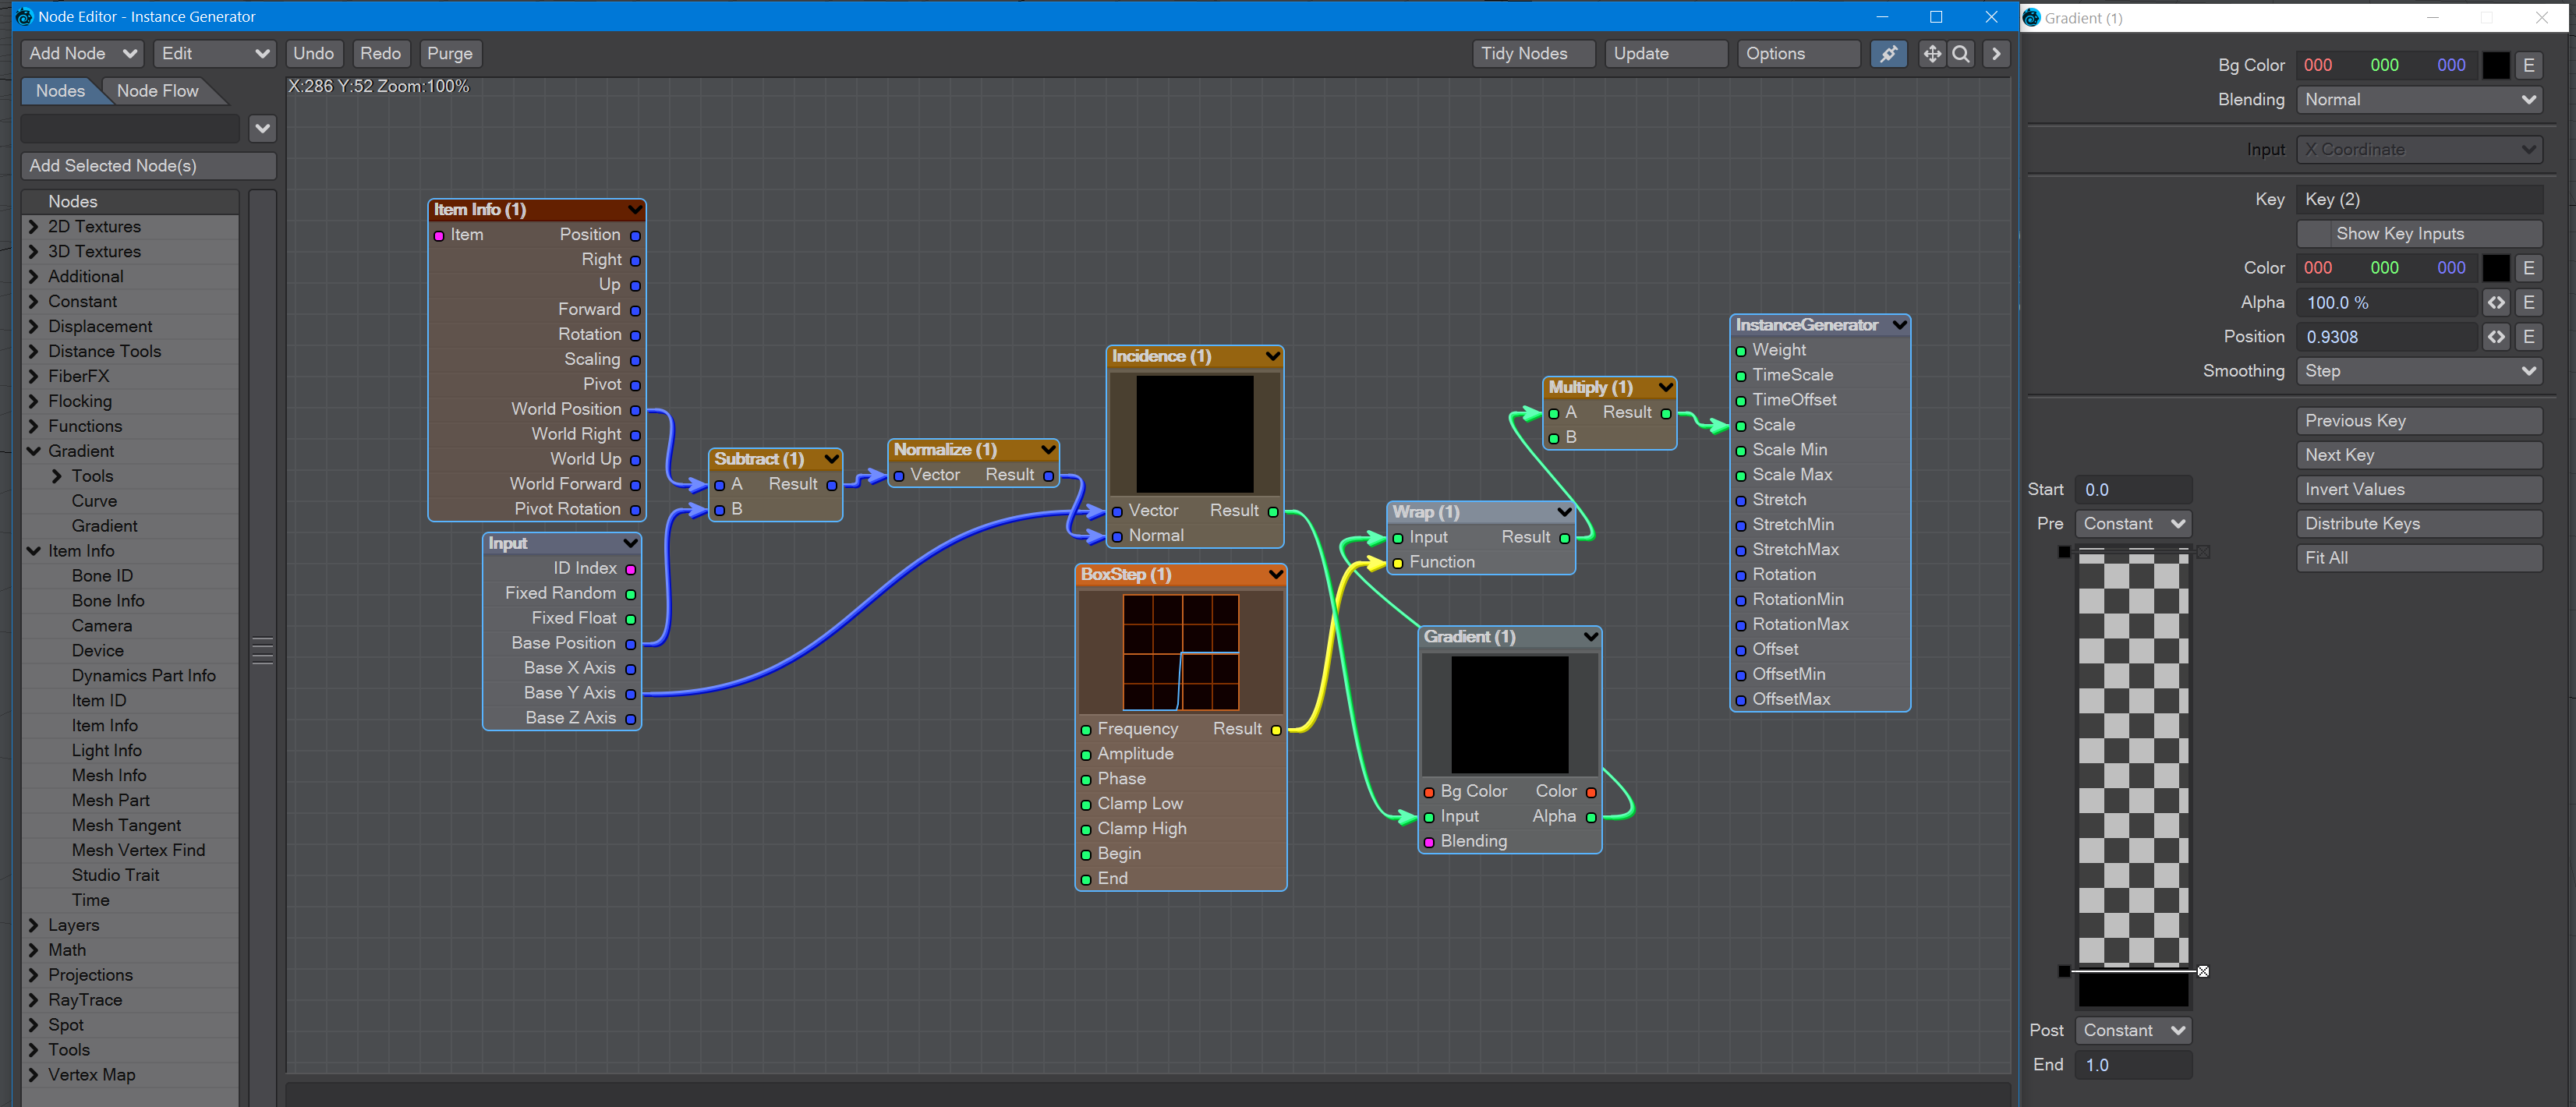
An overview of the node network for this example, and a view of the gradient
Final Touches
We have our eyeball and when we rotate our camera about the ball the pupil moves. To make that movement easier, let's add a null to the scene, parent the camera to it (make sure Parent in Place is on), and then all we need to rotate is the null to move our camera around the "eyeball". You can then select the Ball object and use Items > Clone > Clone, or Ctrl-C, to have a second eye that still has its instanced pupil following the camera's position, just move it to the side to have the pair of eyes following the camera.