Using the Timeline
Introduction
LightWave's timeline shows keyframes for the currently-selected item or items. You cannot edit keys on the timeline itself, they are purely informational. They show that the selected item has keyframes at a particular time in the scene. The key might not be in the tool you are currently using (Move, Rotate, Scale), but there is a key. To edit those keys there are several options.
Viewport
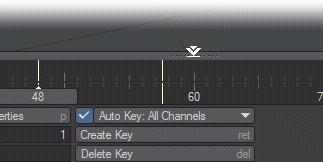
Make sure you are on the keyframe you wish to modify, and move, rotate or scale your item. The keyframe will record the changes you make as long as Auto Key is enabled (as shown in the image above). If Auto Key is not on, you must remember to update the keyframe manually with the Enter key before you change to a different keyframe, or your changes will be lost.
DopeTrack
You can open the DopeTrack section of the timeline by clicking on its top edge, like so:
The DopeTrack is fully explained here.
Graph Editor

Open the Graph Editor from the menu or with the keyboard shortcut Alt F2. You have a timeline view of the keys you have set and can move them, change their pre- and post-behaviors and change their incoming curves.
Scene Editor
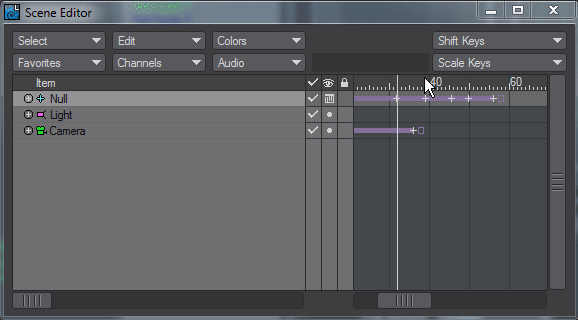
In the standard Scene Editor you can shift or scale all the keyframes for a specific scene item.
Scene / Dope Editor
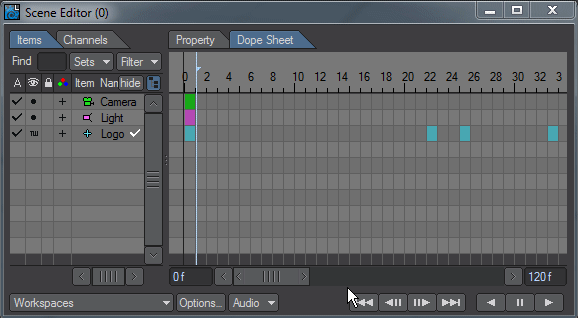
The Scene/Dope Editor allows more control of keyframes. You can modify only selected keys and can copy keys as shown at the end of the animation holding down the Alt key. An Undo is available by right-clicking in this scene editor.